Sunday, September 22, 2013

Quilt Cave 2.0...fruits of re-organization


I have mostly finished reorganizing the Quilt Cave and culling my stash of books, patterns, fabric, and crafty stuff getting ready for a big quilters/crafters garage sale with two of my friends.    I will share pictures of my "makeover."  Most of you have seen pictures of my troll hole...it is in an L-shaped, unfinished Michigan basement that I share with my husband and teenage daughter.

It is not an elegant space...don't we all drool over magazine pictures of glamorous creative spaces?  Then I wake up, and work with the cave and fixtures that I have, most of them second-hand or found at garage sales or driving around on garbage day.    :o)


I kept my primary work space and sewing machine station in the same place.  I have the metal support pole and plumbing spout to work around...it is literally in the middle of the floor.  By putting the work space where it is, I can put the TV on a lazy Susan so that wherever we are in the basement, we can see the screen.  A folded up quilt for the kitty is a must...sometimes it keeps him off what I am working on...


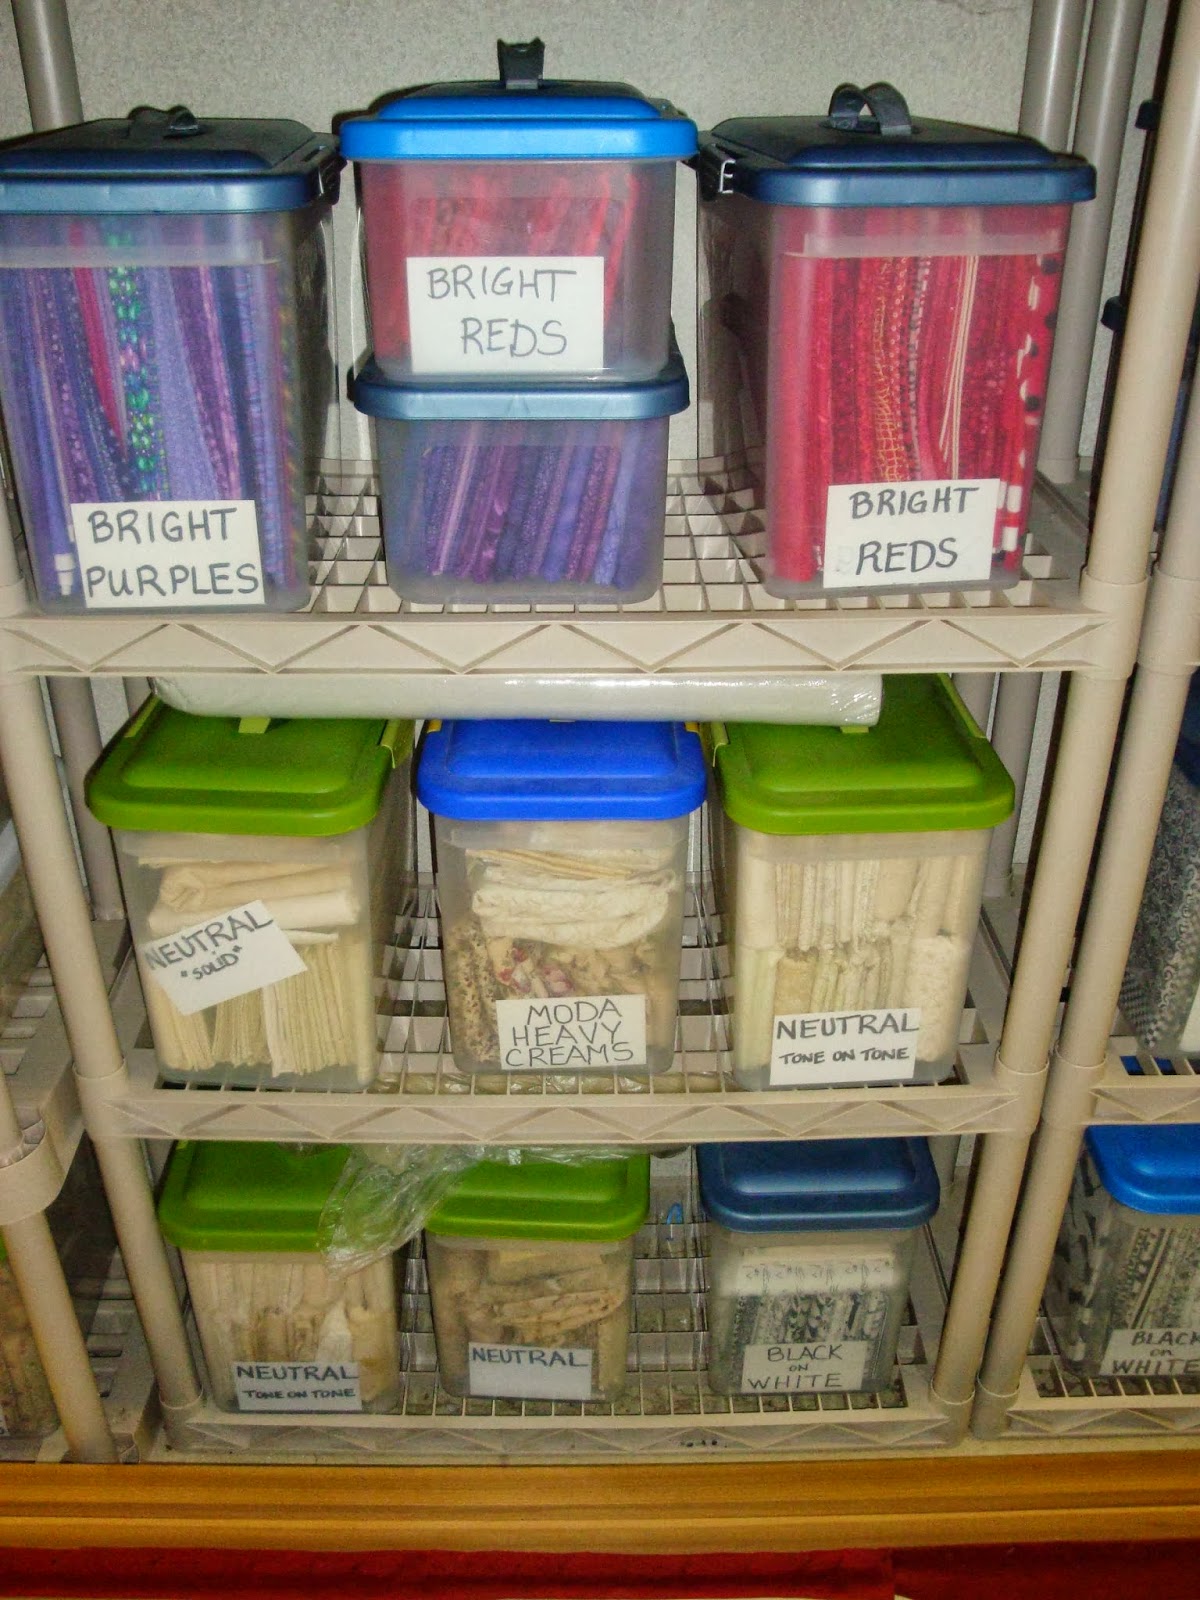
The long, back wall is still mostly fabric.  The lids are not bulging now that I have gone through and removed fabric that I probably won't use...I even emptied some containers!


I moved my files/tables and bookshelves to the end wall and moved Steve's desk to where the books used to be.  This did a lot to open up the space.  Before, there were two "deep" things right across from each other, which only made the space long and skinny.  It was too narrow to unfold and set up tables on which to work.  Now the deep, file/table/book storage unit is in a better place at the end of the room and the continuation of the fabric shelves, which has a less deep profile, works better across from Steve's desk area.


With a sump pump, there is always a threat of a little water if things go wrong, so I like my books up off the floor.  I use three sturdy, used, 2-drawer filing cabinets to support a re-cycled wooden door surface and a re-purposed table top (without the legs).  

Once this was all leveled up with scrap pieces of plywood, I added four "Bonde" IKEA shelving units on top to hold the books.  This is the one thing I splurge on...they are the BEST thing for books...won't sag or collapse, like previous bookshelves.  I bought them slowly, one-at-a-time, which is why I have small ones, but even if I was buying all the shelving I needed at one time, I would still buy four smaller units instead of 1 or 2 larger ones.  This gives me a lot more flexibility as far as organizing goes.  I actually had 5 overfilled until I went through and set over 150 books aside for the sale...now that 5th shelving unit holds other stuff.


Putting the shelving units on a table surface gives me a place to sit, look for what I need, and work.  I arrange my books mostly by content...general "how to," applique, history, seasonal, individual technique, kid/baby, etc.  


I use some magazine files to put books by the same author or subject together...this also helps if they are the thinner, soft-cover books that have no book spine where the name is not easily accessible.


On top of the book shelves, I have plastic drawer units holding my scrapbooking/picture stuff, and on top of that, seasonal decorations that I don't access very often.


The drawers come out easily to get what I need (I have them labeled so I don't have to pull ALL of them out...).


My six, deep, file drawers hold patterns and projects from magazines (in sheet pocket protectors), labeled and organized in a way that works for me, in hanging file folders.


I placed the left and right filing cabinets angled inward, so that they are more easily accessed.


I have all my redwork, stitchery, embroidery patterns/projects in one drawer, organized by season, etc.


I keep applique projects in one drawer, organized by author (I have a lot of Lori Smith, Bunny Hill, The Rabbit Factory, Edyta Sitar, etc.), then by topic (flowers, BOM, etc.).  By using the sheet pocket protectors, I can store not only the pattern, but freezer paper or plastic templates that are re-usable).   I love sheet pocket protectors!


I know a lot of people sort their projects and sheet pocket protectors into binders, but I have never used a binder that I have been happy with.  I really like the hanging file folders with tabs and regular file folders when needed.  It is a flexible system that can easily change as needed.  Every now and I then, I go through and purge magazine projects as my tastes change.  (or I glue a picture of the project, without the instructions, into one of my idea books as a future reference...).


In a perfect world, I would not have to store the shop vac or paint cans (that would freeze in the garage) in my space.  Oh well...


More storage of photos, seasonal items, sewing machines, infrequently used kitchen stuff...


I try to store e
verything on the bottom shelf or on the floor in something that is waterproof...and most of the fixtures touching the floor are plastic, or can get wet.


Steve is happy with his space.  (Gotta keep the hubby happy...).  It is nice that we are down there together sometimes.  My computer is on the main floor, but we all use it.  Steve and Riley's are in the basement.  He uses 2-draw file cabinets and a door desk as well.

I love these second-hand file units...I can get them for $10 a piece at the U of M Property Disposition Center.  That is also where I get our $10 desk chairs.  Sometimes I even find stuff that matches, but since it is in the basement, I mainly want it fairly clean and functioning properly.


The quilting poles that are on the floor are going to be suspended from the ceiling, alongside the duct-work...they are too tall to stand up somewhere.


I store batting pieces and my tub of recycled jeans under the stairs, along with all of my folding work tables.  THIS space had become totally crammed with misc stuff and I could not get to the batting pieces before the cave re-do.  I would just lean my 5 folded up tables up against the bulk to keep it from spilling exploding out onto the floor.

It really is true that if you want to control clutter, EVERYTHING must have a home where it can be PUT AWAY.


It is so nice that the fabric containers all CLOSE now that I have removed some stuff...there were pieces that I never selected when picking out fabrics, just moved from side to side, so it was time to put them in the sale.  More is only good if you actually use it, I am finding out...


Using the lazy Susan under the TV allows me to swing it around while I am piecing at the machine...


My long rulers...and my awesome back scratcher...are in those grooved holders, inside another re-purposed, found-beside-the-road-on-garbage-day storage unit.


My idea books are only a reach away...


These are my right-at-my-fingertips, "go-to" containers of scraps, for doing my applique...


...in two sizes...small for crumbs and larger for scraps that are a little bit bigger.  These are ULTRA convenient and make my scrappy applique REALLY fast and convenient.


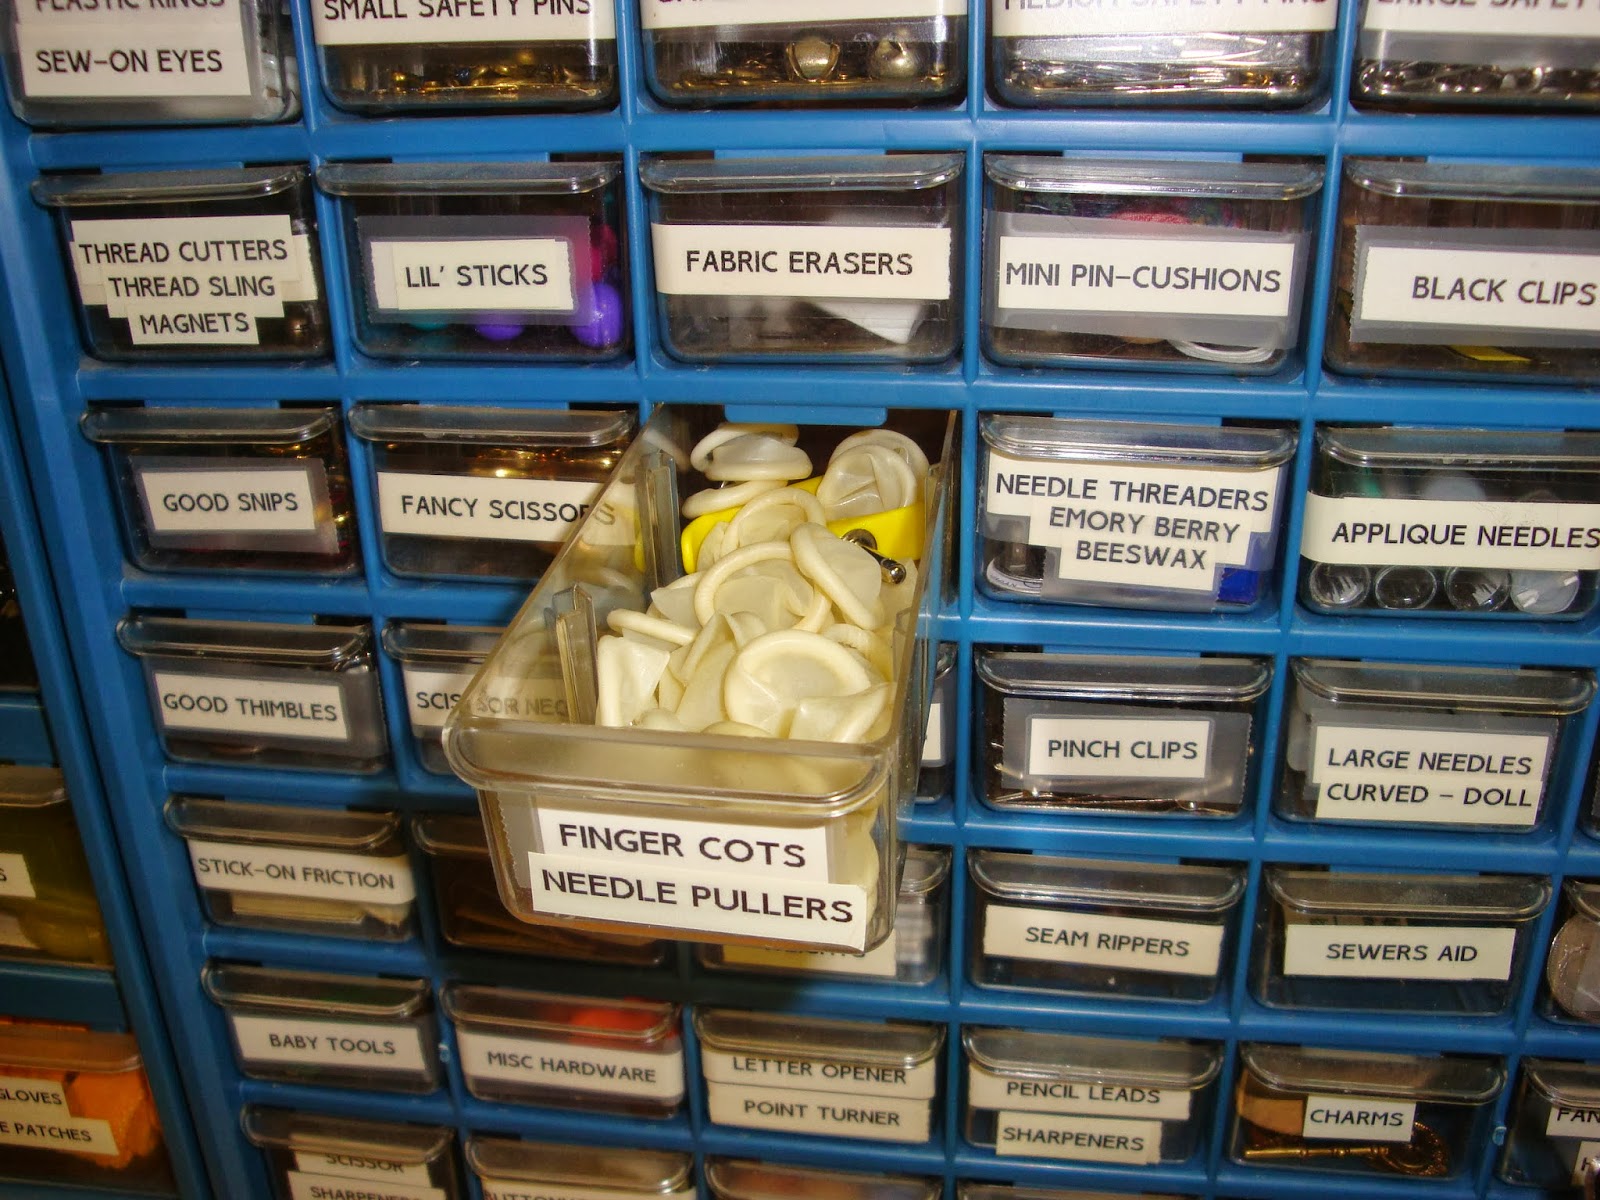
I still depend on these little draw units from Home Depot (or Target, Walmart) for little tools.


I still love these plastic drawer units for other rulers and templates...but the other draw units that were on the floor at my feet now reside on a shelf.  It was feeling cluttered and I wanted some leg room!


The front wall still stores fabric, project boxes, and my color-segregated scrap boxes (and ties, ribbon, etc.).


The recliner entices my family to come read, watch a movie with me, or play with the Wii.  The exercise equipment calls to us less frequently...


Unfortunately, the laundry and the cat box also share my troll hole (see?  not at all elegant...).


I feel like a new woman now that my creative space has had an overhaul.  There is still 10-11 days until the sale...I may be like the Pharaoh in "The Ten Commandments"...my hard heart may loosen, and I may be ready to let more of it go.  It is surely liberating to go through the process.

Our sale is Friday and Saturday, October 4 and 5 near Saline, Michigan, just west of Ann Arbor, 9 - 4 each day.  Comment that you might be interested in going and I will email you the details.  The three of us are pricing stuff to move...none of us want to take anything home afterwards!  (and we have made a pact that we can't "shop each other's stuff!")

In stitches,
Teresa  :o)

Monday, September 16, 2013

Starting on Christmas and surviving the IMPLOSION...


Anyone else out there getting nervous about Christmas?  I have gotten started...here are three little 6-inch applique blocks from a Lori Smith pattern.


I just love these little scrappy applique projects...such a good way to use my tiniest scraps, and they are very portable when I am on the run, which I always seem to be.


The quilt cave has suffered a self-imposed IMPLOSION...too much stuff crammed into too little cave makes me a grumpy, frustrated, unproductive, creative cave troll.  Something had to be done!

We have not moved in almost 20 years, which means things have accumulated...gravity tends to fill the quilt cave...ugh!

EVERYTHING was taken apart, gone through, and moved.  It was my summer project that never happened...hard to launch a pattern business with an unworkable space.  It doesn't matter how organized you are, too much stuff is simply too much stuff!

It was time for that hard, hard question..."am I really going to use ALL of this?!?  It seemed like a good idea at the time..."  

Well, unused books, patterns, fabrics, containers from tiny to huge, crafty ingredients, seasonal decor, household items, etc. have been culled.  Boxes, bags, and bins have been filled with precious booty and temporarily placed in the garage.  Ads have been placed and a quilter's garage sale has been planned with two other, equally crazy, overly-ambitious quilters/crafters in my area. 

If you are local to me and interested in coming, shoot me a comment or email to that effect and I will fill you in.

I will take pictures of the new and improved cave for the next post. It is not elegant, but it is organized, leaner and meaner, and almost ready for activity.  Yahoo!

Take the time to do the things that are important to YOU!  

In stitches,
Teresa  :o)

Tuesday, September 3, 2013

The "CONTENTMENT" Quilt - Block 3, when I started quilting...


As I come up with blocks for my "Contentment" quilt, I just have to include one that depicts my quilting passion.  I hope to include one with a sewing machine as well, at some point.


I had this great cheater piece from some Christmas fabric line that looks like tiny red/green applique blocks, so I decided to make a frame/outer border and call it a quilt!


Drawing myself, sitting on a stool, was a little tricky, and I chose to draw myself at my fighting weight back in 1983...


Since there were roses in the little cheater quilt, I decided that the block needed a red rose and some buds.

The block will finish 10 inches.  If I had it to do over, I don't think I would have gone with the yellow dress, but using the cheater red/green fabric sort of painted me into a corner.  I think the purple fabric choice for the numbers of the date were a little rebellious!

I hope you got a chance to sew over the Labor Day holiday.  Now that September has arrived, holiday panic is beginning to creep into the back of my mind...

In Stitches,
Teresa  :o)

Friday, August 30, 2013

The "CONTENTMENT" Quilt - Block 2, here comes the stork!!


Here is another "Contentment" block - this one noting the birth of our daughter.  "Contentment" is a story quilt I am designing for our 20th wedding anniversary this October.


I love the idea of the stork delivering the baby...a very traditional idea.  As I recall, this was a very appealing idea to me about the sixth hour of labor, LOL..."here, storkie, storkie, storkie...I have some hospital saltines for you..."

I had a long, single strand of orphan gold thread that I used to chain-stitch the delivery cap...it makes him look a little more official, doesn't it...maybe I should go back and give him a little bow tie, his skinny little neck looks so naked.


I studied a lot of pictures of storks and then tried my hand at sketching one.  Remember the stork that delivered Dumbo to his sweet momma elephant?  Leave it to Mr. Disney to gloss over the ordeal of birth...how many of us thought that OUR babies would be magically delivered by stork one day when we grew up?


I liked doing the feet and the knobby knees...


I'm still trying to decide how I feel about the lettering.  I like the presentation of information, after all, this is a story quilt.  But all that data does makes the block seem crowded...maybe I need to make the blocks 12 inches instead of 10 inches?  What do you think?


All the leaves and petals are great ways to use up the tiniest scraps...and eliminates fabric decisions...they all work!


I hope you get lots of stitching done over the long, holiday weekend.  I am glad I got the stork done before Labor Day, since "they" say we are not supposed to wear white AFTER Labor Day, LOL.

In stitches,
Teresa  :o)

Thursday, August 29, 2013

"Baltimore Rhapsody" Block #20 - the banjo


The next block in the "Baltimore Rhapsody" quilt project is the banjo, and is also the first folk instrument in my original applique music block series.


This instrument originates from the African banjar, and was brought over to the United States by early slaves. 

Crude instruments were built here in this country by tightly stretching a coon skin over a hollowed out gourd.  A handle was attached, along with 4 strings.  Soon it became known as the banjo and was a source of plantation songs and dances.


Soon they were made from wooden or metal hoops and had 5 strings.  This hound dog is patiently waiting for his master to come back and play for him!


Melodies can be played on the banjo, but more commonly chords are played rhythmically as accompaniment.  Very fine players can play the rhythmic arpeggios while featuring the melody note prominently "on top" at the same time (a technique also used by guitarists).


Around 1830 the banjo could be found around the campfires of the westward movement in this country.  Everyone knows Stephen Foster's song "Oh, Susanna!" about "coming from Alabama with a banjo on my knee."


The rhythmic syncopated melodies played on the banjo led to the early jazz style called ragtime, and until 1930 banjos were a basic member of the rhythm section of dance bands.  It was then replaced by the smoother sounding guitar.


The banjo is popular once again thanks to musicians like Bella Fleck, Pete Seeger, and the comedian/actor/musician Steve Martin.
  
It also lends its characteristic sound to bluegrass and American Folk Music.


Some musical snobs define "perfect pitch" as throwing a banjo into a dumpster without hitting the sides.  It is their loss.

In stitches,
Teresa  :o)

Saturday, August 24, 2013

Spa treatment for finished blocks...


The first two blocks of my new "Contentment" project are all hand appliqued and ready for my "glue removal spa treatment..."


I use two different glues while doing my hand applique...both temporary, although they are both archival glues and could be left safely in the fabric.  I start out with cool water, and add more and more warm water as I am assured of my fabric's color fastness (I'm a fabric washer, so I am pretty sure of nothing running at this point...).  Warm water seems to dissolve the glues faster for some reason.


I use Elmer's Disappearing Purple Glue Sticks (the smaller size) to glue my raw edges to the back, or wrong side of the fabric.  I've seen pre-schoolers sucking on those madly, like a purple Popsicle...those suckers are SAFE (no pun intended).

And because hand sewing around straight pins make me super cranky, I use Roxanne's Glue Baste in teeny-tiny dots to hold things together while I concentrate on invisible stitches.

(You can faintly see my "dot-dot-not-a-lot" dots on the wrong side of the pant legs below.  Even when I use the tiniest dot possible, they spread out when the 2 fabric layers are mashed together.)  

I soak, gently squeeze, replace water, and repeat until I can no longer see the little dots.  The glue stick comes out in minutes.  The Roxanne's takes a little longer...a lot longer depending on how much glue baste you use.  

I left these two blocks about 4 hours...I walk by and squeeze-release a few times while they are swimming around to help the process along.


WITHOUT WRINGING, I GENTLY ball up the blocks together and squeeze out the excess water.  I was super gentle this time, as I had already cut away a little bit of the backing behind larger motifs to remove excess dark fabric that was peeking through.  (I usually sew some layered motifs together before placing on the background, but this time I glue basted everything together so I could stitch on them away from home.


I gently pat each block out, right side down, on a clean towel over my pressing surface.


I fold the towel over the block, then gently roll up the towel.


Then I gently squeeze along my roll, NEVER wringing.


I pat out the block again on my towel, face down, and pat to smooth it out, NEVER pulling or tugging.


 (pat-pat-pat...)


I press (lifting to move the iron) with my hot, dry iron to mostly dry the block and remover wrinkles.


These blocks will finish 10 inches when I trim them down, which I will wait to do, just in case I change my mind about the setting, etc  

This one commemorates the day we met...


Hey, check out LuAnn at Loose Threads...she is using the glue sticks to make her hexies...so cool and so clever!!

In stitches,
Teresa  :o)