Tuesday, January 31, 2012

Rx for January...work with bright fabrics!

 have my 12 center blocks hand appliqued for the Lori Smith's "Folk Art Applique" quilt.  Each block will finish at 9 inches.

This has been the perfect hand stitching pattern for this time of the year in Michigan...there are a lot of gloomy, cold days with linoleum skies.


The picture on the original pattern looked as if solid, saturated fabrics were used.  I decided to use tone-on-tone bright fabrics, hoping they would read as solids, but with more zing and pep.


It's time to play with the layout and order of the blocks, sew them together, and start thinking about a border.  I think I will come up with an original border design...perhaps a swag. 
 

Should I put eyes on the animals?  I think the original pattern gave eyes only to the chicken and bird...


I've enjoyed the simplicity of the design elements.  This pattern works up nicely using the glue stick method of hand applique.

I carefully trimmed the black background away from behind the larger applique shapes, especially the yellow ones.
I found I needed to stitch in good light because I soon discovered that the black background really magnified misplaced stitches!  I'm still loving the YLI silk thread for hand applique.

The sunflower block just may be my favorite...


I have trouble with January...anyone else in the same boat??  I have a love/hate relationship with the holidays.  I had such a good mojo going with the weight loss and exercise in 2012.  Now I am on a plateau.  Lots of walking and exercise would burn me past the plateau and get me on my way again.  But the January weather can be bad for walking...and for mojo.  Sometimes it is just dangerous to be out there due to the ice, snow, and/or cold.

I whipped up this little top as a sample for the shop.  It is called "We're Chicken," by Button Weeds.  I really liked making up the scrappy half square triangles.  I love scrappy...I don't have to make decisions about fabrics...they're ALL good!  Right now the chickens are running around blindly...I will add button eyes after it's quilted.  They have little prairie point wings...so plucky!


Good-bye January...I hope you take the doom and gloom with you!

In stitches,
Teresa   :o)


Saturday, January 21, 2012

Practical magic...


It's no secret that I love YLI silk thread for hand stitching my applique blocks.  It is fine, strong, and nearly invisible - it is kind of like sewing with human hair.  But I find that it tangles off the spool (not while sewing) like MY human hair, and my spools are usually surrounded by a cloud of loose thread that resembles 'Pig Pen' from the 'Peanuts' comic strip.  Desperate for a quick solution, I remembered I still had some of my daughter's hair do-dads from when she was a little girl.  One worked so well, I ran out and bought a whole bunch!


The Goody Co. has the best, simplest ones, and one pack (of 42!) was only $2.49 at my local grocery store...that's just under $0.06 a piece!  That's a bargain at twice the price!


One will work, or you can put two on a spool.  With two or three on a spool, you don't have to keep moving the do-dad to cover the thread tail.  They also fit sewing machine bobbins and slender spools of regular sewing thread.


If you want to get all fancy, you can match do-dad color to spool color (until you get to the browns...).  I've stored the extra ones in a baggie until I go down to the quilt cave and fix the remaining silk spools.


I like the larger ones on my spool of YLI glazed hand quilting thread.  I usually double or triple the do-dad and it works perfectly.  I've been using one on my quilting thread for a couple of years...I can't believe it took me so long to remember the little do-dads for the silk thread...


I wonder how many human inventions came from someone being annoyed?!?


A week or so ago, I finally had dinner with 3 girlfriends (Ola, Mary J and Beth) and we celebrated Christmas and my birthday.  We grabbed attention in the Ruby's Restaurant as we opened little gifts...serious and silly (the singing and dancing elf and Santa hats were particularly fun in public!).  Beth's HUSBAND found the following little trinket for all of us at the AUTO PARTS STORE...a magnetic nut and bolt holder that works great for pins.  The base is even magnetic, so it will hold pins up-side-down and in tight places.  Brilliant!!


It just goes to show you that quilting tools can be found practically anywhere!

In stitches,
Teresa   :o)

Monday, January 16, 2012

Applique taskmaster...


Weasley has been holding my feet to the fire, keeping me company and helping me to get some applique prep work done. I've been methodically glue basting smaller units of each block, then stitching those smaller units with YLI silk thread.  By building the applique blocks unit by unit, then stitching the smaller units before glue basting further, I will be able to trim the black background behind the larger applique motifs in preparation for hand quilting...especially if my black background muddies my lighter, brighter fabrics.


Since I am using a black background for this applique quilt, my usual trick of using my light box for applique placement won't work.  I am using the 'overlay' technique instead. 

You know those clear dividers you get when you buy the deeper Art Bin satchel containers.?  They are smooth on one side, ridged on the reverse?  They make great overlays!  Since I have temporarily misplaced my pen that wipes off with water, I am using a dry erase pen (and being very careful not to smudge the ink!).


I trace just the very outside lines of the block design from the paper pattern to the smooth side of the clear divider.


After gluing then stitching the smaller units, I've glue basted everything I can by just working over the paper pattern BEFORE working on background with the overlay.  Using the "dot-dot-not-a-lot" amount of Roxanne's glue baste, I know if my applique gluing bleeds through and the piece sticks to my pattern, my dots are too big, LOL.


My background is a couple of inches larger than the finished size, so I glue the round center medallion in the center of my over sized background square (confident in having enough background to carefully place the other motifs)...


Next I place my traced overlay on top of the applique block.  Using my long tweezers, I move things around until they line up pretty well.  Then I remover the overlay and carefully lift and apply my tiny dots of glue baste one motif at a time, checking alignment with my overlay when necessary.


Now I can simply wipe to remove the dry erase pen from the clear plastic overlay.


I place the clean overlay on the next paper pattern.  The dry erase pen removes easily, but is way too easy to accidentally smudge or remove.  When I use this overlay method, I much prefer the wipe board pens that have to be removed with a damp rag.  I don't have to be so careful with those overlays.

 
I only outline outer edges.


Before using my traced overlay, I glued up the sunflowers and stitched the centers first.  This is especially important on this block with all the light yellow fabrics.  If too much black background shows through, I will trim away even more of the unseen black background.

Here are the flower flip sides.  You can see how I sewed the smaller circle centers to the larger ones, then stitched and trimmed before placing the center units on the petal layers and doing it all over again.


Now I am ready for my overlay,

 
Done...ready to erase and trace the next block...


These are a little out of proportion because the camera is at an angle, but you get the general idea of the four blocks I will be stitching now! 


Oops!  I forgot to say that these are blocks from Lori Smith (From My Heart to Your Hands).  The name of the pattern is "Folk Art Applique."


Preview of coming attractions...

In stitches,
Teres
a    :o)

Saturday, January 14, 2012

On the flip side...

I love quilting.  It is a constant source of creativity, challenge, comfort, escape, deep emotion, whimsy, beauty...not to mention a reward/justification for paying attention in math and geometry class.  It seems like such a pure, private, intimate sort of craft because it does touch on so many personal emotions and we do spend many hours in solitude with our 100% cotton. 

Because we feel our craft so personally, we often have an unexplainable, instant connection with other quilters when we meet them for the first time.  It is almost as if we can't fathom the possibility that two people could feel like this about a craft.

I'm sure it's happened to you...you are out of your quilt cave...out in the REAL world, and you bump into a stranger, somewhere totally unexpected that mumbles a word of "quilt speech" that you recognize.  You look at each other, smile, and feel like you've known them forever.  You start talking about projects, patterns, and the person you are making the current quilt for as if you have a history, a bond, a real connection.

There is something so pure, so innocent, so COOL when this happens.

Finding out that someone else feels the same emotions about this craft opens up a WHOLE other world of quilting to us.  Let's be honest...there are times we turn to our cotton when we are sad, worried, confused, hopeless, lonely...we frankly feel like no one else would understand.  We feel soothed and hugged.  The colors, patterns, and the tactile feel of the fabric makes everything all better...almost.  When we make a connection with another quilter, we find a kindred spirit to share our projects and our lives with.

All of a sudden we have people we can't WAIT to show a pattern to, we pick up a fat quarter of something we KNOW they would LOVE, we get together to sew or go to a new quilt shop.

Do guys have this kind of thing happen when they go to the auto parts store?  The power tool department at Sears?  The big screen TV section at Best Buy?  The beer isle at the grocery store?   

I think this is a singular event in the human experience.  Substitute "scrapbooking" or "knitting" or "beading" for "quilting" (or even "women who have miscarried" or "holocaust survivors" or "breast cancer survivors") and the same thing happens.  We make connections with other people who share deep loves or hurts.

I think the depth of these connections make incidents of hurt feelings and misunderstandings among us so painful and hard to heal.  Maybe we wonder why people who deeply love the things we do could ever hurt or wound us, or make us feel used and unappreciated. 

It is also human nature to look at things from only one perspective...the one side of things we actually see.  I have found this to be true through my part time employment at both a church and a quilt shop.  As a member of a church, I saw the clergy and other staff members in a certain light, as perfect vessels of outreach, facilitation, and faith.  When I joined the church staff, I realized they were flawed, conflicted, complicated people just like me...trying to do their jobs and answer a calling while struggling and dealing with the same difficult, painful baggage.

The same can be true of a quilt shop.  As quilters, we drive up to a shop, the gray skies part, a rainbow appears, birds and angels start singing...in we trot to find comfort, escape, inspiration, and a connection with other quilters.  Little do we consider the human burdens that are carried by the owners, employees and other shoppers. 

Point of reference and perspective are hard little nuggets to grasp sometimes, but they are worth the effort of pursuit.

In stitches,
Teresa   :o)

Wednesday, January 11, 2012

Following rainbows...


This rainbow palette is a sure remedy for the after-Christmas winter blues.  I have nothing but happy feet while digging through the stash bins that contain these happy fabrics.  When I popped the top off the containers, I actually heard faint singing, birds chirping, a waterfall, and the clicking of tiny unicorn hooves as they frolick on my work table.  Yep, these fabrics sure brighten up the quilt cave.


So does this cute little quilt project!  I love the folk art feel of this little quilt (finished size 36.5 x 45.5).  The hard part for me is narrowing the palette.  I get so spoiled when I work on scrap projects where everything goes...no difficult fabric choices...no choices at all, really.  I think making fabric picks, especially when I have to limit myself, is my least favorite part of the quilt making process.


I have spent a little time between laundry cycles tracing and cutting out my freezer paper templates for glue stick applique.  I put in one of my favorite Jane Austen DVD's...I've seen them so many times that I don't have to watch every scene.  That makes the cutting out of the paper shapes pass fast.


Then I transfer the paper pieces for each block into a clear sheet pocket protector.  If you have ever read Karen's fabulous blog called Sew Many Ways, you know how excited and creatively motivated she can get from a trip to the hardware store (when I peeked today, she was dressing up an old milk crate - inspiring!).  Well, a trip to my local Staples or other office supply "candy store" is equally inspiring for me.  Some of my favorite quilting tools come from there...sheet pocket protectors (they come in boxes of 100!...), mechanical pencils, ultra-fine Sharpie markers, glue sticks, wipe boards & vis a vis pens, hanging file folders, pads of graph paper, sticky notes, etc.  When I go there, I get that wonderful "shopping-for-new-school-supplies" feeling...priceless.


Now all the templates are prepared and awaiting fabrics.  Here comes the hard part for me...actually picking and assigning fabrics from my gathered rainbow.  I feel like I have a gun to my temple and I hear a voice inside my head saying, "choose wisely, grasshopper..."


Since the background is black for this quilt, I audition the fabric choices on top of a piece of black Kona cotton.  I used Lori Smith's fabric choices as a jumping off place for my decisions, then deviated a little as I locked in the choices for each block.  I made little piles of each color so that I could sort through easily.  I think the original fabrics in the pattern photo are solids, or read as solids.  I choose mostly tone on tone fabrics and tried not to pick anything that would pull eye focus too much. 


A word about my picks for my green pile...there is a lot of green in this quilt.  I love lime green, and at first those were the fabrics I chose.  I quickly realized that I needed to shift to a more acid green, with some light and dark choices thrown in for excitement. 

I started "Stars and Sprigs" last year and put it aside.  I now see that maybe I did that because I was dabbling in the wrong greens with that bright palette...maybe I will keep this pile of rainbow fabrics together and revisit some of those previous fabric choices.

The wrong fabric choice can certainly drain my excitement about a project.  I really struggle with the choosing.  I think I struggle due to fear...OMG, what I wimp I am...afraid of cotton, LOL.

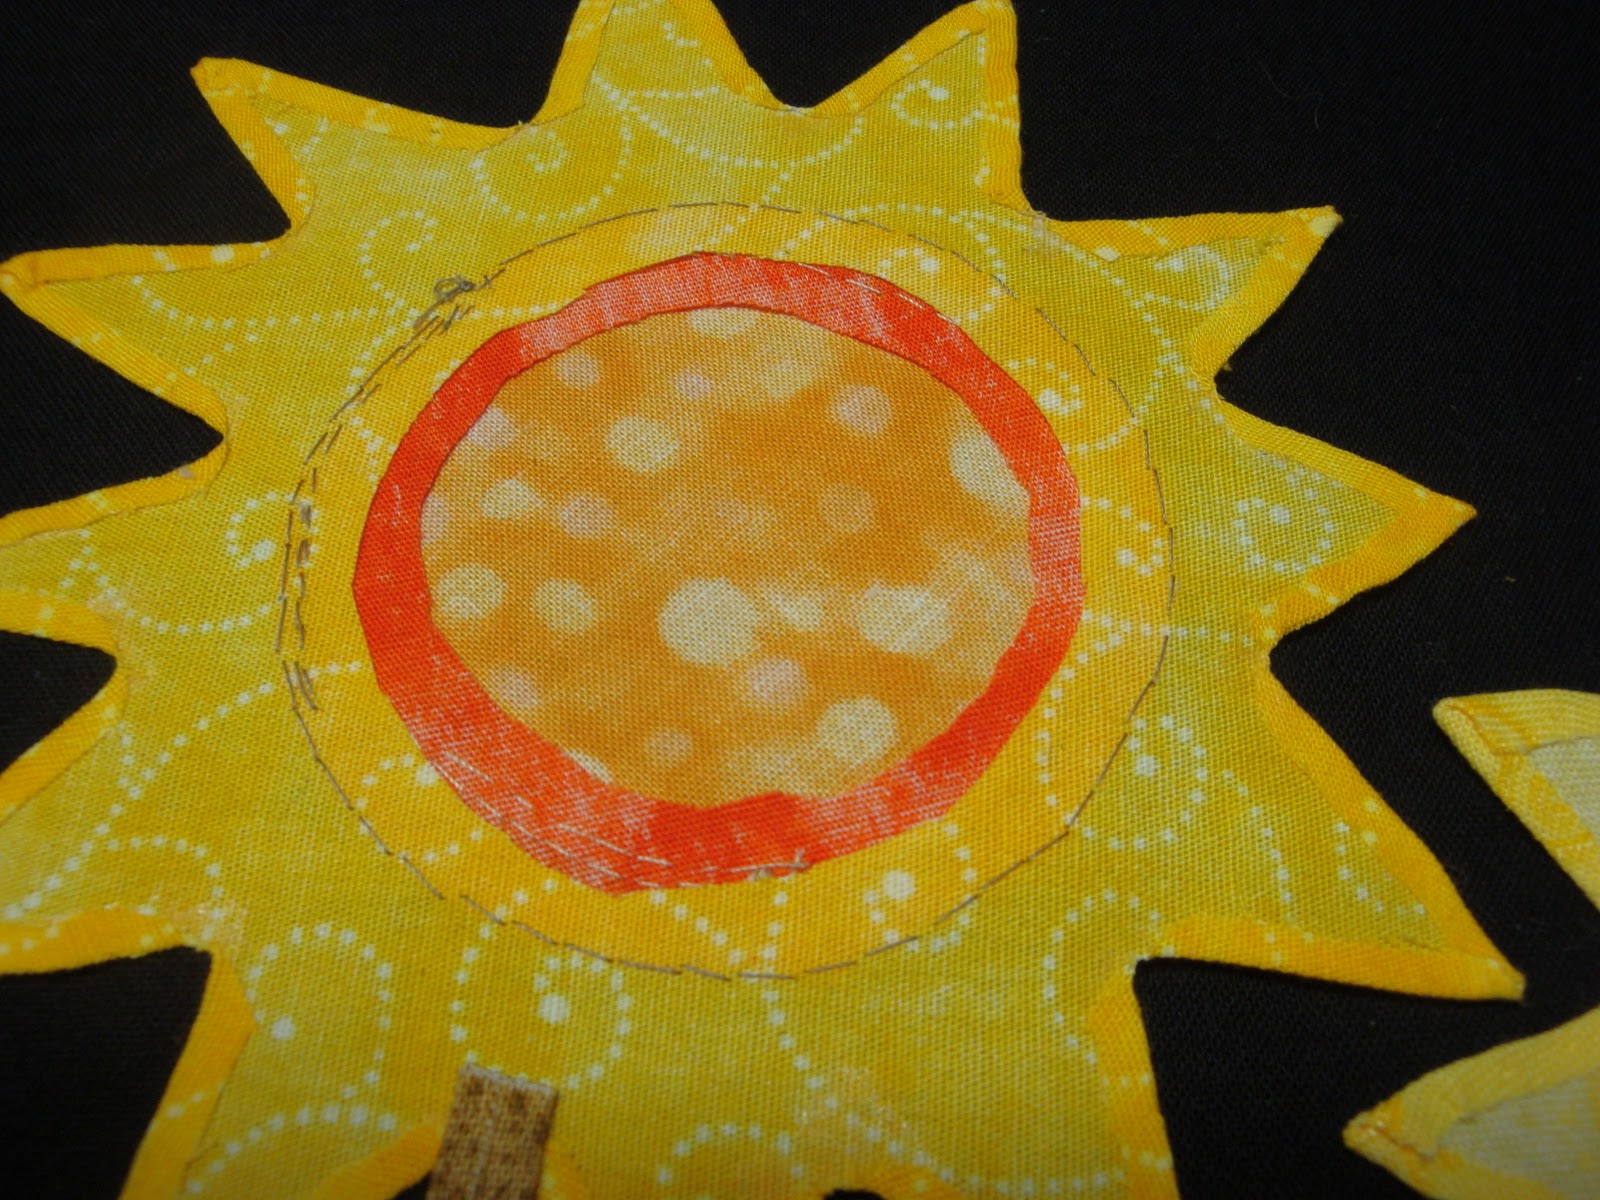
As I choose each fabric for this project, I iron the freezer paper pattern pieces (say THAT 3 times fast...) to the RIGHT side of the fabric, "chunky trim" (leaving room to add a glue under allowance later), then place the ironed chunks back in the appropriate sheet pocket protector.  Later, with more TV time, I will trim each piece, adding either 1/8 inch or 1/4 inch (depending on whether I am gluing under or allowing for overlap of another piece).  At the base of the orange leaf-shaped pieces, you can see where the "stem section" has pencil hash marks at the edge.  I do this to tell myself to leave a 1/4 inch on that edge (that is where the piece is tucked under something else).  That way, the trimming becomes a brainless activity while I am watching Lizzie and Mr. Darcy (for the umpteenth time...).


There are glue stick applique tutorials on my top blog tool bar if you are curious about this hand applique technique.

 
Working on my applique block pattern, I place the block bits and glue baste what bits I can (to each other, not the paper). If you are doing this step and your bits get stuck to the paper pattern, YOU ARE USING TOO MUCH ROXANNE'S GLUE BASTE!!  Remember, "dot-dot-not-a-lot" and make sure you aren't applying your tiny dots of glue too close to the edge of the piece where your needle will be sewing later.  Gluing what I can now will make block placement easier later (since I am working on a black background this time).

I usually like to work in units, but as album applique patterns go this one is fairly simple, so I can glue baste everything but the leaves...I will place and glue baste them when my black background fabric comes out of the dryer. I can't wait to see how the colors look on black! Happy, happy, happy...

I couldn't resist prepping a second block before quitting for the night.  In addition to block 2, I worked a little on block 4 (skipping around, no discipline, I know...).


The pink and deep purple double center pieces are just sitting there for now.  I will sew those as units first before glue basting to the purple posie so that I can trim away the background behind the deep purple circle.  I like to trim away behind layers of applique so that later hand quilting will be a pleasant (rather than "princess and the pea") experience.

It feels good to focusing on some projects now.  I hate that hand-wringing, cant-make-up-my-mind feeling.  I mentioned last fall that I am drafting an unusual , original album project (shhhhhhh...).  I am also working on prepping some of those blocks.  And, I am going to continue to focus on scrappy, stash-busting quilts this year.  Fine hand applique versus wonky, scrappy...polar opposites, kind of like me!

In stitches,
Teresa  :o)