Saturday, January 25, 2014

Dreaming of Cinderella (while the paint is drying)...


Remember the "Cinderella" TV movie/musical that used to come on every year?  (Yes, I am DEFINITELY dating myself now...)


It first aired in 1965 and starred Lesley Ann Warren as Cinderella. I used to LOVE watching that thing every year!  Remember those song lyrics, "In my own little corner, in my own little room, I can be whatever I want to be?"


Well, today I am Cinderella, established in the corner of the family room by the window, working away on hand quilting the outer border of my "Baltimore Rhapsody" quilt.


It is snowing like crazy outside as I work, and the wind-tossed snowflakes make me feel like I am lost in a magic spell.


Maybe I am hoping my Fairy Godmother will come and finish my hand quilting chores so I can get on with more applique...

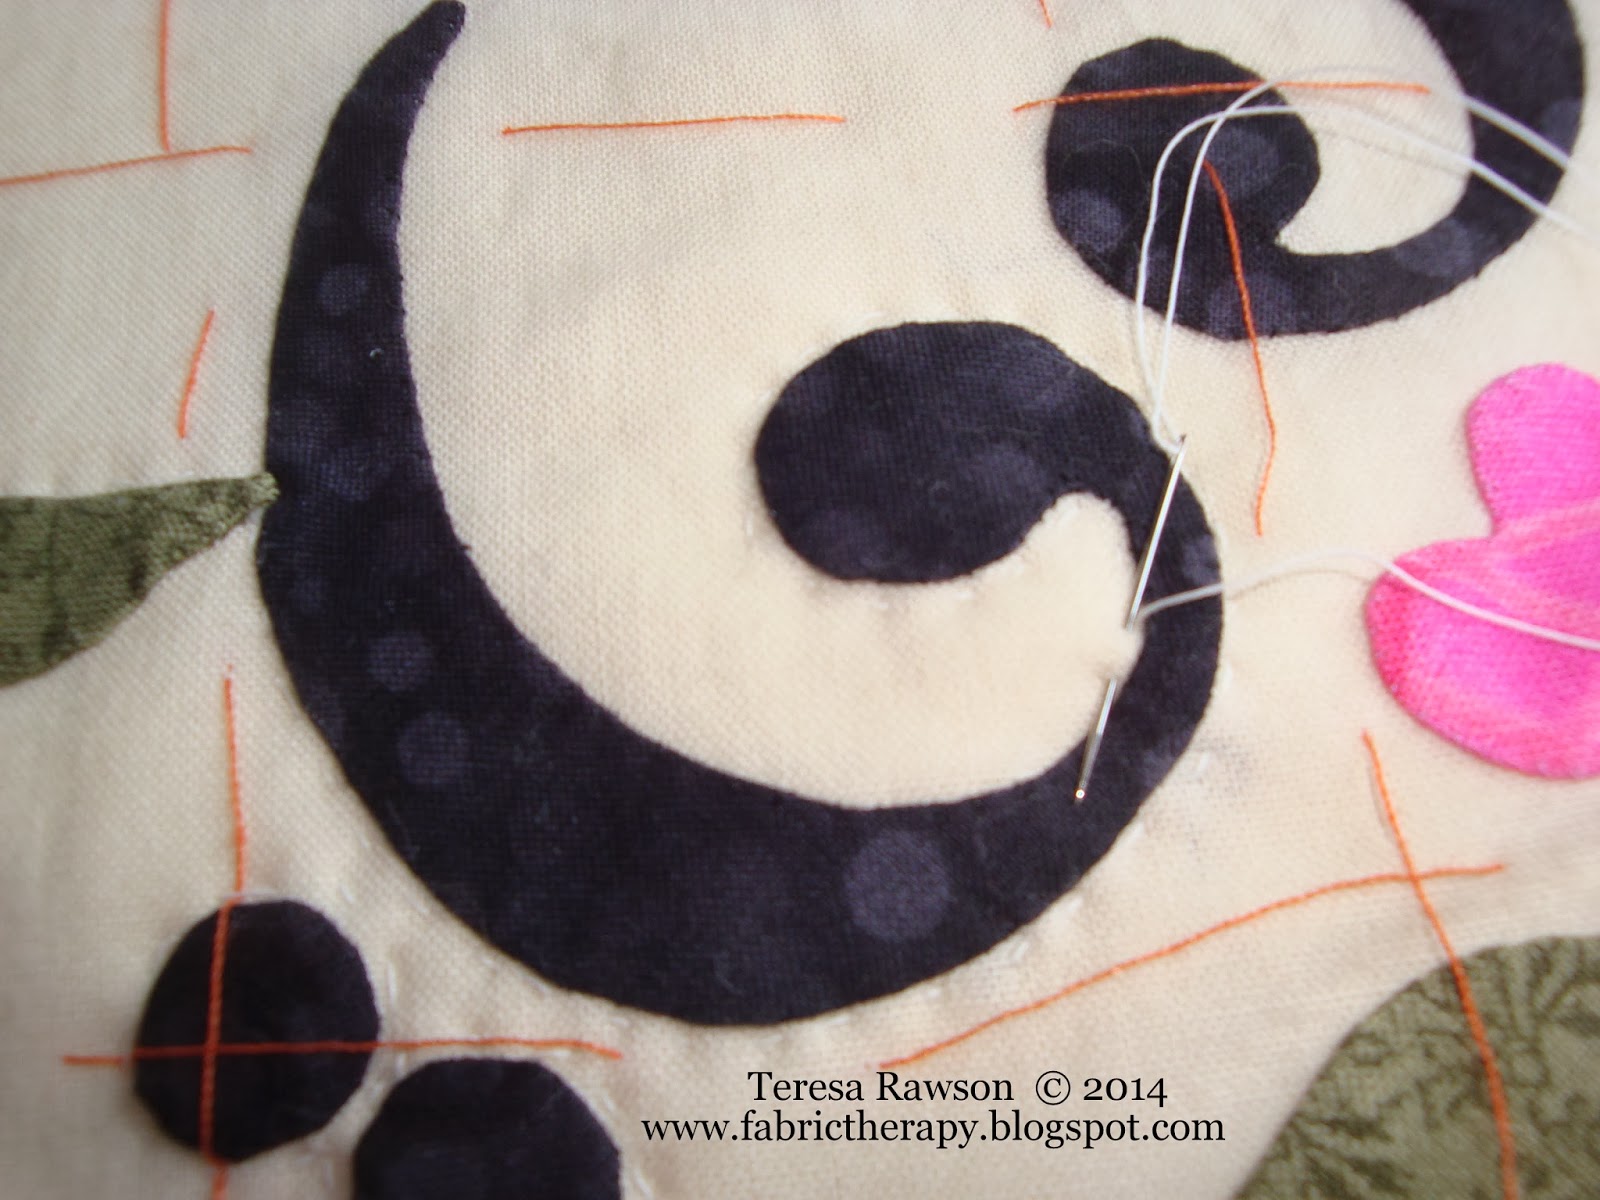
Part of my inability to finish the hand quilting was due to being stumped on what to quilt above the outer border swags.  I sort wanted something musical, but not something so busy that it would draw the eye away from the hand applique too much.


I have gone through so much waxed paper, doing overlay drawings, trying to come up with something.  I finally settled on a simple leafy swag with a single eighth note in the middle.  Eighth notes are not symmetrical, which really bugs me...it is centered over the swag, but due to its irregular shape, it just looks funny to me...


I made my own little set of crude templates (I'll show you below...) and got busy with the 28 repeats of the motif required.


I am using a hoop for this, but took it off trying to get a decent picture...I think the picture would have been better if I had left the hoop on!


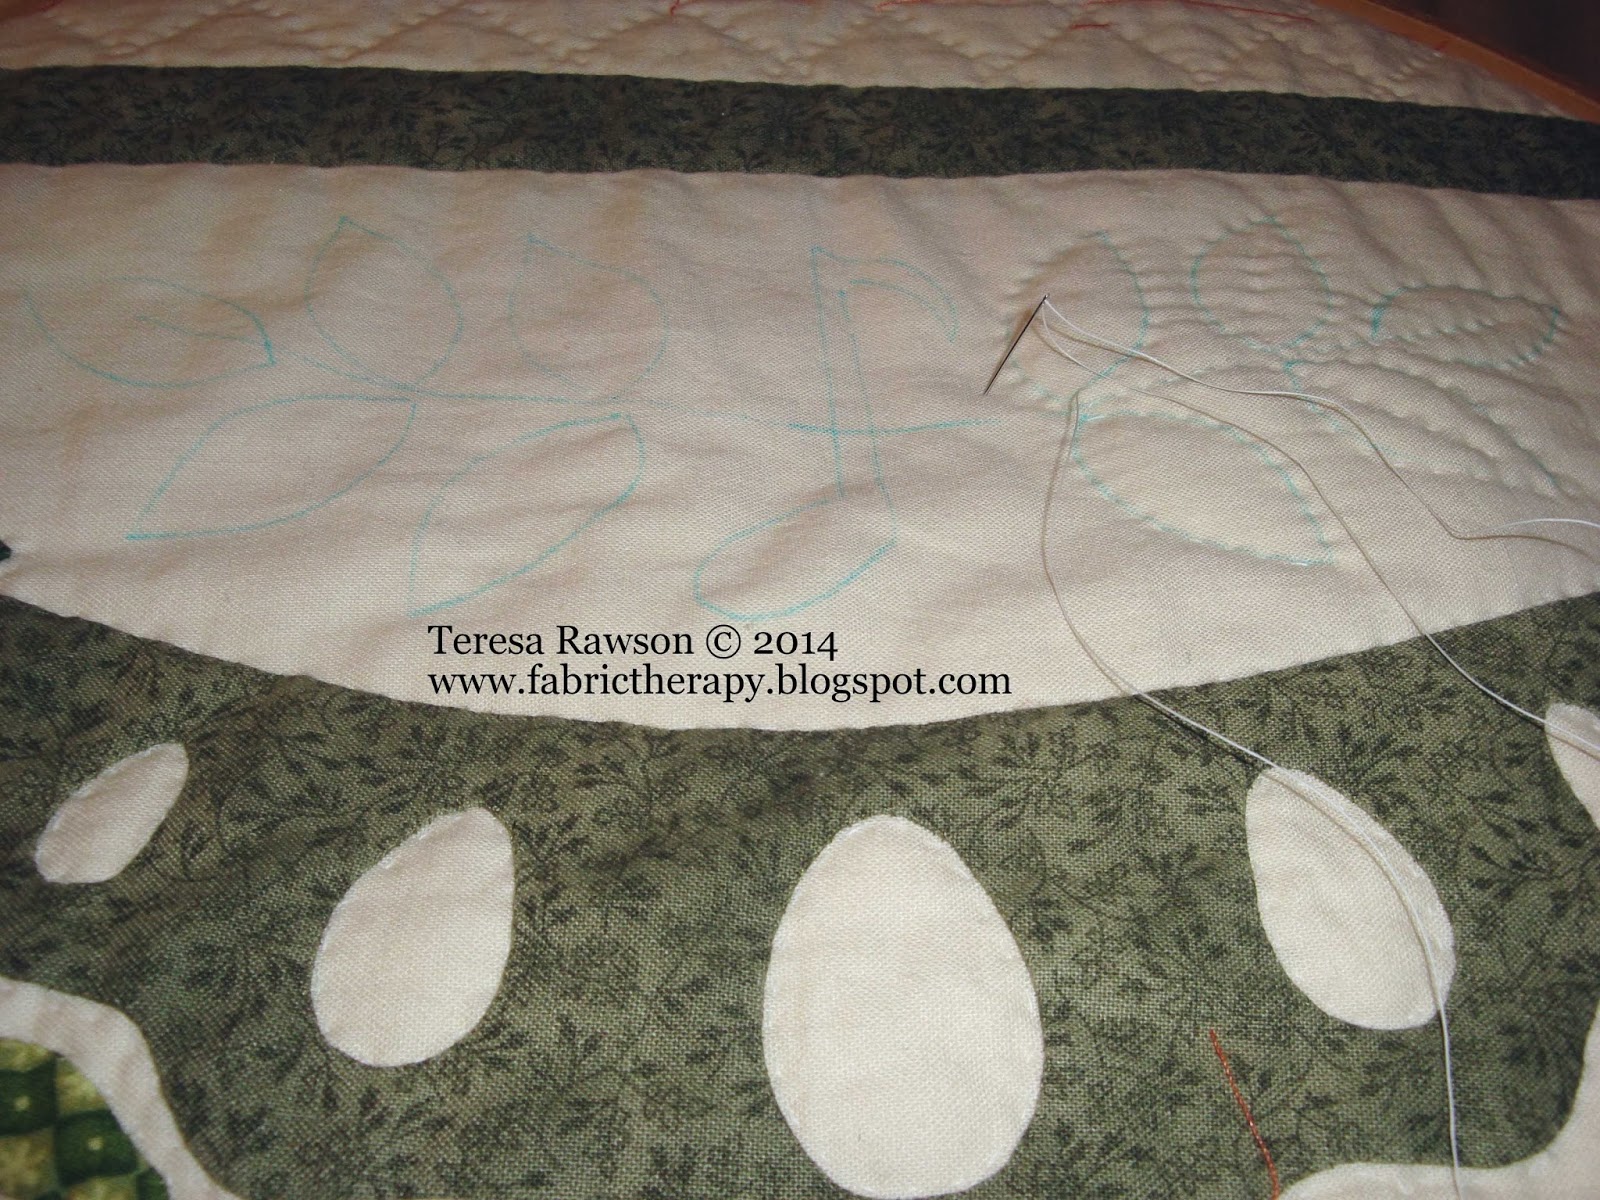
Once I got a side done (seven repeats), I still wasn't completely satisfied...something was missing.  Since I had already appliqued little hearts in the outer border corners, I decided to quilt little hearts between the leafy swag motifs.


The quilt is all bunched up on my little table so the picture is not good (when the quilt is touching the floor, Mr. Weasley is ALL OVER this puppy!!), but I think you can get the idea.  The following picture is before I removed the blue marking pen.


For continuity, I decided to do leaves in the corners as well, and more hearts.


Here is a shot after I spray-flooded the area with water to remove the blue pen...my house is so darn dry from the constantly-running furnace, that it took only minutes to dry (except for a couple of spots on the left...).


OK...don't laugh...here is how I made my template...templates, actually.  I don't have one of those fancy stencil cutters, so sometimes I make the motif in stages on different pieces of template plastic (pay no attention to the quilt underneath...the stencil does not match up at the moment).

I figured out the length of my swag...not from leaf TIP to leaf TIP, but from leaf VEIN to leaf VEIN.  I made a curved line on my piece of template plastic with a skinny Sharpie marker, then used tiny, very pointy, curved scissors to "cut out the line."  (I think the scissors are actually delicate toenail scissors...I do NOT have delicate toenails, so they are in my sewing scissor drawer, LOL!).  

To "cut out the line," I just cut to the outside of my line all the way around.  As you can see, the channel is ULTRA skinny...I only need the point of my blue marker to fit down in the channel that I cut.

The two lines, one above and the curved one below, are just crudely drawn to help me line up my "line template" in the right place.  Then I carefully, and LIGHTLY draw my curved line.


On my second, separate template, I cut out the note and the leaves after drawing them around my initial curved line (the drawn curved line helps me to place this template in just the right spot on my quilt.  

I could have done all this on one piece of template plastic, but there would have been so much cut away that it would have been floppy and hard to stabilize while using.  Commercial stencils leave little chunks in the design line, but I don't have the patience to be that precise with my homemade pieces.

The leaf tips on either end will extend BEYOND my drawn line (the ends of my drawn line represent the ends of the leaf VEINS, not the leaf TIPS).  I just eyeball the veins in the other leaves while I am quilting.

Then I carefully trace around the inside of each cut-out...

...when I quilt, I stitch to the OUTSIDE of my drawn line (this also makes it easier to remove the blue pen because it is not underneath the stitches, hiding from the water spray!).


I loaded up the corner template with additional different sized hearts in case I needed them, so I have to move the template around to trace what I need...the spacing between the hearts and the branch are not the correct spacing.


When the correct side of the template is not clear, I label the template or at least write "this side" on the plastic.  Once I didn't do that and some of my motifs were backwards when finished, which I didn't notice until I saw the quilt hanging in a show, ha-ha!  Oh well!!


Will it ever stop snowing in Michigan...or get back to normal winter temperatures??  


I have two borders, fourteen of the twenty-eight repeats, done.  I am going to hunker down with a cup of tea and work on more of them after shoveling a little snow...

I hope you are warm and cozy somewhere, doing a little stitching!

In stitches,  
Teresa  :o)

Wednesday, January 22, 2014

Watching the paint dry...one stitch at a time...


People often make fun of home improvement shows and call the networks that carry them the "Paint Drying Channel," or some such insulting label.  They use their remote to find something more amazing and remarkable to watch to get their "buzz" or "high." 

It is not very sexy TV for the uninterested - the changes just don't happen fast enough for most viewers.  Although, I think the fact that the improvement took place before our eyes in 30 - 60 minutes is remarkable...I've DONE home improvements.  I really appreciate seeing every little detail because let's face it, THE DEVIL IS IN THE DETAILS...


The same jaded thinking happens in the quilting and DIY blog world...unless you are interested in the topic being detailed and expanded upon, it can be a snore-fest for some.  BRING ON THE SEEMINGLY INSTANTANEOUS FINISH OF THE QUILT/PROJECT IN QUESTION!

I say, "NOT FAIR!!"  Some things just take time.  Hand quilting is one of those things.


The thing I like most about reading blogs is seeing the details...good and bad.  While I like the lure of "Ta da!  Look at this fabulously complicated thing I just finished," I don't think it is very helpful to miss out on the pain and personal growth that it took getting from step one to step done.  

I like to hear that there were some problems that were overcome, because there are things about quilting that ARE difficult.   It is always helpful for me to see how people workout the tough stuff.


I have been frustrated with finishing the hand quilting of the music quilt.  Mostly, because there is a lot of quilting!  But also because there are many things that seem to constantly need my attention.  

A lot of the quilting is outline quilting which, let's just say it, is not very exciting.  I did it to myself...I appliqued all these tiny, little things that really need to be outline quilted to make them "pop."

What possessed me to design border swags with holes in them...holes that all need to be outline quilted?  I love how they look when they are quilted, so I am going to stop questioning my use of TWENTY-EIGHT of them...

Sometimes the edges of the motifs are straight so that I can fill the needle with stitches before pulling the thread through.


But most of the time, I can only take one stitch at a time due to the tightness of a curve...that "quilt pecking" takes more time.  I was literally flying on the cross-hatch quilting behind the blocks because I could load up the needle with lots of stitches before pulling the thread through.


And then, there is all the "traveling" between little motifs...times I am worming my way through the batting trying to get the needle to its next destination without knotting off.


Oh, don't get me wrong...I still love hand quilting.  It just takes longer to make what most people would call "progress."  When outline quilting the actual music blocks, it is hard for the untrained eye (my husband...LOL!) to figure out which blocks have been outlined and which ones have not.

I spent Monday and Tuesday finishing all the piano key and outline quilting on the border motifs (minus the corners).  When my family came home and looked, nothing looked all that different to their eyes.


Oh well...Teresa knows that she is getting closer to her goal.


I have been so thankful for a good thimble and a little pile of rubber finger cots.  The finger cots really help me get a grip on the tiny quilting needle, especially when I get a chance to really load it up with stitches before pulling the thread through...


I have a bad habit of thinking that when the center of the the quilt is quilted, I'm almost through.  Well, I calculated last night that the center part is 5184 square inches.  The outer borders on this quilt are almost just as much "real estate" - 4224 square inches.  No wonder I have been so hard on myself!  

It sounds like I need to be a little more patient with the paint drying MYSELF...

...while working on the details, the devil has definitely been working on me!

In stitches,
Teresa  :o)

Saturday, January 18, 2014

"Baltimore Rhapsody" Block #22 - Fermata Crocus Wreath


"Fermata Crocus Wreath" is the latest block in my ongoing series, "Baltimore Rhapsody," an original music applique project designed in the Baltimore Album style.

I wanted a fourth wreath block to combine with the three clef wreaths I have already designed...at some point they will be combined in a smaller, 4-block wall hanging.  When the pattern is printed, it will be added to my online pattern store, www.fabrictherapyonline.com.


The fermata is also know as a hold, pause,
and more playfully a birdseye or cyclops eye.

The fermata is a symbol of music notation.  It started appearing in written music during the 15th century.  When this symbol appears over a note, it is an indication that the composer wanted the note held longer than its usual value, or number of "beats."  


The actual length of the note with a fermata is up to the discretion of the performer or conductor.  Sometimes this symbol appears over a barline in a concerto and is an indication that the performer can insert a cadenza, or short, improvised, unaccompanied passage (a great opportunity for the soloist to show off a little).
.

A fermata is a tool of personal choice for a musician...it is as if the composer is inviting the player to put his or her personal mark on the piece. 


It is always amazing to me that so much written music exists all following these little music symbols and their rules.  In music, a symbol speaks a thousand words...it makes explanation and intention unnecessary.


In stitches,
Teresa  :o)

Thursday, January 16, 2014

First post of the New Year...FINALLY!


I think I am finally "over" the holidays...the tree came down yesterday and we have finally put the Polar Vortex behind us.

We had a great holiday season...I actually had all 6 siblings together at one time for a few hours at my parents' house.  I was so overcome with ho-ho-ho that I forgot to organize a picture.  You have to realize that along with these siblings come nieces and nephews from 12 months to 24 years of age.  That's a whole lot of craziness contained in a single moment of time.

I spent 10-11 days in Alabama and really enjoyed the mild temperatures...maybe that made all the below zero temperatures and wind chills even harder to deal with during the Polar Vortex. 

We received a fresh layer of snow today...sigh. 

Look at this quilt stand that my Dad designed and made for me in his wood shop for Christmas!  Isn't it fabulous?


Now here it is with a quilt on it...a quilt that his mother (my Grandmother) made for his sister (my favorite Aunt).  He wanted to make it big enough to see almost the WHOLE quilt.


I just love the antique glass door knobs that he used on it.  I am hoping that it will just fit at the foot of my bed, although that is not a very good place to show it off.  

Unfortunately, my second-floor bedroom doesn't get a lot of traffic. Right now it is in the living room while I play with it.  I may need to rethink its location...

I could only fit a small project in the car for the holidays, so I took a music block and the center medallion for my parents' anniversary quilt to hand applique when time permitted.  After Christmas I put some stitches in, and since coming home I added the last two little bits...a fat squirrel and a bluebird carrying a banner.


They will benefit from the finishing embroidery...there are a lot of details missing.  ALL the hand applique has been finished on the center medallion (and the next music block!), so my portable project will now be all the embroidery embellishments.

Now that the holidays are over, the big push to finish the hand quilting of the first music quilt is ON, baby!  That is my home project...it is just too big to take anywhere.

I hope everyone had a great Christmas and New Year...I hope to catch up with blog reading and answering emails soon!

In stitches,
Teresa  :o)