Friday, December 7, 2012

Ornament exchange offering...


I am a late bloomer.  I have just now discovered the mindless joy of making yo-yo's.  Be still my OCD heart!

Some of you make them by the 100's, not even knowing what you are going to do with them (Margaret D. and sister...).  I have to say it is a very satisfying use of scraps.


It is time for the yearly ornament exchange, so the pressure has been on to come up with a worthy offering.


Since I like the way the red ornaments really "pop" on a Christmas tree, I started with my bright red scraps.


I knew I needed to make them small...as small as my fingers would fumble.  I also wasn't sure how I would embellish them in the end, so I chose to fold the edge under as I made my gathers rather than leave the edge raw.


I love Kay Buckley's "Perfect Circle" applique templates.  I don't use them very often to applique circles...I'm far too lazy and just turn the edges under with a glue stick when I make circles...and I do love making circles, but I diverge...


OK Teresa, stay on task.  Since the yo-yo's finish about half the diameter of the circle you start with, I chose a template and "dug in" to the scraps.

I decided I wanted the finished yo-yo to be about the size of a penny.


They really are addicting to make, which is a good thing!  When they are made this tiny, it takes a lot to cover a styrofoam ball.  Using some red-on-white fabrics in addition to red makes the ornament really sizzle and adds movement.


I used inexpensive pearl-headed pins to attach each yo-yo, starting at the "bottom" of the ornament, and adding them row by row, slightly overlapping them to cover the styrofoam ball.

They held so well, I didn't even have to glue them, but I could have.  I did make a hole at the "top" by stabbing the very tiny exposed place on the styrofoam ball with my stiletto, then filled it with a little craft glue and poked the knotted end of some skinny ribbon into the glued hole for a hanger.  Easy! 

(The time-consuming part is making the yo-yo's...NOTE TO SELF: spend spare time in 2013 making yo-yo's so that I will have lots to play with next year...).

I had some minor foot surgery yesterday, and now I am sitting with my foot propped up, typing (not pretty...), questioning the wisdom of my decision to drive myself to the annual party and ornament exchange this morning.  The stitches are on the bottom of a toe, and it would be better if I stayed home and stayed off of it...but it's a party...hmmm.

I have an hour to decide and make my planned dish to pass...do I act like a responsible adult and stay home or go PARTY HARDY with my friends?!?  Stay tuned...

In stitches,
Teresa  :o)

(p.s. I will do a proper tutorial on these, and a couple more ornaments I came up with, soon...)

Friday, November 30, 2012

"Baltimore Rhapsody" Block 15 - the double bass


The double bass, or string bass, is block #15 of my original applique project called "Baltimore Rhapsody."   (You can read about the back story of this project here.)

This lowest of the stringed instruments is also called the bass viol, contrabass, and bull fiddle.  It is about 6 feet tall and the player of this instrument has to either stand or perch on a high stool to play it (the violin is only 23-24 inches long, in comparison).


The double bass is not just a larger version of a violin.  The "shoulders" (top of the body) are narrower and the back is flat rather than rounded like the violin, viola, and cello.  These and other subtle differences in shape and proportion help to create the deep, velvet tones. 


The double bass has four strings that are tuned in fourths rather than fifths, as the other three stringed instruments.  This helps the player a little, as it decreases the hand span needed to play a scale from 14 inches to 10.5, which is still very challenging!  The thickness and greater tension of the strings requires very strong fingers to play.


The music is written an octave higher than what is actually heard to avoid the excessive amount of ledger lines that would be needed to voice the actual low tones (ledger lines are used above and below the 5-line staff).


Before the time of Beethoven, the bass parts were pretty much just the bass line...rare difficult passages and melody lines.  He had a good friend who played bass, which enabled him to understand the instrument better and write more demanding, thematically interesting parts for the bass to play.  Very few solo pieces were written for this instrument.


In addition to producing the tone by bowing, the bass is often plucked (pizzicato) to produce a clear, resonant tone.


It takes great dedication to play such a large instrument...it can even determine what kind of car you drive!  In addition to being the foundation of orchestral music, the bass replaced the tuba in jazz and dance bands, where is is most often plucked, rather than bowed, to produce the beautiful tones.


One more stringed instrument to go to round out the section...the viola.

In stitches,
Teresa  :o)

Monday, November 26, 2012

"Baltimore Rhapsody" Block #14 - the violin, the top of the orchestra


Here we are at the violin, Block #14 of "Baltimore Rhapsody" (see the back story here).  I drafted so many versions of this block, a couple of which I will probably also turn into patterns...it is nice to have a choice of blocks!  This is a small version of the instrument (because I really wanted to include a fruit compote in the first quilt, since it is such a classic Baltimore album motif).


This smallest, soprano of all bowed instruments is made from about 70 pieces of various kinds of wood - maple, sycamore, ebony, pine, and pear wood.  The pieces are glued together and varnished.  Believe it or not, the quality of the instrument's tone can vary depending on which woods are chosen and the chemical formulas of the glues and varnishes used.


The violin's length is basically the average distance between the shoulder to the palm of the hand, about 23-24 inches.  Smaller scale sizes are made for children - 3/4, 1/2, and even 1/16 lengths.  Like the cello and the viola, the 4 strings are tuned in a series of perfect fifths.  The strings are strung from the tail piece to a set of pegs, which can be individually turned to tune each string.


The sound is made by pulling a bow across the strings.  The bow is basically a wooden stick with horse hair stretched from end to end.  Rubbing the tightened horse hair across the strings causes them to vibrate.  The unique shape of the body and the size of the
"f holes" serve as a sound amplifier and "sweetener."  Bowing technique results in differences in volume, smoothness or shortness of notes in a passage, and whether the tone is forceful and hard or caressed into sweetness.  The strings can also be plucked with the fingers rather than bowed to produce short, pizzicato notes.  It is a very expressive instrument.


The violin is held between the chin and left shoulder, with the left-hand fingers pressing the strings to produce pitches and the right hand holding the bow.

The first violin player, or concert master/mistress, asks the principle oboe for the tuning notes, first for the strings, then for the winds and brass.  The piano and the violin have had the most solo works written for each.  The most common small ensemble is the string quartet, consisting of 2 violins, 1 viola and a cello.  There are no stringed instruments in a concert band, but the violin is the most popular instrument in an orchestra.  It has also been used as a solo instrument in the folk and country music genres.

The next block will be the largest stringed instrument...the double bass.

In stitches,
Teresa  :o)

(Thanks to my oboe-playing buddy, Margaret D, for the reminder!) 

Saturday, November 17, 2012

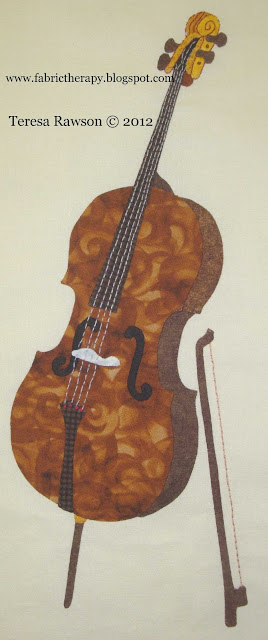
"Baltimore Rhapsody" Block #13 - the cello


The next block in "Baltimore Rhapsody" is the cello.  It's full name is violoncello, which means "little bass viol," but it is commonly just called "cello." 


It is not simply a violin that has been blown up in size...the proportions of the instrument are different, and it is played with a shorter bow than the violin (which means less notes can be played on a single bowing).


Difficult passages can be played on the cello, but it requires greater stretch in the hand to facilitate the placement of the fingers on the longer neck of the instrument.  It has to be played sitting down, between the knees, and there is a spike extending from the bottom to help hold it in place.

Short, "plucked" notes (pizzicato) sound beautiful on this instrument, either as single notes or chords.  This ability and the instruments range made it a natural harmonic choice to accompany woodwinds or higher strings.


In the 17th and 18th centuries, the cello mostly played the bass part along with the continuo/harpsichord (baroque) or double bass.   

A little later, Haydn and Mozart finally gave the instrument more moving, interesting parts.  Ultimately Beethoven came along and brought out the cello's singing quality in his orchestral works, chamber music, and 5 sonatas for cello and piano. 


The greatest and most recognized cello works date back to the early 1700's...a set of six suites for unaccompanied cello by J.S. Bach.  They are very technically challenging and rank among the most significant masterpieces in musical literature.


I fell in love with the cello (and fell hard!) when I first heard a string quartet playing outside, near a fountain, at some fancy event when I was a kid.  That is what possessed me to draw and applique a fountain in this block...I may have to go back and embroider some more water so it will show up a little better!

If there had been a string program in my school in the late 60's/early 70's, I would have played cello.  I love the sound and the versatility of this instrument!

"Baltimore Rhapsody" is an original project done in the Baltimore album style.  Read more about the project here.

In stitches,
Teresa  :o)

Monday, November 12, 2012

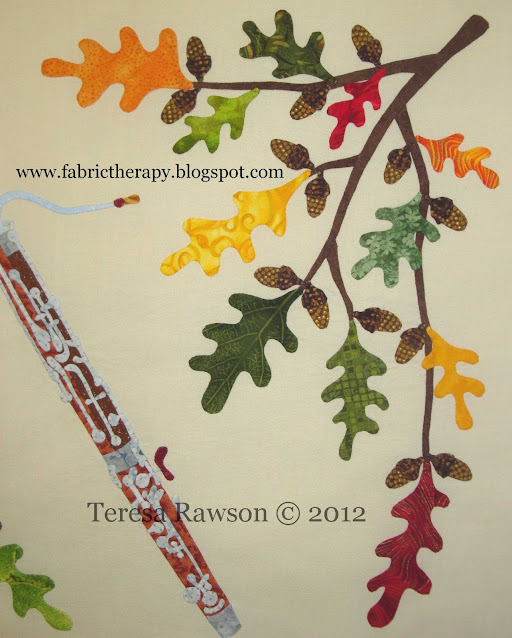
"Baltimore Rhapsody" Block #12 - the bassoon, the bass of the woodwinds


The bassoon rounds out the woodwind section of the "Baltimore Rhapsody" symphony blocks.  (Read more about the "Baltimore Rhapsody" project here.)


The body of the bassoon is wooden and would stretch to 8 feet long if it wasn't doubled up so that the player can reach all the keys.  The longer the instrument's body or tubing, the lower the sound.  The bassoon plays in the bass and tenor range...very low.


A thin, metal tube, or bocal, connects the body of the instrument to the double reed...two pieces of reed that are tied together and trimmed carefully to make the mouthpiece.


Air blown through this double reed causes the reeds to vibrate to produce the tone in the same way as the oboe and English horn.  Some people consider the distinctive bassoon sound to be the "comedian" or "clown" of the orchestra.


The bassoon represented the comical, ever-increasing, enchanted brooms carrying buckets of water in the Disney cartoon Fantasia's version of  "The Sorcerer's Apprentice" by Dukas.


It can also play sweet melodies or whisper the deep tragic feelings expressed in the opening of Tchaikowsky's "Pathetique" Symphony #6.


Remember the "59th Street Bridge Song" by Simon and Garfunkel (also called "Feelin' Groovy")?  The bassoon was featured prominently in that top 40 hit of 1966 (probably the only pop song to feature a bassoon...).


The bassoon was invented in 1600.  It is used in orchestras, bands, and woodwind quintets (along with flute, oboe, clarinet and French horn).

Next, on to the string section of the orchestra!

In stitches,
Teresa  :o)

Wednesday, November 7, 2012

Possibly obsessive, DEFINITELY helpful...SMALL CONTAINER MANIA!


Since I like to use LOTS of different fabrics when doing applique, many have asked through comments and emails how do I work with so many fabrics and get blocks done so quickly. 

Normally using lots of different fabrics, often for each leaf or petal, would take a long time if I was dealing with yardage or large pieces...choosing a bin, sifting through to find the right fabrics, unfolding, pressing, using, re-folding, putting away...TOO SLOW!


I am guilty of container-mania.  I can't seem to look at any kind of container and NOT think of a way to organize quilt stuff in it!  If you are familiar with my quilt cave, you already know this.  If you aren't aware of my whacky OCD and the quilt cave, click here (and be kind...)


My larger scraps are already segregated by color, but even these medium-sized art bins can be cumbersome when I am working with many colors at once.  They are too big to have many of them open at my fingertips, all at once, as I audition fabrics and group them together to test compatibility.


I found these small bins lately, and realized that I had found a way to speed up choosing fabrics and prepping ahead of doing the glue stick thing on each piece.

They were made to store and organize 4 x 6 and 5 x 7 photos while archiving or scrapbooking (that should give you an idea of their small, handy size).  At my JoAnn's, I found them both in the scrapbooking AND sewing container sections of the store. 


Well, at the risk of ridicule, I will share my latest organizational idea for tiny and small scraps.  It only took one good movie on DVD to establish these little boxes for this project, and now prepping blocks is a joyful breeze.  I picked through my large, "wee bits" (or crumb) bins to find the colors I needed for most all these blocks.


I use the small ones for the tiniest fabric crumbs (pictured below, right)...sometimes just big enough to get one leaf or petal shape out of it.  I can sort through the little container of crumbs very quickly and easily with my large, straight forceps (my fingers are a little clumsy picking up the little bits - have you ever seen someone doing this kind of thing with chop sticks?  It's amazing how agile and quick you can be when clumsy fingers get out of the way!).


I put slightly larger pieces in the 5 x 7 boxes (pictured above, left)...this is good if I am prepping larger pieces or several pieces from one fabric.  These bins are so small, I can have several open at one time around my immediate work area.  (I actually went to my pink yardage and quickly whacked random rectangles with my scissors that were slightly smaller than 5 x 7 in size to establish this box of larger pieces.) 

I used to dig through these large crumb containers...


...they are large and clumsy, and hold a color family ("hot" - reds, oranges, yellows; "warm" - purples, blues, greens; "neutrals" and "browns/blacks").  I spent all my time first digging to choose, then pressing (because they are a jumble on the inside of the big bin).

Using the forceps to move bits around (for speed,) I did a quick press of the desired crumbs only once when establishing these little boxes, then as I use pieces, I put them back in the container stacked instead of jumbled...meaning I don't have to press them ever again.  Taking a little time now saves much time later.  Using the forceps to move them in and out makes this go really quickly.


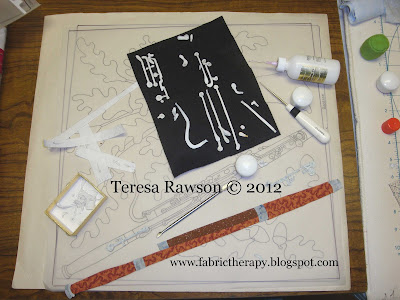
I just use the forceps to quickly lay out some pieces, then use the forceps to easily pick up the tiny pieces of freezer paper and place them on the scraps, then I come through with the iron to adhere the patterns to the scraps, several at a time.  MUCH FASTER!

After cutting out the piece, if there is enough crumb left to save and use again, I use the forceps to quickly stack the pieces back in the small bins, maintaining the nice, flat, "pressed-ness."  When pressed, you can get a lot of crumbs into each small container!


They don't take up a lot of room when closed and stacked, so I can have them right next to where I work, ready to grab.


These little bins make the following nonsense a lot easier and faster to do!


Think this is nuts?  Welcome to my OCD world!  But it is helpful to have OCD, sometimes...

In stitches,
Teresa  :o)