

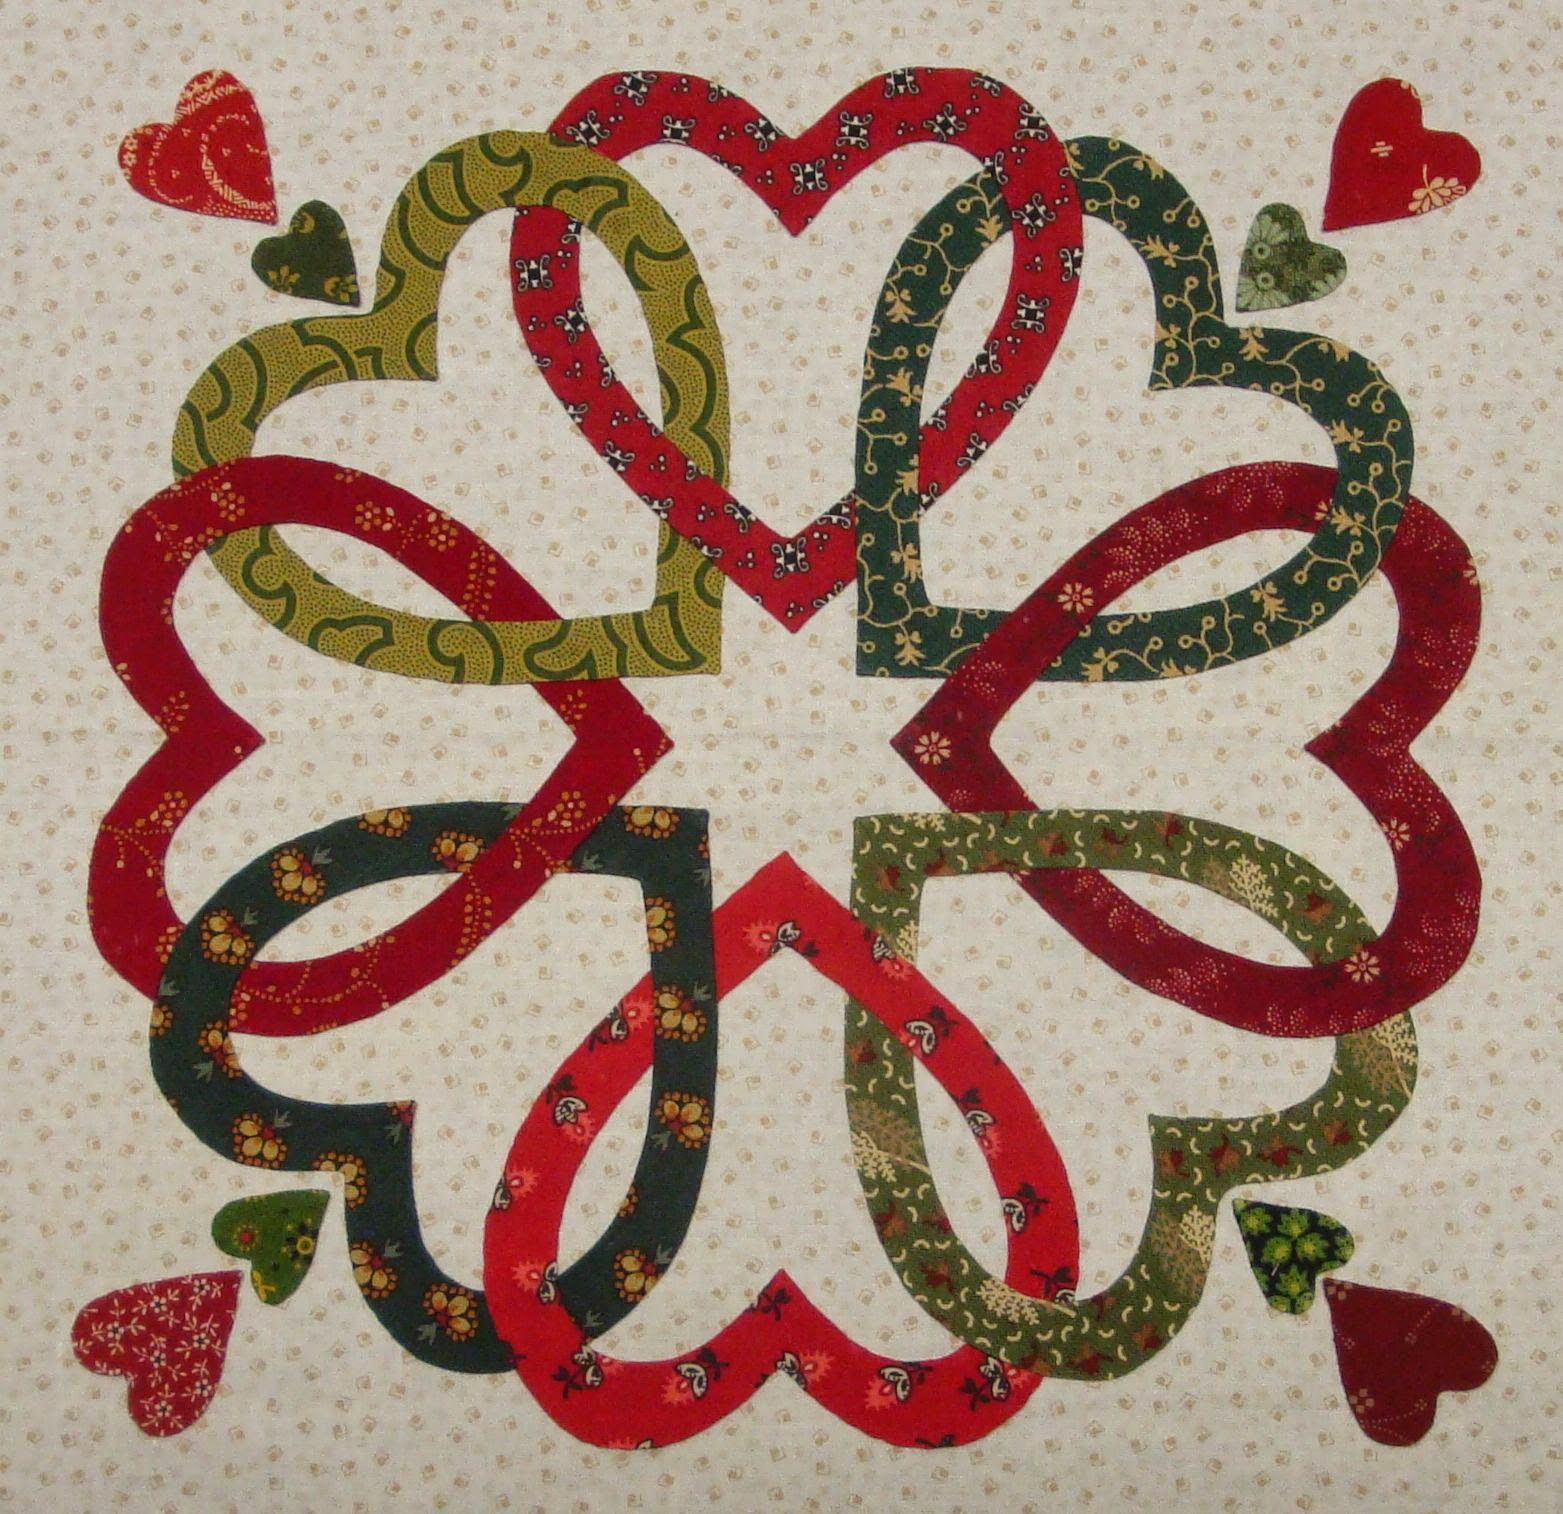
Welcome to the big reveal for "QUILTMAKER'S 100 BLOCKS,
Vol. 10." I am so pleased and proud to have had a block chosen for this edition! My block is called "Tangled Hearts" and is block #912 on page 23. It is now available where quilt magazines are sold.

At the end of this post, you will have an opportunity to enter into a give-away for a copy of this new magazine to be sent from QUILTMAKER and for one of three quilty prizes from me...a total of four fun prizes for 4 lucky who leave comments. In addition, I will announce the winners of my premature "blunder giveaway" of last week.
But first, the block tutorial!
This block calls for 8 tangled, appliqued hearts. The color palette can be anything that strikes your fancy and the method of applique can be of your choosing, hand or machine, turned under or raw edge.
.JPG)
I decided to work from my bright scraps in red, pink, orange and yellow.

I like to do hand applique using a method I will describe in detail in this post, in case you would like to try it. I love the speed, ease and flexibility of this method.
I use the following tools: (numbers correspond to picture below)
1) freezer paper (butcher paper)
2) nice, sharp scissors for fabric and regular snips for paper
3) a stiletto (also called awl - I like the one made by Clover)
4) an Elmer's "disappearing purple" glue stick
5) a small, washable surface to work on (an acrylic ruler or
small cutting mat works great - the excess glue stick will
wash off with warm water)
6) Roxanne's Glue Baste or Elmer's Washable School Glue
7) long handled tweezers, optional (I like using these to handle
all the fiddly paper and fabric pieces)
8) pattern weights, optional (usually the glue will stick well if
you just hold it for a few seconds, but I find these helpful)
9) a pencil
10) a "Fast Turn" (smallest), optional - these are THE BEST
THING to clean out the needle tip of the glue (they can be
purchased here from P3 Designs)
.JPG)
Find Pattern Sheet #2 in the pull-out section of the magazine. There you will find heart shapes B, C and D.

Using a pencil, trace the heart shapes on the freezer paper...eight of heart B, four of heart C, and four of heart D...on the non-shiny side of the paper. Here are the eight heart B shapes on eight bright scraps. Press them on the RIGHT side of the fabric scrap with a hot, dry iron, making sure there is a small margin all the way around. The shiny side of the freezer paper will adhere until peeled away.

I numbered each heart pattern so that I would remember the order later on when arranging the 8 prepped hearts.

Using the sharp scissors, cut out each heart, inside and out, leaving an 1/8 inch allowance (or 3/16 inch - the skinnier the allowance, the smoother and less bulky the outer curves).
If you are doing raw-edge or machine applique, no allowance is needed and you probably want to use a light-weight fusible instead of the freezer paper, adhered to the WRONG side of your fabric.
Now I will show you how I prepare the pieces for hand applique.


One at a time, turn the hearts wrong-side-up on a washable surface. I usually use a seldom used acrylic ruler, but they were too shiny for taking photos, so I am using a small cutting mat here.

Working on the edge of the glue stick...

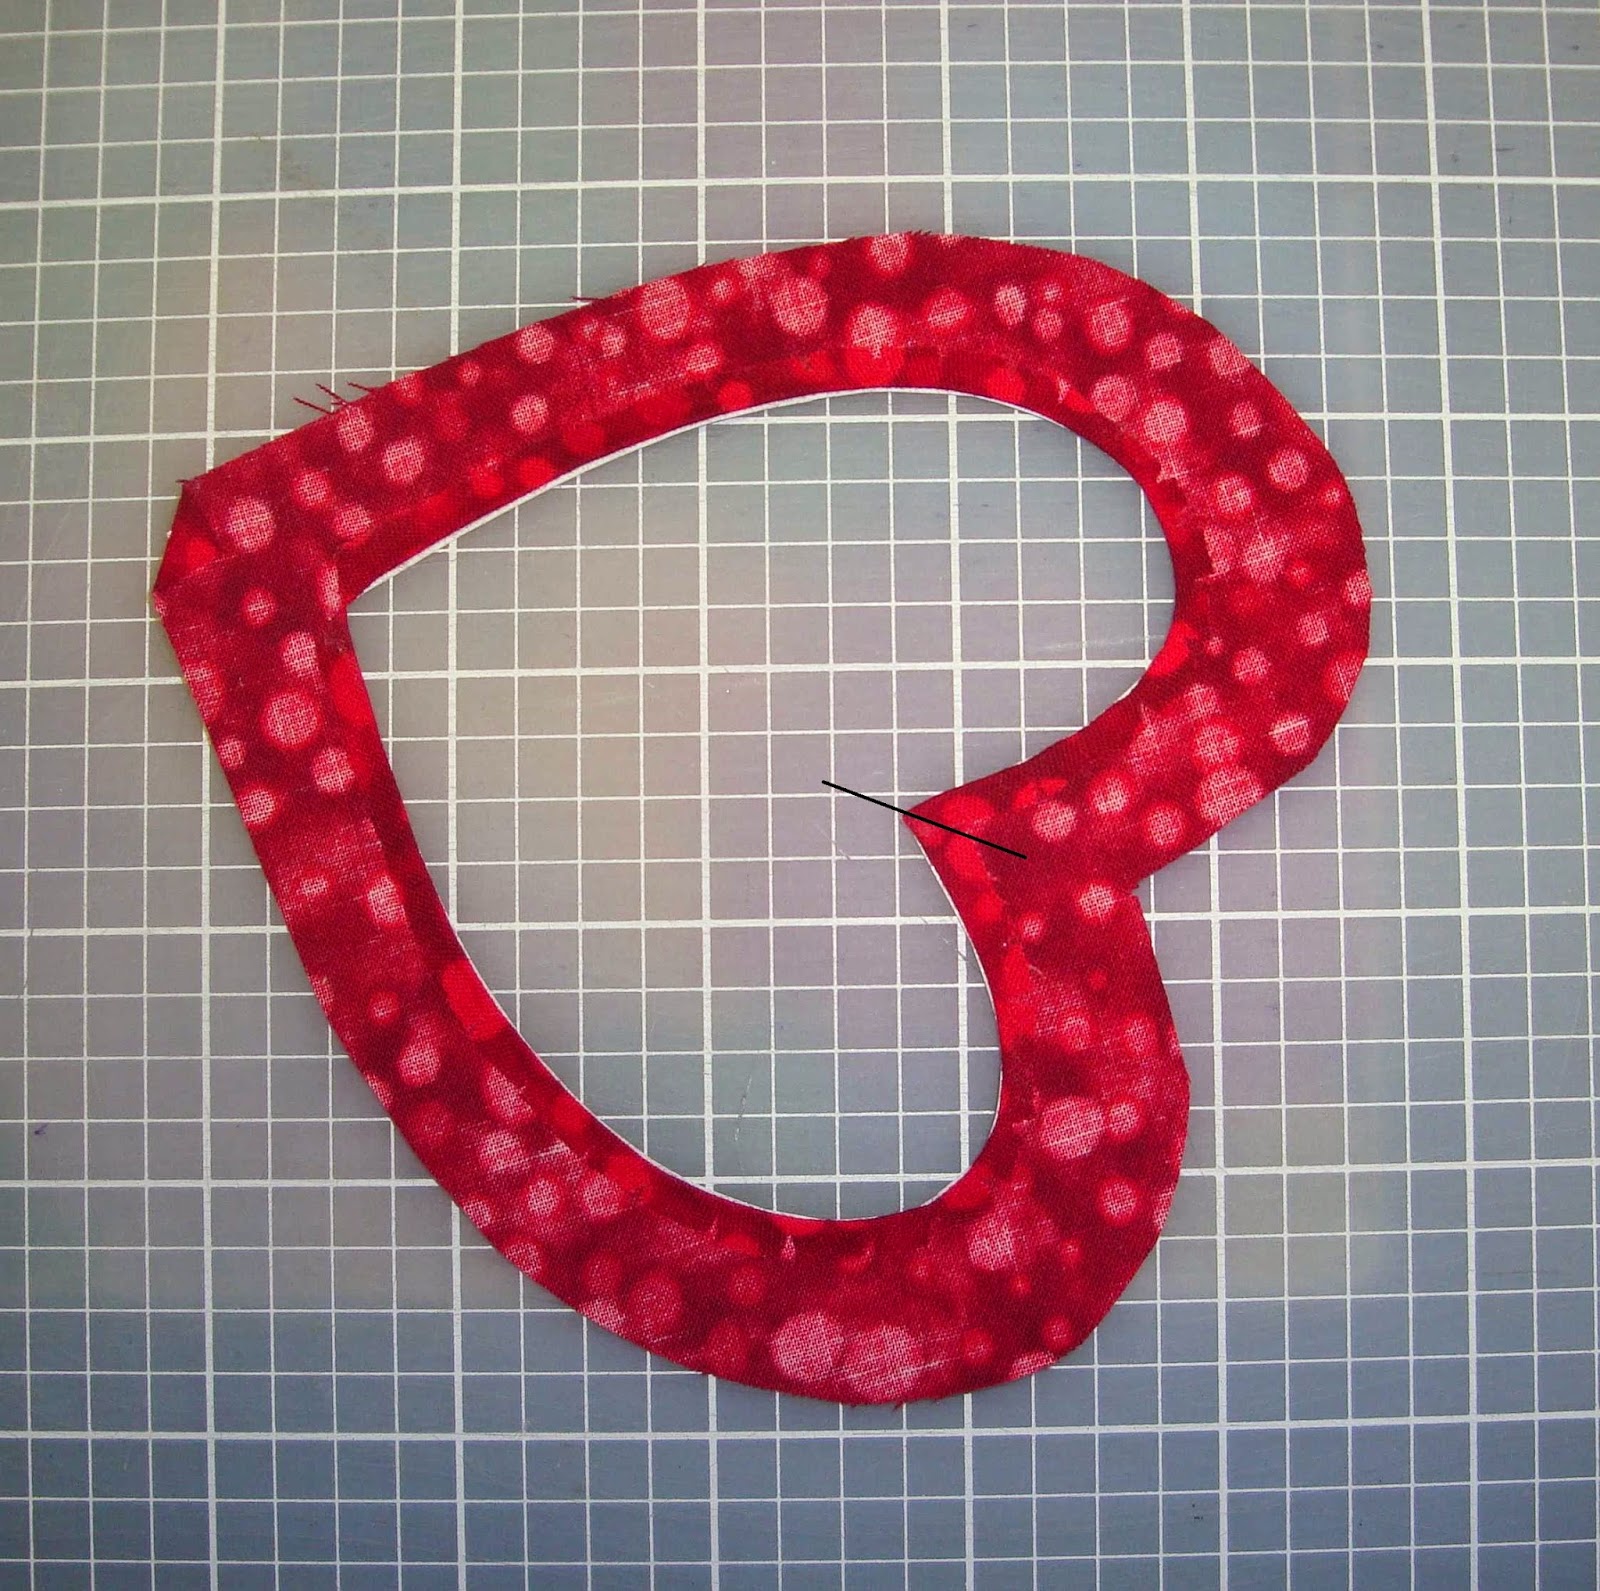
...dab a little glue on the two points indicated below. The "disappearing purple" shows up a little bit on the red fabric (it is much more visible on lighter fabrics - the purple is temporary).

Using the awl, I fold the points over until I just see the white paper pattern point (that is pressed on the other side). The white pattern will always be my guide as I glue the edges over on the wrong side of the fabric.
I like the stiletto because the sharp point helps me to grab and fold the fabric over.

Before gluing under the edges, I need to use my sharp scissors to make a single cut (a snip) at each of the INSIDE corners (see below). Because these are sharp corners, I cut all the way to the edge of the paper pattern.

Before gluing the inside curves, I make additional little snips with my scissors. These will be much more shallow that the ones made at corners...the depth and the frequency has to do with how deeply curvy the area is where I am gluing...where the curve is deeper, the cut is a little deeper and more frequent. This keeps the piece flat as the edges are glued under.
The arrows below show where I cut, and the following pictures show the depth and frequency. Once the edge is glued, it will be easier to see where I made my snips.

When gluing each inside edge, I will fold under at the inside apex to the point of the line drawn below (each side folds in, half way, to meet in the middle and make a nice point).


I use the very edge of my white paper pattern as a guide as I glue.

It is a little hard to see, but I try and show the snips below (I circled a couple of them).

As the curve gets deeper, the snip goes deeper, as shown by the inserted lines parallel to the edge as shown below.

Then I do the same with the other inside curve. The point at the inside apex of the heart is crisp (see below at the the arrow tip).

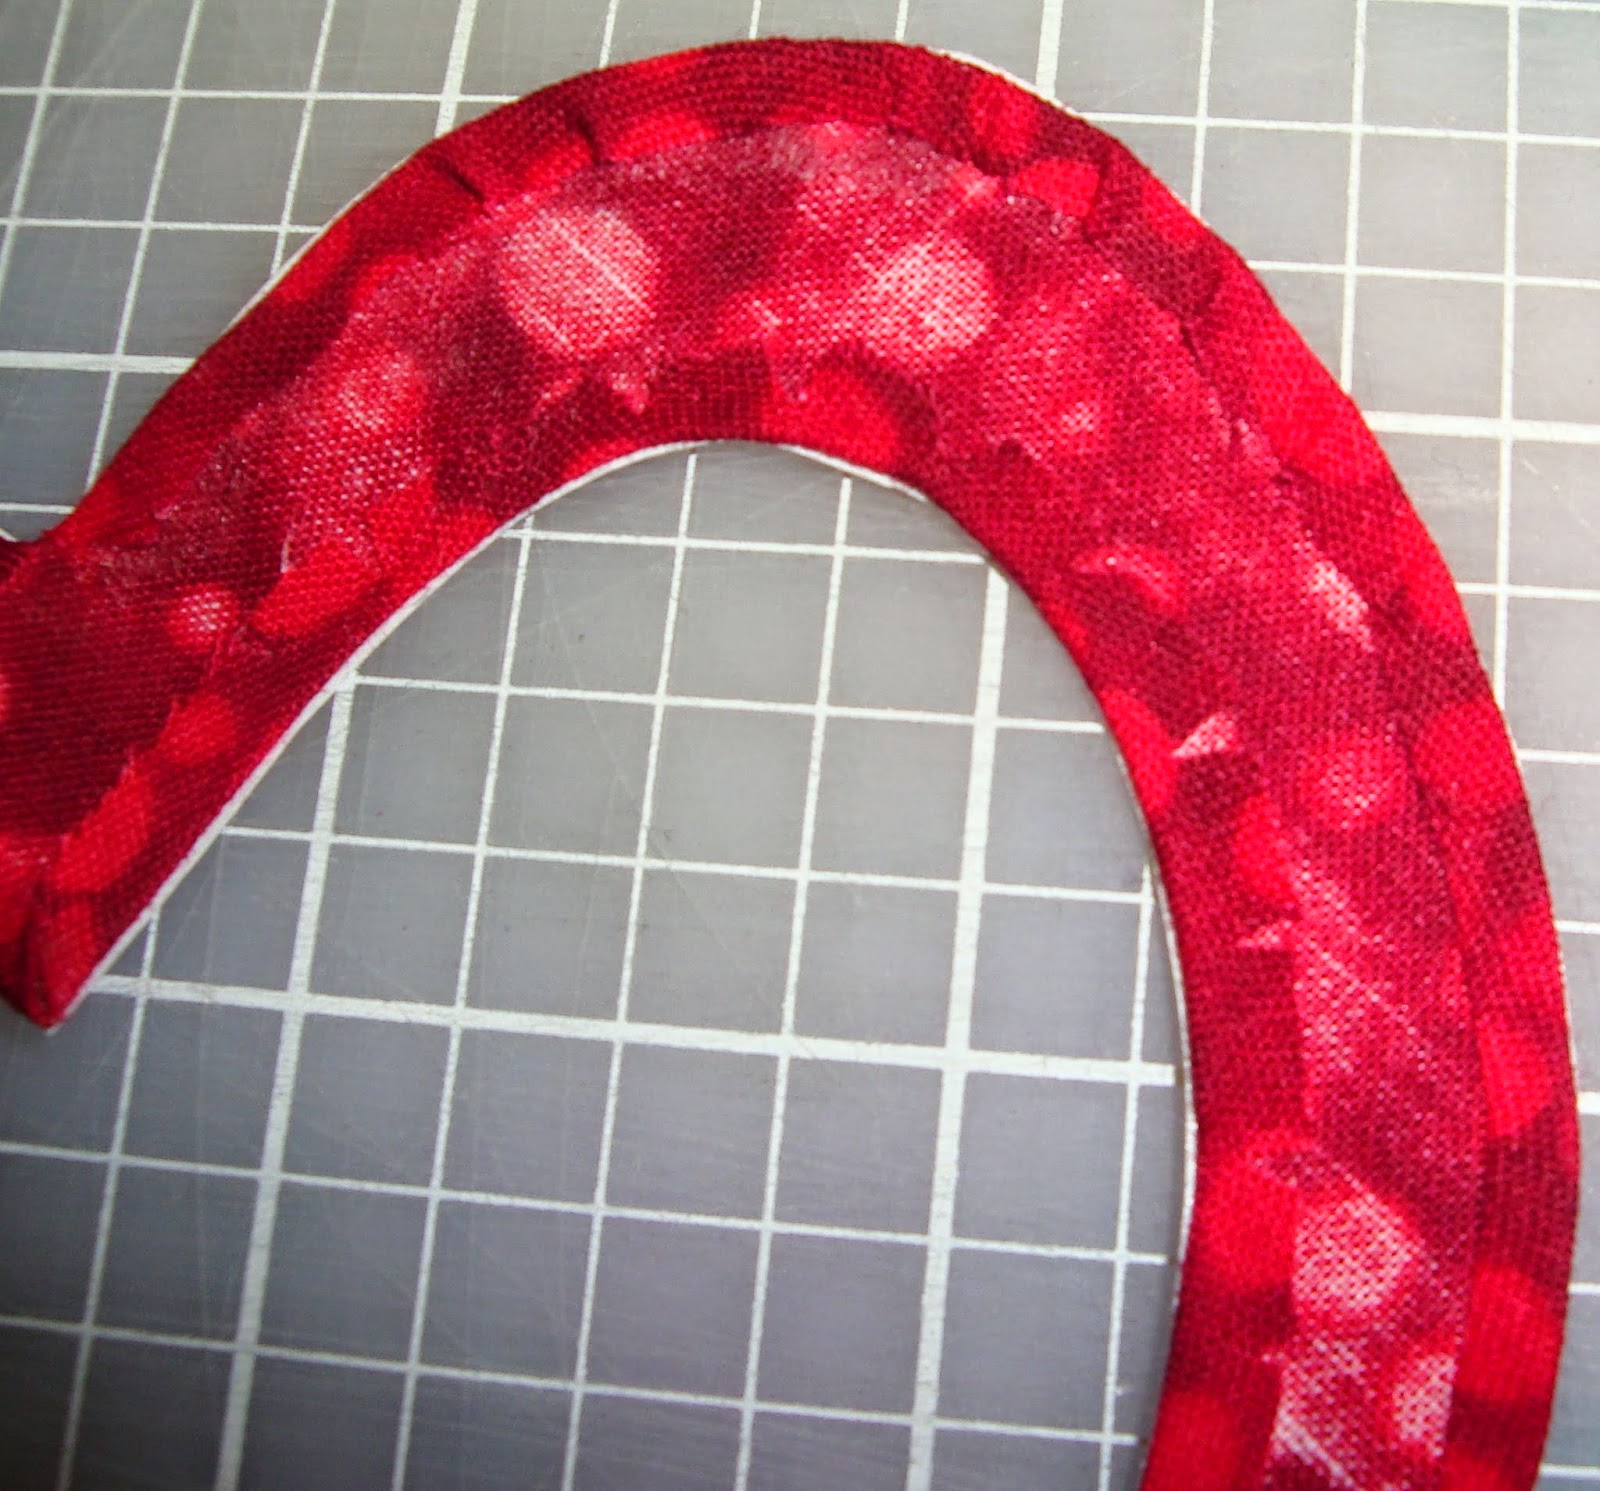
And the inside curve at the bottom snip goes all the way to the paper.

Now I glue the outside edge. Make no snips here! Here I make little pleats as I go. I pull the edge over with the stiletto in my dominant hand and press with the index finger of my other hand, looking for the first sight of the edge of the white pattern as my guide (my pressing index finger is not in the following photo because it is holding the camera).


Since I already glued the tip over, when I fold the other two glued edges I get a nice point (I call this a tri-fold - I also do this on the tips of leaves).

This orange heart makes it easier to see the nice, crisp point.

As I work and the surface I am working on gets sticky from the glue stick, it is easy to wash and dry the ruler or surface, then get back to work.
The purple glue stick shows up a little better on this yellow heart.


The FINISHED size of the block will be twelve inches. I started with a 14 inch block. I always use a larger block for applique, then trim the block to working size (12-1/2 inches) after I've hand stitched, soaked out the glues, pressed the piece flat, flat, flat. Then I use it in my project and the finished size is 12 inches square.

Freezer paper can be used to label pieces...just a tiny scrap of freezer paper as a label pressed on the right side of each piece can eliminate confusion.

There are a few choices of how to proceed with the layout of the prepped heart rings. If I am making more than one of a particular applique block, I like to draw a template on tracing paper. It is a little more trouble, but worth it for multiple, completely identical blocks. I do it in pencil first, then go over it in ink (ultra-fine Sharpie marker) when I am sure it is accurate and correct.

Or, I at minimum draw up a template with lines drawn up-and-down, side-to-side, and on the diagonals, as below.

At the very least, you could fold and lightly press the background to reveal the same guiding lines that I drew above.

The center of each heart will line up over each of these 8 lines, and the distance between the bottom, inner-most points of opposite hearts is 1-1/2 inches.

I am working over a light box (if you don't have a light box you can open up an Ott light under a large, square acrylic ruler).
I will wait and cut open each heart as I work around the ring of hearts.

Above, I show how I will cut the heart rings open in a place where the cut is centered over the heart to the right.
The Quiltmaker editors put a dotted line on the pattern to indicate where to cut, but I cut as I go so I make absolutely sure I cut in the right place for it to be hidden!

First, I lay out the hearts in the order that is pleasing BEFORE I cut them open and tangle them up! Below, they are in place, but not woven together.

One at a time, I will cut, weave, and glue baste the hearts to the background. I use TINY dots of glue ("dot-dot, not-a-lot") to glue baste the pieces to the background. Below, I am holding up the edges of the piece with my clumsy fingers, but I prefer to work with my long beading tweezers.

Here I have placed my glue dots, but I don't stick the red heart down until I've enclosed the yellow heart.

The pattern weights hold things in place while I pull things up to apply the tiny drops of glue.


Once the ring of hearts is in place and glue-basted, I prep the smaller heart accents. Again, I use my dry iron to press the freezer paper patterns to scraps of yellow, orange, pink and red on the right side of the fabric. Then I cut each one out leaving a 1/8 inch margin.

After I glue the edges under, I remove the freezer paper pattern and replace it with a tiny freezer paper tag so I can keep up with where each heart will go (top right, TR, etc).

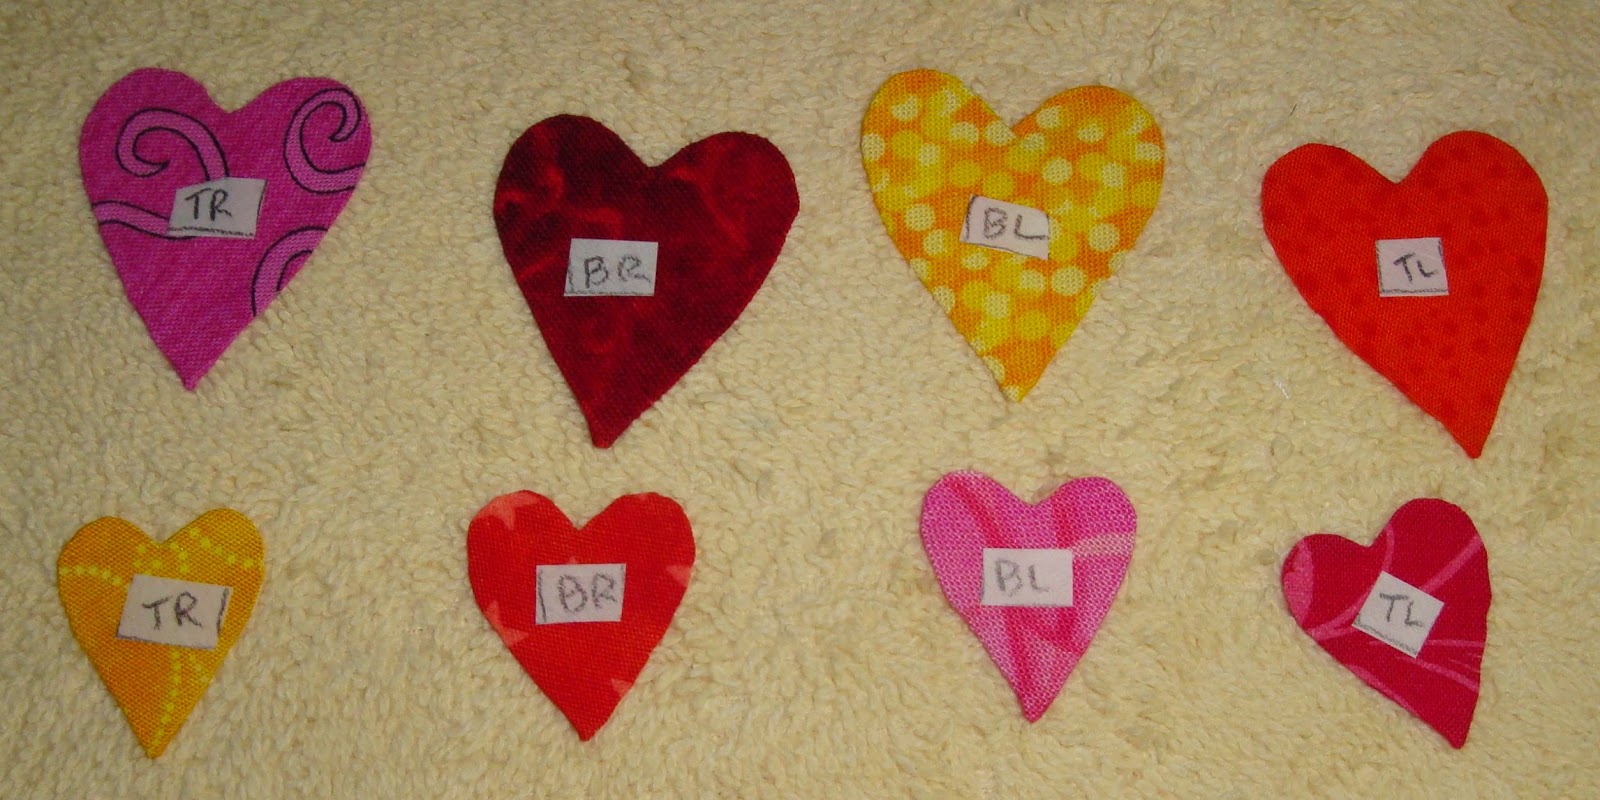
Then I glue baste the little hearts into place, centering them on the diagonal lines that are either lightly pressed into the background or drawn on the tracing paper template, if I took the time to make the deluxe lay-out template.


After the glue is dry enough to be secure, I use the stiletto to pry up the edge of the pressed labels...

...then I use my tweezers to remove them!

Now I am ready to hand applique all the edges down using silk thread and my best invisible stitches. The glue baste allows me to do this without annoying pins catching my thread. Here is my block, all ready to start stitching!

After I do all the hand stitching, I soak the block in warm water with some gentle squeezing and multiple water changes to remove the glues. I use archival glue, with no acid, but I still prefer to remove the slight stiffness of the glues.

Then I place the block on a clean towel, roll it up, and squeeze gently (DO NOT WRING!). After the block mostly air-dries, I press it, right-side-down, on a dry towel. Once pressed, the block can be trimmed down to 12-1/2 inches.

Here is the block done in Reproduction fabrics.


And now, THE GIVE-AWAY!! On Thursday morning, November 20 at 6:00 AM, I will use a random number generator to pick 4 lucky winners from among the people who leave a comment on this post and follow my blog. Quiltmaker will send out one copy of this fabulous, new publication and I will send out 3 quilty surprise bags of applique-related goodies (no anonymous bloggers, please...). All winners will be revealed in a post on Thursday, November 20.
And now for my BLUNDER GIVE-AWAY from last Monday. (It's a long story...I posted this post a week early and needed to take it down, but not before there were commenters! How embarrassing!)
1) Karen of Quilts, Etc. blog
2) Teresa in Music City of A Quilt and a Prayer blog
3) Judy Dietrich
4) Janet
5) Nancy of Tattered Garden Quilts blog
Congratulations to these winners and good luck to the ones will be revealed on Thursday!
I hope you will all try this method of applique!

Check out other block designers this week by visiting the Quiltmaker Blog and following the links! I am grateful to the nice people at Quiltmaker for this opportunity to publish a block!
In stitches,
Teresa :o)
I am in awe of your patience with this technique - and as always, your work is just fabulous. Congratulations on having your beautiful block in this issue.
ReplyDeleteThis does not surprise me at all. You are so talented. So happy for you to be in this issue. Beautiful block. Thank you for always sharing your tutorials with us.
ReplyDeleteRondi
What a beautiful block! I love hearts, so this block caught my eye immediately :) And thanks for the great tutorial as well.
ReplyDeleteCongrats on getting your block published!! I like the bright hearts, but I love the greens used in the repro block more. What a neat way of prepping these hearts & the center star is quite a fun surprise.
ReplyDeleteOh, wow! I see why Quiltmaker choose your block. It is gorgeous. It looks so intricate, however, your clear instructions make it doable. Congratulations on being published.
ReplyDeleteLove your block and your process and pictures are so clear it makes me feel like I may be able to do it too.
ReplyDeleteTeresa, congratulations for having your block published. It is amazingly beautiful!
ReplyDeleteLove your block!
ReplyDeleteThanks!
Congratulations for having your block included in the latest edition of Quiltmaker! I love your block!!! What a great tutorial with fantastic pictures. I've never tried this method before. I'll definitely return to this post and give it a whirl. What a great tip to use freezer paper bits to label pieces! Thank you!
ReplyDeleteThat's a great block! Your tutorial is wonderful, very clear and down to the last detail.
ReplyDeleteGood job
Love the block, and am really over the top about the red and green one! Thanks for the opportunity to win a copy of the magazine - I do believe I have all issues(except this one) in "the library"!
ReplyDeleteYour block is just lovely--and that tutorial is terrific, Teresa. Thanks so much for the chance. Hugs, Julierose
ReplyDeletecongrats on the block being in the magazine - would love to win a copy!
ReplyDeleteCongratulations. It is a beautiful elegant block that would be a lovely addition to any album quilt.
ReplyDeleteI check your Blog daily and love your use of color and style. So glad to see you in the 100 block edition again!
ReplyDeleteCongratulations! This is a wonderful block and I love that you've shared your process with this tutorial. I have been following you (some might consider it stalking) for quite some time and I rarely comment, but I just had to for this post. Your work is awesome and I can't wait to get my magazine. I will be attending a wedding this winter and it will blend two families. This block is perfect! Thanks again. :-)
ReplyDeleteI love your block! Congratulations on getting it into the magazine.
ReplyDeleteTeresa, you are the master! You have taught me so much through your blog posts, and you never cease to amaze me with your creativity. Congratulations on your blog being in the magazine! What a well-deserved honor. Have a great week!
ReplyDeleteI get so excited when I see that you have a new post to your blog. The tutorial on the heart block is simply amazing. Your photos are right on target along with the narrative. You're a great teacher. Thanks for sharing your techniques.
ReplyDeleteThis block is so pretty and the tutorial on how to do it is very helpful. Thank you for putting this together and posting it. I am book marking it as a reference for later.
ReplyDeleteWhat a pretty block and great tutorial. I am thinking this block would look pretty all in red to go in my Chester Criswell quilt.
ReplyDeleteOh, girl!!! Never in a million years could I have that block come out right, but I'm so happy to see you make it turn out perfect!
ReplyDeletePrecioso, me ha parecido que... Tengo que hacerlo!!!!
ReplyDeleteAnother gorgeous block!! Thank you for the tutorial! I'm always amazed at your work!!
ReplyDeleteYou have left nothing out in this tutorial and I'm going to pin it!! Thank You!! Those inni corners are the ones that I don't like and you make it look easy! Thanks
ReplyDeleteNow I see how you achieve perfection in your applique work. Great tutorial and am anxious to try your method. Congrats on your block publication.
ReplyDeleteTerry
I so admire your meticulous attention to detail. Your applique work is amazing! Thank you for the opportunity to win a book :)
ReplyDeleteAs always, Teresa, you give great detailed instructions and make the applique look so easy. Always gets me excited to start an applique project.....but I can't seem to make it "off the blocks". Maybe THIS time! Thank you for the chance to win the mag and congratulations on having your beautiful block published.
ReplyDeleteYour block is so pretty. Thanks for sharing and for the detailed instructions. I will be giving it a try. Thanks for the giveaway too. I've also listed your giveaway on my Giveaway List for just sewers & quilters at wowilikethat.com. Thanks again.
ReplyDeleteLove hearts. Thanks for the chance to win a copy of the magazine.
ReplyDeleteCongratulations on another great block ...and thank the detailed how to you also provide!
ReplyDeleteYippee for me! Thanks, Teresa!!
ReplyDeleteOh,, one of my favorite shapes, hearts. Love the intertwining.
ReplyDeleteSo happy to be one of the winners from last week. A lovely block and you did such a great job with the tutorial.. Thanks Teresa.
ReplyDeleteGreat tutorial. I love the hearts. This will be on my 2015 list of must do projects.
ReplyDeleteLovely block-so very intricate and pretty!
ReplyDeleteExcellent tutorial! I have used freezer paper before but I always put it on the wrong side of the fabric. I will try your method. Maybe then I won't be so intimidated by your spectacular Baltimore Rhapsody quilt.
ReplyDeleteGood Tute! The hearts look nice in all the fabrics. Thanks for a chnace to WIN! I'm following.
ReplyDeleteMost of the time it's better to be early than late. LOL.. fun story. WOW your blog was very interesting. I've never done applique like this before. Thanks for the fun. I'll make sure to follow you.
ReplyDeleteBeautiful block, love seeing it in the different colorways. Wonderful tutorial. Following on Bloglovin'. 24Tangent@gmail.com
ReplyDeleteI love your Tangled Hearts!!
ReplyDeleteI've only done fusible applique but I'll be trying your method, your fabulous tutorial makes it look very 'doable'
your instructions made this applique block doable for me. I love the block, but I usuallt shy away from applique. With these instructions I think I can do this. Thanks!!
ReplyDeleteThere are times when our own hearts can become tangled. You have done a superb job on teaching us how to make Tangled Hearts. I just love your block so much and am looking forward to make these for me. Thank you for being a part of this blog hop and the chance to become a winner. This magazine is just awesome and winning one would be just amazing. I also would be honored to win one of your goodies. We all love to have a nice squishy package waiting in our mailbox to pick us up and it just makes your day so much more special.
ReplyDeleteSandi Timmons
sandit1@sbglobal.net
Hi, Love your block! Gotta try it. You make is look doable by seeing all the steps on your site. Thanks.
ReplyDeleteFabulous block! You always give such great instructions!
ReplyDeleteThanks for the AMAZING tutorial!!!
ReplyDeleteWow, thanks for the amazing tutorial!
ReplyDeleteYour block is just beautiful! And you are one very talented lady.
ReplyDeleteLovely block! Thank you for the easy to follow instructions and for the giveaway.
ReplyDeletebeautiful block and excellent instructions
ReplyDeleteWhat an impressive tutorial! and a lovely block!
ReplyDeleteI love this block! I use a method very similar to yours but I haven't used the glues. I prep my pieces but use pins. After seeing your beautiful work I will try the glue on my next project.
ReplyDeleteWow! what a detailed tutorial. You're very coordinated to be taking your own photos and working through the applique process. I've always had my freezer paper on the wrong side but I can see how following your method would work better and no burnt fingers! Love the block and the surprise star in the middle.
ReplyDeleteLove to applique! Have not tried the freezer paper method, but your instructions are great......might have to try it!
ReplyDeleteI want very much to learn applique. I love the looks of your technique for this block. Maybe I can do it. This coming year is dedicated to learning new techniques. No more putting it off. Thank you for "Tangled Hearts".
ReplyDeleteFabulous work! This is such an impressive block. Thank you for showing the steps so clearly!
ReplyDeleteJackiethompson323(at)gmail.com
Since I am trying to learn needle turn applique this has been the best tutorial that I have seen yet. Thank you very much for all the information. Your hearts are beautiful
ReplyDeleteCongratulations!!! mumbird3atgmaildotcom
ReplyDeleteJust saw Baltimore Rhapsody Sympathony in QN! Congratulations. Love everything you do; great blog.phyllisjoconnor@gmail.com
ReplyDeleteI love your block-- and the tutorial. I am going to add your block to my Favorites in Feedly. Yeah-- so happy I found your blog. Thanks so much
ReplyDeleteFabulous design! I think I may have seen it a week ago...giggle...so glad it is back! Congrats on your design and thanks for the chance!
ReplyDeleteOMGosh - your block is fabulous!! Thanks for the detailed tutorial and for the chance to win :)
ReplyDeleteDebby E
samtaylorcjsmimi@yahoo.com
Aaaaaah!! I love your entwined hearts . . . perfectly darling! You did a great job of outlining your process, too -- I really appreciate that!! :)
ReplyDeleteVery pretty block and great tutorial. I have tried your method and I have never had better looking results. Thanks!
ReplyDeleteLove your hearts and tutorial. Can't wait to try it.
ReplyDeleteMarge
mnjberg@gmail.com
Beautiful block and thank you so much for the tutorial! I really have to try this. And I look forward to read more of you as a new follower by email.
ReplyDeleteWhat an incredible tutorial - I don't do much applique and certainly not this involved -but with your step by steps I just might try. This would be a wonderful ring bearers pillow pattern!!!!
ReplyDeleteGorgeous block! I'm not a strong appliquer YET ... but I could at least make one of your beautiful blocks to frame, or a pillow. Thanks for sharing - and the chance to win!
ReplyDeleteHello! This is my first time visiting your blog, but I will be back! I love hand applique, and appreciate all the tips in your block tutorial. Oh kitty! I love kitties, too and had a big smile on my face when your blog header came up. You block is one of my favorites in the new issue. I love how the points of the hearts make a tiny star in the center of your block. Beautiful. Have a super day! curlicuecreations@gmail.com
ReplyDeleteI love your block. Gonna try your method! love the weights you made!! Thanks for the great block.
ReplyDeleteThe tutorial was great, thanks so much.
ReplyDeletedawnm1993 at gmail dot com
My goodness. What clear pictures for illustrating this technique. Love your block. Thanks so much for sharing.
ReplyDeleteThank you for the sharing. would love to win the book of blocks to give me more ideas on what I can try sewing.
ReplyDeleteA great tutorial Teresa! And a fantastic block... how can I resist?!?!
ReplyDeleteI have to try it!
I learned more about applique from this blog than I've learned from classes! Excellent! I might even be tempted to try it. hehe
ReplyDeleteWhat a wonderful tutorial!!! Very detailed....so you can't go wrong in making the block! Thanks so much for that! Love the block!
ReplyDeleteHello,such a great tutorial! Saving this one! Thanks!
ReplyDeletemsstitcher1214@gmail.com
Thank you so much for sharing this technique, I have been a quilter for over 20 years, and never saw this approach, I usually wrap the fabric around the freezer paper. Thanks so much for the pictures. Love your block, congratulations. Your work is truly meticulous. Thanks for the chance, at the giveaway.
ReplyDeletejanie.mccombs(at)yahoo.com
I love the techniques you used and the great descriptions of the steps! Thanks for the inspiration!
ReplyDeletewould love to win either the book or the quilty package
ReplyDeleteGood tutorial and the finished block is beautiful!
ReplyDeleteLet me start at the beginning...I love your blog header photo :-) Your sweet feline is adorable. I remember following along as you made your beautiful musical instrument quilt. Absolutely fabulous piece of art!
ReplyDeleteNow to this amazing post here...this is going to be a go-to tutorial spot for me to learn this technique. I've read from you before how you do it but this post really is thorough and inspiring. Thank you for taking the time to share it!
Your heart block is gorgeous in those bright colors!
Thank you for THE BEST tutorial on applique I've seen--and the block's "not bad" either. I'm looking forward to trying this method.
ReplyDeleteWhat wonderful, detailed instructions! I'm anxious to give this a whirl.
ReplyDeleteCongrats on having your block included! It is a classic design, and I appreciate the carefully written, comprehensive tutorial!
ReplyDeleteWhat a colourful block! Love it and thanks for the instructions. Much appreciated!
ReplyDeleteLove the block!! Fantastic tutorial!! Thanks for a second chance. Yay!
ReplyDeleteLove your block and those instructions are so clear and interesting. I have even seen some of these tools. Makes me want to try this.
ReplyDeleteWhat a cool way to create a sophisticated block.
ReplyDeleteI love applique and will definitely try this method. I love the block and I know I will use it! Thank you!
ReplyDeleteGreat tutorial. Thanks for sharing. Lovely block!!
ReplyDeleteYour heart block is adorable! Thank you very much for the great tutorial on how to make it. I have signed up to follow your blog by email. You do beautiful work. Thanks, Cynthia cknapp3626@sbcglobal.net
ReplyDeleteAbsolutely love your block. Thanks for the very clear instructions.
ReplyDeleteI can't thank you enough for the detailed tutorial. I am a new follower; clearly, there is a lot I can learn from you.
ReplyDeleteLove your block! I have the perfect spot for it!
ReplyDeleteI am really trying to develop the patience to do beautiful blocks like yours. I'm not impatient with the process, I get frustrated with my clunky arthritic fingers :P They just don't handle detailed work very well some days.
ReplyDeleteI have to say..ever since you showed the world your fabric stash you became one of my favorite blogs to visit..Not that I want or need that much fabric but your organization gives me hope. I love raw edge applique but your method makes me want to give it a try..
ReplyDeleteThanks for the great detailed tutorial. Your block is lovely.
ReplyDeleteoooohhhhmmmmggggg I love your block, such detail and patience! thanks for the opportunity to win a copy of the magazine and thanks for your tutorial!
ReplyDeleteOh my goodness this is so adorable. Thank you for the wonderful tutorial. I am now following you via email.
ReplyDeleteThanks for the tube - lovely block - and thanks for the nice giveaway.
ReplyDeleteWhat a sweetheart of a block - just what I need to make for my darling D-I-L. Thank you for the block and the tutorial.
ReplyDeleteTangled hearts are so intricate. Stunning!
ReplyDeleteI'm now following your blog. Thank you so much for this generous giveaway.
Your block is gorgeous! Thanks for showing the method you use; very helpful. I follow you with e-mail. sarah@forrussia.org
ReplyDeleteLove your Tangled Hearts block. Nice to have a tutorial to go to if problems with the block.
ReplyDeleteGreat instructions. Lovely block.
ReplyDeleteBeautiful block, and a great tutorial! Now if you could send some courage my way to try your method . . . !!
ReplyDeleteGreat tutorial. I read it through again today. Can't get enough of your applique method. I'm going to try it on something I'm working on now. Thanks a lot.
ReplyDeleteI just found your blog today and love it! Your block is beautiful and thank you for the very detailed tutorial. Your curves are so smooth and the points are very precise so I want to try your technique. I signed up so now I'm a new follower. tkmattson@hotmail.com
ReplyDeleteCongratulations on having your block in Quiltmaker's 100 Vol. 10. Love your block and I love applique. I was blessed earlier this year to take a two day applique class from Pearl Periera. Thanks for a great tutorial and it's wonderful with all the photos.
ReplyDeleteThank you for a super giveaway and a chance to win.
usairdoll(at)gmail(dot)com
I do freezer paper and starch appliqué but I think I'd like to try your method. Thanks for the fantastic tutorial. It's amazing what a little glue can do. (and I have a glass cutting board that is terrible for food prep but is sew useful in things like this) Your block is stunning!
ReplyDeleteGreat tutorial, I love applique! I tend to be a little timid about using glue but I think I'll give it a try!
ReplyDeleteAwesome block! Thank you for showing us how you make the block. Congrats on getting into the magazine!
ReplyDeleteLove your block .I donot do this type of applique but with your instructions I think I can
ReplyDeleteWhat a wonderful tutorial. Thank you very much, I love how it makes a star in the center. Congrats on being chosen to be in the magazine.
ReplyDeleteCongratulations on your block being selected. It is beautiful! The instructions look very good.
ReplyDeleteOMGosh.....what a great tute and a very unique block.
ReplyDeleteVery cute block! Thanks for such a thorough tutorial.
ReplyDeleteCute Block but it looks like a lot of work. However, with your great instructions, I think I'll try it.
ReplyDeleteAll I can say is "WOW!" I have never been a fan of appliqueing, but am an admirer of said method. Having said that, and with the great tutorial you provided for Tangled Hearts, I might be willing to attempt to try one block. It only takes one block at a time to create a quilt of beauty, right?
ReplyDeleteFantastic Block and tutorial! I will try your method for sure!
ReplyDelete<<< Is digging through stash to find fabrics for this block!!! You have my heart all "Tangled" wanting to make this Fantabulous block. Congrats and Thank you "sew" much for sharing with us.
ReplyDeleteA great tutorial on applique! Thank you for posting it. I love your tangled Hearts and can see myself making this block. Thanks for a chance at the giveaway.
ReplyDeleteWhat a beautiful design. Excellent tutorial. I so want to make this but I think it could be addicting and become my absolutely favorite quilt block. #quiltlove.
ReplyDeleteSewCalGal
www.sewcalgal.blogspot.com
All I can say is Wow, that is some block. How beautiful. The quilt is your header is gorgeous, and so is your cat.
ReplyDeleteThanks for drawing my name for the magazine----love this block. Am going to follow the tutorial step by step!! Yeah for appliqué & quilty friends!!
ReplyDeleteTeresa, I am so excited for you. I have every magazine and can't wait to get this one. Your tutorial is just great. Thanks for a chance.
ReplyDeleteLove the block and the method! I have used it several times the past 2 years. I even do the hand applique now that there is snow outside our window and it is too cold to wander out and about.
ReplyDeleteThank you for showing your technique is such meticulous detail. I appreciate the education in addition to the beautiful block design.
ReplyDeleteThanks for the very detailed instructions -- I think I'll be able to make the hearts now.
ReplyDeleteReally pretty, but I think too much work for me! LOL! I am following you via email!
ReplyDeleteWonderful block with so many possibilities, especially for Valentine's Day. This just might get done by then. LOL
ReplyDeleteI'm new to hand turned appliqué. Thanks for your great tutorial
ReplyDeleteI have been a big fan of freezer paper used in quilt patterns! Congratulations, it is such a fun block!
ReplyDeleteAll I have to say is WOW!! Great tutorial. Thank you!
ReplyDeleteI love your block but I think it is way beyond my capabilities. Your tutorial is very thorogh though.
ReplyDeleteYou may have finally convinced me to try applique! The hearts are beautiful.... I am in awe of your patience and talent!
ReplyDeleteYour heart block is beautiful and I love how detailed your tutorial is.
ReplyDeleteYour block is beautiful and the lovely colors make it vibrant. Thank you for the wonderfully detailed instructions.
ReplyDeleteWow - amazing block and tutorial! I have not attempted anything this involved but now after reading your tutorial I think I could. It is lovely!
ReplyDeleteWonderful tutorial, loved reading it. I love applique, it allows your own person touch to the project! Thanks for sharing it. Wonderful Block!
ReplyDeleteI fell in love the moment your block appeared on my screen. I hope I can re-create it exactly as described, using the same colors you did, because they blend so well together. Thanks so much for sharing your instructions and also for the giveaway opportunity. lv2bquilting2@comcast.net
ReplyDeleteHow beautiful! Definitely a challenge for me. Thanks for such a detailed post....
ReplyDeleteI have learned so much just on this post. And you have created a very lovely block. Love it. Thanks.
ReplyDeleteWow! What a gorgeous, intricate block. You have a lot of patience!
ReplyDeleteVery pretty block, and an excellent tutorial. Thanks!
ReplyDeleteAll I can say is "Wow"! That was an awesome tutorial! I don't know if I could applique ONE heart that way, much less eight!
ReplyDeleteWhat an amazing creative block! Love it!
ReplyDeleteAbsolutely beautiful block!! Thank you for the great tutorial!!
ReplyDeletelove the colors you chose. Thanks for the tutorial also i found it very helpful.
ReplyDeleteBeautiful block. I usually use either fusible applique. When I use freezer paper I fuse it to the wrong side of the fabric, spot glue the piece in place, and turn the fabric under as I stitch. When I clip the fabric from under the applique, I remove the paper.
ReplyDeletejitney41gmail.com
wow your block is amazing! Beautiful! I love the name :)
ReplyDeleteI love your block and thanks for the tutorial on it. I am a new follower. Nancy: rangerer@sbcglobal.net
ReplyDeleteI love your tutorial -- I can't wait to start working with applique techniques and this is one of the best tutorials I've seen.
ReplyDeleteThanks!
What a lovely block you have designed. I always enjoy making new blocks. Thanks for the chance to win a great magazine...Ursula....bandu.yeo@gmail.com
ReplyDeleteI have bookmarked your tutorial - I now have hope of achieving sharp corners! Thank you for taking the time to put it together. Congratulations on having your beautiful block published!
ReplyDeleteKim
tnjmom1 at gmail dot com
Amazing tutorial. I enjoyed reading and looking at it as much as I did the first time. Also loved the tutorial with the weights. Very informative. Thank you for all your hard work.
ReplyDeleteCongratulations on having your block published. It is amazingly beautiful. I am looking forward to making it. You made a very detailed and informative tutorial on the appliqué..
ReplyDeleteYour block is beautiful....love the bright colors! And that is an amazing tutorial on how you applique...thank you!
ReplyDeleteVery beautiful. I have used freezer paper before but not in this way I will totally being doing appliqué this way in the future. Thanks for sharing.
ReplyDeleteCongratulations, Teresa! I love doing hand-turned applique. I have seen it done with freezer paper, but never like this. I will definitely be trying this the next time. Thank you so much for your giveaway.
ReplyDeleteThanks for the great tutorial and your block is so colorful and happy! Thanks for a chance to win!
ReplyDeleteFabulous tutorial. Thanks for sharing it.
ReplyDeleteWonderful tutorial, I have now learned a new way to appliqué, I am so impressed with your block, when I get my magazine I am going to make your block the way you taught us. Thanks so much.
ReplyDeleteVery detailed tutorial. Clear and easy to follow. Love it!
ReplyDeleteWow! Thanks for all the tips! I love to applique, but don't have your precision. This tutorial will help!
ReplyDeleteWowzers, that was a great tut on applique. And a fabulous block. I'm making a sampler heart quilt and this block will work in nicely in it.
ReplyDeleteAbsolutely gorgeous! Thanks for the great tutorial.
ReplyDeleteThanks for the detailed instructions!
ReplyDeleteLove it! I have been trying to master your prep technique for a little while now. You make it look so easy! (Your directions are A+) I'll get there, I know, because you keep making patterns that inspire me to keep plugging away at it! Thanks for all you do (I'm working on making my quilting room look like your cave, too. THAT'S going to take me a little longer!) Thank you!
ReplyDeleteI'll have to give your method of applique a try. I'm partial to the raw edge applique but open to trying new things. Love your orange kitty and grand piano!
ReplyDeleteLove your block. What a wonderful tutorial too. I love to have instructions along with pictures. It really helps me a lot.
ReplyDeleteI used your method of applique for many years and loved the precision of it. Now my love is foundation piecing .....it also is great for precision. Love your block !
ReplyDeleteI am now following your blog.
ReplyDeleteI would definitely put Block #912 on my list to do immediately! I love hearts in any fashion and this one is exquisite! Congratulations!
ReplyDeleteYour block is amazing. I've only done a little appliqué but would love to do the tangled hearts block.
ReplyDeleteI love your block & the tutorial is wonderfully done so anyone can understand it. I'm now following your blog!
ReplyDeleteVery cute block! I'm now a follower.
ReplyDeleteQuite a block and great instructions. pjrcontest@msn.com
ReplyDeleteSuper appreciate the tutorial. The block is AWESOME....LOVE it. I see you have a Chief Quilt Inspector too!
ReplyDeleteGreat instructions and pics! Makes it so much easier to understand.
ReplyDeleteI'm not an applicator but you make it took so easy and tempting, great pattern design, but even a greater tutorial. Thanks, Kathy in Colo repzjr at plains dot net
ReplyDeleteHi, I just signed up to follow you. I'm trying to figure out why I have not read your blog before. Can't wait to try your beautiful applique block. I'm thinking this might be extra cute on the back of a black scrub top for my granddaughter who works with troubled kids ages 11-17. They love her holiday scrubs and I think they would be intrigued by the Tangled Hearts. Thanks for a chance to win! b.j.day68@gmail.com
ReplyDeleteThank you for the awesome, detailed tutorial! I really learned a lot!
ReplyDeleteGorgeous block! My mind is whirling with color ideas.
ReplyDeleteLove hearts, this block is perfect
ReplyDeleteWhat a charming block. It actually makes me want to give the freezer paper technique another try.
ReplyDeleteswalker287 (at) aol (dot) com
Thanks for generously posting the details of how you do your applique placement.
ReplyDeleteI really like the star shape that forms in the center of the entwined hearts!
Thank you for the detailed tutorial!
ReplyDeleteI admire the time you put into the preparation of your appliqué pieces. The results make it seem that it's really worth it.
ReplyDeleteGreat to read your tutorial and as a musician (piano) I especially love your Rhapsody quilt. Thanks for the blog and ideas'
ReplyDeleteWhat a beautiful block!!! Thank you for the detailed way you explained how you achieve your applique perfection!!! Thank you for the fabulous giveaway!
ReplyDeleteIt was great to see each step of the creation of this block. The colors look great and will work in so many different color schemes.
ReplyDeleteHello from the chilly shore of Mobile Bay! I follow your blog and thank God every time I read it that He gave you the talent and patience to do such a beautiful job with your appliqué! (Especially since I no longer have the patience to do it!) Thank you for sharing your talents with us.
ReplyDeleteCongratulations! A great block! Hearts are my favorite. And your tutorial is wonderful just read your earlier tutorials about your glueing technique. I have the perfect project cut out to try it on. Will start on it after the holidays. Again, a beautiful block. Thanks.
ReplyDeleteI'm in love with your tutorials! Can't wait to give this applique method a try. The block is beautiful, and I can't wait to get my hands on the pattern.
ReplyDeleteI'm newer to appliqué, but I'm getting better and I'm not so scared of it like I used to be. thanks for all the tips and tricks.....I love the hearts.
ReplyDeletereillyr2(at)hotmail(dot)com
Your blog makes hand applique' look fun and easy.
ReplyDeleteThanks for showing the best way of making a nice block . It' s Fantastic! Thanks you very much.
ReplyDeleteYour heart block is fabulous -- I definitely want to make this for my husband ... and I am a new follower of your blog -- soparkaveataoldotcom
ReplyDelete