Wednesday, September 7, 2016

More finished "Afternoon Delight" blocks...


I have a few more "Afternoon Delight" (Sue Garman) hand applique blocks finished.  They are portable, so I mostly sew on them when I am away from home, waiting on some thing or another.


These will finish 6-3/4 inches.  There are 40 appliqued blocks in this quilt.


I hope to get a lot of the double nine patch and other pieced blocks for this quilt done on my retreat at the end of September.


These are just delightful and fun to do!  It is interesting and satisfying to experience my collection of shirting and repro fabrics as I sew.  When I hand stitch, I can really study what went into the design of each fabric and enjoy each one.  I think I used a different background for every block.

These one-piece designs may not be the most interesting, but they were certainly fun to stitch...just one thread choice per block for them!


I hope to prep the last block for the "Contentment" quilt today. I'm getting more and more excited about finishing that quilt.  I have an idea for the inner border and lots of ideas for the outer border. Hopefully it will come together quickly.

In stitches,
Teresa  :o)

Monday, September 5, 2016

A way to cheat on my applique prep - BRILLIANT!!


I think I showed you this block that I designed before.  It is going to be the center medallion for my "Little Treasures" project.  


It has been languishing on my design wall as I pondered the skinny border that would come next.  I need a 2-inch border - the rest of the quilt is made up of alternating pieced blocks from my friends and my LITTLE TREASURES applique blocks, all finishing 6-inches and all done in Reproduction fabrics.

That's going to be a very busy quilt, so I want a strong border, but not just a boring strip of fabric.


Ta da!  Appliqued red and black stars on alternating black and red squares (these aren't sewn together yet).


OK...I can hear you now..."those are mighty small stars (each block will finish 2-inches) and lots of them...too difficult and time-consuming!

I have found a great cheat, and now I will share it with you!  I made these eight little blocks as an experiment in NO TIME using this...


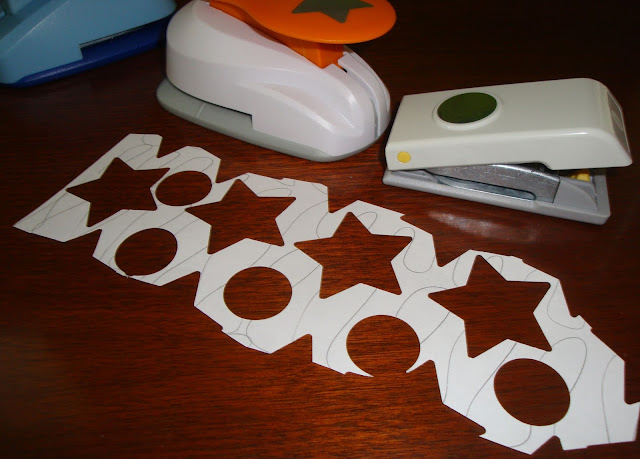
The step in my applique that slows me down is tracing pattern pieces on freezer paper and cutting them out.  I also like to scrapbook, and these paper punches make repetitive shapes SUPER easy!

I have experimented with stars, hearts and circles.  Here's how I do it...


You can use a piece of freezer paper from a roll or a loose sheet. But in the heat of hurriedly pressing multiple freezer paper patterns to multiple little scraps, I sometimes end up accidentally sticking the glossy side of the freezer paper to my IRON instead of my FABRIC.  I hate it when that happens!

Now I scribble on my freezer paper to make the right side obvious with a quick glance...


Now I will know where the glossy side is...


I have been cutting out some circles at the same time so that I don't waste my freezer paper...


I like this Fiskars star as it has rounded star points, which I find MUCH easier to turn under with a glue stick.  If you have a star punch with pointy start points, just ignore the points when you start gluing your edges under.


These stars measure about 1-3/4 inches across, which works well as my squares will finish 2-inches.


It is hard to see, but I cut from the edge of my allowance to the paper pattern between all the star points (where my tip of my stiletto is pointing).


Then I just work my way around, gluing and turning under.


With the state of my fumbly, numbly, cat-bitten fingers, I use my tools for everything, so I use my stiletto point to to loosen one tip of the paper, then remove the it the rest of the way with my big beading tweezers.


I will soak and rinse my squares after stitching to remove the glue, followed by pressing and trimming them to 2-1/2 inches.  So, I glue-baste my stars to the center of a scrap that is at least 3 x 3 inches.

"Dot-dot-not-a-lot" with the glue-baste, not too close to the edge because I don't want to stitch through the glue.


I trim to size (after stitching, soaking, and pressing) with my 2-1/2 inch template.


Pattern weights on top of glue-basted stars...


Cool, huh?  Look what else you can do with punches?


Those tiny circles are 1/2-inch, my friend.  The larger circles are 
1-1/4 inch.  The middle-sized circles are 3/4-inch.  I used to hate cutting out all those little circles from the freezer paper!  With the punches, this is easy-peasy!


The crazy pencil marks help me press the glossy side down onto my scraps, not the bottom of my iron.


Now they are ready for gluing the edges under!


All pressed an ready to put away.


This is what I can do with some of the smallest snippets of scraps I save and they work up really fast.  I am storing them until I cook up a plan for them...


They make all kinds of punches...shapes, squares, HEXIES, circles. I'm just saying...

In Stitches,
Teresa   :o)

Saturday, September 3, 2016

The "Chemistry" block for the "Contentment" quilt...


Block number twelve out of thirteen for our anniversary project, "Contentment" is done!  It depicts my college major and subsequent research lab career.  

Edit: I just realized that I forgot to put the button "French knots" on the lab coat, so not quite finished!  It is always something...

Among other things, I worked in a DNA repair research group doing a lot of tissue culture (growing cells) and running electrophoresis gels with radioactive markers.  That seems like a long time ago!  I'm even a published co-author on some research papers!

Very early in my career, I worked with growing mouse testicular cells and treated them with things that might or might not reduce male fertility, but I didn't want THOSE things pictured in my quilt!!

That is why I had to come up with a picture of me wrangling with a DNA molecule...and holding a flask of/or micro-pipetting colorful liquid, which is hardly ever done, but it photographs well so photographers always ask us to do it when they are taking pictures in the lab.

Anyway, here is the block before I got up the nerve to add some embroidery details.  

Yeah, I have a saying, "better to be vague and ambiguous when drawing shapes so as not to prove you can't draw, than to add too many embroidery details and remove all doubt about your drawing skills."


Oh well, I do think that having a face and fingers does help a bit.


I love my vintage pattern weights!  I have managed to procure a couple of extra sets of these weights, so I will do a give-away next week for you appliquers interested in that sort of thing.


After adding a face and fingers to my chemistry block, I drummed up the courage to add them to the center medallion block, which has been finished for weeks.

Yeah, I won't be hired as a portrait artist in this life time...


The fabric that I used for Steve's skin was so pale that it was hard to distinguish his features from the background fabric, so I outlined his head and arms with a single strand of a slightly darker DMC embroidery thread.

Our faces are comical, but I still like the effect better than just being blank.


ONE more block to prep and sew!  I have been experimenting with something sweet to fill the 2-inch border between the center medallion block and the twelve blocks that will surround it.  This will be an applique border, I think, even though it is a skinny, skinny space with which to play!  Every little mocked-up pieced border I have tried just looked awkward and out of place.

I have also finished a few more "Afternoon Delight" applique blocks and settled on a medallion border for my "Little Treasures" swap project.  More on that next post.

There's nothing like working on several things at one time!  It helped me stay sane this week as major work was being done on our large, metal roof (ALL the screws needed to be replaced!).

In stitches,
Teresa   :o)