Saturday, November 17, 2012

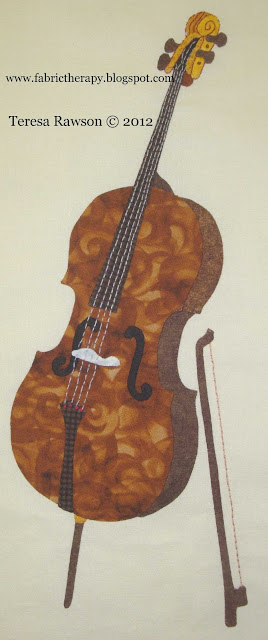
"Baltimore Rhapsody" Block #13 - the cello


The next block in "Baltimore Rhapsody" is the cello.  It's full name is violoncello, which means "little bass viol," but it is commonly just called "cello." 


It is not simply a violin that has been blown up in size...the proportions of the instrument are different, and it is played with a shorter bow than the violin (which means less notes can be played on a single bowing).


Difficult passages can be played on the cello, but it requires greater stretch in the hand to facilitate the placement of the fingers on the longer neck of the instrument.  It has to be played sitting down, between the knees, and there is a spike extending from the bottom to help hold it in place.

Short, "plucked" notes (pizzicato) sound beautiful on this instrument, either as single notes or chords.  This ability and the instruments range made it a natural harmonic choice to accompany woodwinds or higher strings.


In the 17th and 18th centuries, the cello mostly played the bass part along with the continuo/harpsichord (baroque) or double bass.   

A little later, Haydn and Mozart finally gave the instrument more moving, interesting parts.  Ultimately Beethoven came along and brought out the cello's singing quality in his orchestral works, chamber music, and 5 sonatas for cello and piano. 


The greatest and most recognized cello works date back to the early 1700's...a set of six suites for unaccompanied cello by J.S. Bach.  They are very technically challenging and rank among the most significant masterpieces in musical literature.


I fell in love with the cello (and fell hard!) when I first heard a string quartet playing outside, near a fountain, at some fancy event when I was a kid.  That is what possessed me to draw and applique a fountain in this block...I may have to go back and embroider some more water so it will show up a little better!

If there had been a string program in my school in the late 60's/early 70's, I would have played cello.  I love the sound and the versatility of this instrument!

"Baltimore Rhapsody" is an original project done in the Baltimore album style.  Read more about the project here.

In stitches,
Teresa  :o)

Monday, November 12, 2012

"Baltimore Rhapsody" Block #12 - the bassoon, the bass of the woodwinds


The bassoon rounds out the woodwind section of the "Baltimore Rhapsody" symphony blocks.  (Read more about the "Baltimore Rhapsody" project here.)


The body of the bassoon is wooden and would stretch to 8 feet long if it wasn't doubled up so that the player can reach all the keys.  The longer the instrument's body or tubing, the lower the sound.  The bassoon plays in the bass and tenor range...very low.


A thin, metal tube, or bocal, connects the body of the instrument to the double reed...two pieces of reed that are tied together and trimmed carefully to make the mouthpiece.


Air blown through this double reed causes the reeds to vibrate to produce the tone in the same way as the oboe and English horn.  Some people consider the distinctive bassoon sound to be the "comedian" or "clown" of the orchestra.


The bassoon represented the comical, ever-increasing, enchanted brooms carrying buckets of water in the Disney cartoon Fantasia's version of  "The Sorcerer's Apprentice" by Dukas.


It can also play sweet melodies or whisper the deep tragic feelings expressed in the opening of Tchaikowsky's "Pathetique" Symphony #6.


Remember the "59th Street Bridge Song" by Simon and Garfunkel (also called "Feelin' Groovy")?  The bassoon was featured prominently in that top 40 hit of 1966 (probably the only pop song to feature a bassoon...).


The bassoon was invented in 1600.  It is used in orchestras, bands, and woodwind quintets (along with flute, oboe, clarinet and French horn).

Next, on to the string section of the orchestra!

In stitches,
Teresa  :o)

Wednesday, November 7, 2012

Possibly obsessive, DEFINITELY helpful...SMALL CONTAINER MANIA!


Since I like to use LOTS of different fabrics when doing applique, many have asked through comments and emails how do I work with so many fabrics and get blocks done so quickly. 

Normally using lots of different fabrics, often for each leaf or petal, would take a long time if I was dealing with yardage or large pieces...choosing a bin, sifting through to find the right fabrics, unfolding, pressing, using, re-folding, putting away...TOO SLOW!


I am guilty of container-mania.  I can't seem to look at any kind of container and NOT think of a way to organize quilt stuff in it!  If you are familiar with my quilt cave, you already know this.  If you aren't aware of my whacky OCD and the quilt cave, click here (and be kind...)


My larger scraps are already segregated by color, but even these medium-sized art bins can be cumbersome when I am working with many colors at once.  They are too big to have many of them open at my fingertips, all at once, as I audition fabrics and group them together to test compatibility.


I found these small bins lately, and realized that I had found a way to speed up choosing fabrics and prepping ahead of doing the glue stick thing on each piece.

They were made to store and organize 4 x 6 and 5 x 7 photos while archiving or scrapbooking (that should give you an idea of their small, handy size).  At my JoAnn's, I found them both in the scrapbooking AND sewing container sections of the store. 


Well, at the risk of ridicule, I will share my latest organizational idea for tiny and small scraps.  It only took one good movie on DVD to establish these little boxes for this project, and now prepping blocks is a joyful breeze.  I picked through my large, "wee bits" (or crumb) bins to find the colors I needed for most all these blocks.


I use the small ones for the tiniest fabric crumbs (pictured below, right)...sometimes just big enough to get one leaf or petal shape out of it.  I can sort through the little container of crumbs very quickly and easily with my large, straight forceps (my fingers are a little clumsy picking up the little bits - have you ever seen someone doing this kind of thing with chop sticks?  It's amazing how agile and quick you can be when clumsy fingers get out of the way!).


I put slightly larger pieces in the 5 x 7 boxes (pictured above, left)...this is good if I am prepping larger pieces or several pieces from one fabric.  These bins are so small, I can have several open at one time around my immediate work area.  (I actually went to my pink yardage and quickly whacked random rectangles with my scissors that were slightly smaller than 5 x 7 in size to establish this box of larger pieces.) 

I used to dig through these large crumb containers...


...they are large and clumsy, and hold a color family ("hot" - reds, oranges, yellows; "warm" - purples, blues, greens; "neutrals" and "browns/blacks").  I spent all my time first digging to choose, then pressing (because they are a jumble on the inside of the big bin).

Using the forceps to move bits around (for speed,) I did a quick press of the desired crumbs only once when establishing these little boxes, then as I use pieces, I put them back in the container stacked instead of jumbled...meaning I don't have to press them ever again.  Taking a little time now saves much time later.  Using the forceps to move them in and out makes this go really quickly.


I just use the forceps to quickly lay out some pieces, then use the forceps to easily pick up the tiny pieces of freezer paper and place them on the scraps, then I come through with the iron to adhere the patterns to the scraps, several at a time.  MUCH FASTER!

After cutting out the piece, if there is enough crumb left to save and use again, I use the forceps to quickly stack the pieces back in the small bins, maintaining the nice, flat, "pressed-ness."  When pressed, you can get a lot of crumbs into each small container!


They don't take up a lot of room when closed and stacked, so I can have them right next to where I work, ready to grab.


These little bins make the following nonsense a lot easier and faster to do!


Think this is nuts?  Welcome to my OCD world!  But it is helpful to have OCD, sometimes...

In stitches,
Teresa  :o)
Saturday, November 3, 2012

"Baltimore Rhapsody" Block 11 - F (bass) clef wreath


The F clef, or bass clef, is the next block in "Baltimore Rhapsody."  Some people call it the "left" clef because it usually indicates what the left hand is doing in piano music (but not always...).


It is called the F clef because the top left part of the symbol circles around the second line down, which is F, and the two "dots" surround that line as well.


Likewise, the G clef curls around the G line.


I decided since the shape of the F clef was so weird, I would make an asymmetrical wreath.


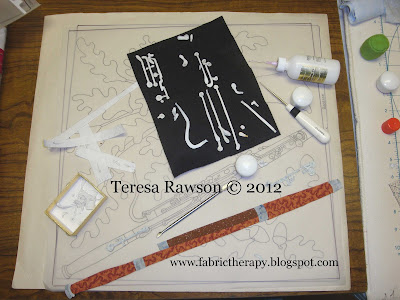
Working over my pattern, I glue basted the vine pieces first, followed by the clef signs.


There is a definite top to this block...the F clef signs looked too weird to me to turn them completely upside down.  When in doubt, add LOTS of cherries to mask the idiosyncrasies.


I get questions about the fact that I use glue and what I do about that after the applique is finished.  Both the Elmer's Disappearing Purple Glue Stick and the Roxanne's Glue Baste are considered archival quality.  But on something like this, where I've put in a lot of hours (and I hope will be around in 100 years...), I like to soak the glue out.  Too much glue can make the block too stiff.

I start with a background cut at least an inch larger in both directions (even if not soaking, a always start with a larger background than required, then trim to size after finishing the block or strip). 

(I have not tried this with pieced backgrounds...I wonder if the cotton thread used to seam the pieces together would shrink and cause puckering.  I need to exeriment with this...)


Since I prewash all my fabric, I don't worry too much about colors running. When I am worried, I start with cold water in the bowl and gradually work toward warm water as I change the water. I find that warm (not hot) dissolves the glue faster for some reason).

After the block has soaked for an hour or so, I gently squeeze-release, squeeze-release a few times.  In the first rinses, the water looks cloudy from the glue.  I change the water a few times until the water looks pretty clear.


I very carefully and gently squeeze most of the water out, spread the block out on a clean towel, then roll everything up.


I gently squeeze the roll - NEVER TWIST OR WRING!


When I unroll the block I place it RIGHT-SIDE-DOWN on a dry towel on my pressing surface.  I press, lifting before moving the iron, the block mostly dry with a dry iron.  Then I turn the block over with the right-side up, and press a little more.  I don't worry about getting it completely dry...I pin it to my design wall to air dry the rest of the way.


I never do my embroidery embellishments until AFTER I rinse the glue out.  I usually don't trim the blocks to size until I am ready to sew them into the top.  A lot of handling can make them unravel.

The bassoon block is next to round out the orchestra woodwind section, followed by the string section.  If you would like the background story about this quilt project, you can go here.

I hope everyone in Hurricane Sandy's path is doing OK.  I'm sure there are many quilters in that area.  My prayers are with you.

In stitches,
Teresa  :o)

Monday, October 29, 2012

"Baltimore Rhapsody" Block #10 - the flute


Block #10 of "Baltimore Rhapsody" is the flute block, the third of four central woodwinds in an orchestra and the only one in which the tone is not produced using a vibrating reed.  Flutes are considered to be in the whistle family, which can be traced back to stone-aged man.  Ancient man made flutes from what was at hand - bone, wood, clay.  Early instruments had no holes, therefore only played a single tone.  As holes were added, it was possible to play tunes.  


The sound is produced by blowing air over the hole in the mouthpiece end of the instrument.  The flute is about 2 feet long and sounds the lowest tone when all the holes are covered...as the holes are uncovered, the tone gets higher and higher.


The flute, along with its close cousin, the recorder, have long been considered "pastoral" instruments - the slender shape makes it a convenient and easy choice for shepherds.  They would fill the countless hours with their flocks carving and playing simple flutes and recorders.


One odd member of the flute family associated with indigenous people of Hawaii and southeast Pacific areas is the nose flute.  Yep...it is played by blowing air out one nostril into the instrument while the remaining nostril is held closed.  No comment.


Flutes appeared in European orchestras in the early 1600's.  They were the natural choice for both sweet, calm melodies and acrobatic, active parts.  They are often used to represent the sound of bird song.


Orchestras typically have three flutes, with the third one switching back and forth between playing flute and piccolo, the smallest, highest member of the flute family.


In addition to the orchestra, the versatile flute can be found in woodwind quintets (with oboe, clarinet, bassoon and French horn), concert bands, and as solo instruments in pop, folk, jazz, rock, and church music.  If you love traditional marches, like those written by John Phillip Sousa,  you have heard the bright trill of the piccolo.
 

"Baltimore Rhapsody" is a collection of instrument patterns that I am drawing/designing.  Each block finishes 15 inches and is designed in the Baltimore album style.  The patterns will be sold individually so that the quiltmaker can assemble the "band" of his or her choice.

I am focusing on the orchestral instruments first and am now trying to decide whether this quilt will contain 16 or 20 blocks...probably 16.  Then I will add folk, church, and jazz instrument blocks in addition to a few surprises.

My thoughts and prayers are with those of you on the East coast, anticipating the arrival of Hurricane Sandy.

In stitches,
Teresa  :o)