Saturday, November 3, 2012

"Baltimore Rhapsody" Block 11 - F (bass) clef wreath


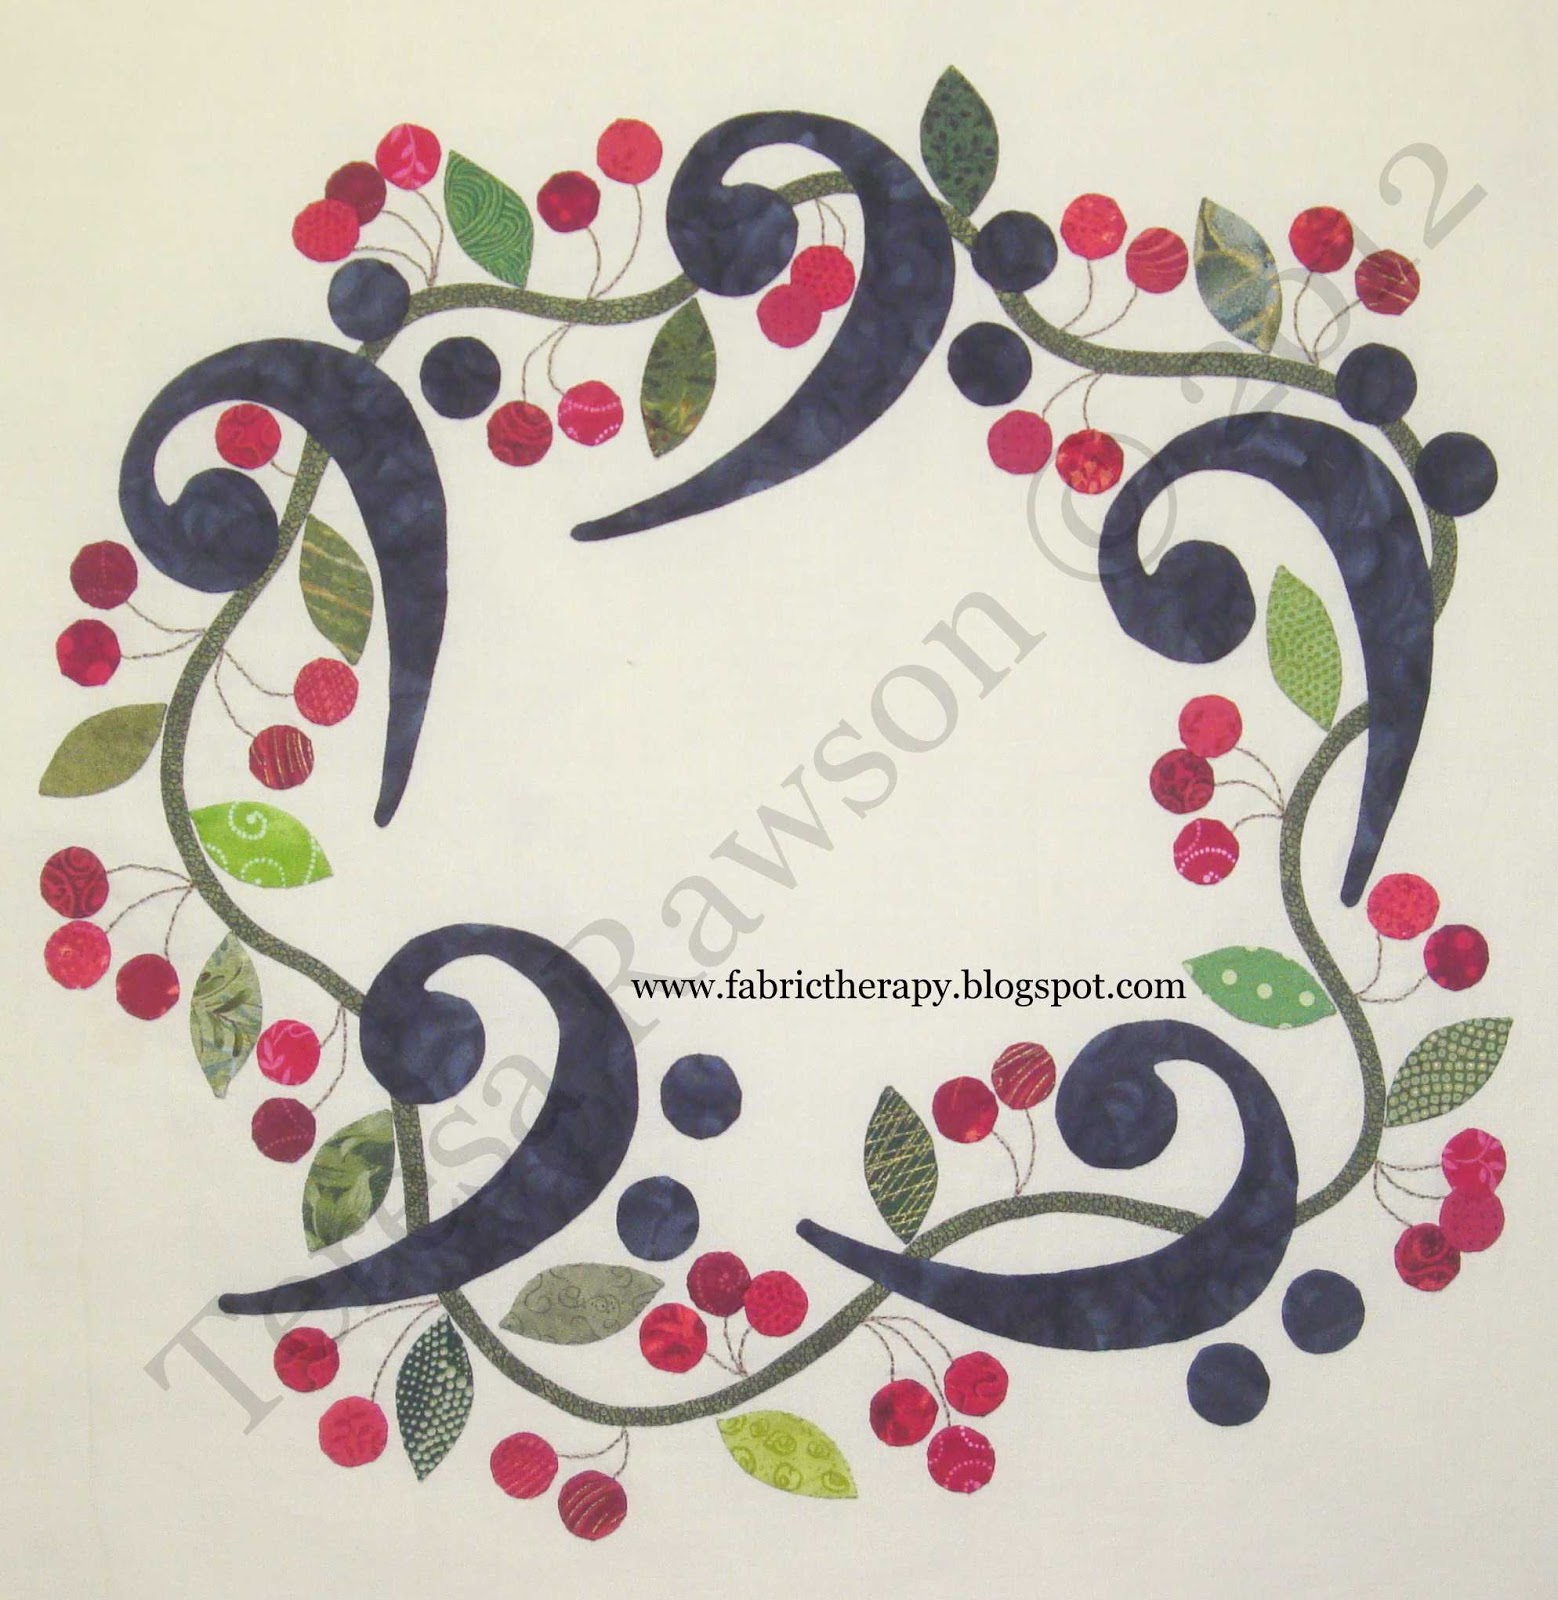
The F clef, or bass clef, is the next block in "Baltimore Rhapsody."  Some people call it the "left" clef because it usually indicates what the left hand is doing in piano music (but not always...).


It is called the F clef because the top left part of the symbol circles around the second line down, which is F, and the two "dots" surround that line as well.


Likewise, the G clef curls around the G line.


I decided since the shape of the F clef was so weird, I would make an asymmetrical wreath.


Working over my pattern, I glue basted the vine pieces first, followed by the clef signs.


There is a definite top to this block...the F clef signs looked too weird to me to turn them completely upside down.  When in doubt, add LOTS of cherries to mask the idiosyncrasies.


I get questions about the fact that I use glue and what I do about that after the applique is finished.  Both the Elmer's Disappearing Purple Glue Stick and the Roxanne's Glue Baste are considered archival quality.  But on something like this, where I've put in a lot of hours (and I hope will be around in 100 years...), I like to soak the glue out.  Too much glue can make the block too stiff.

I start with a background cut at least an inch larger in both directions (even if not soaking, a always start with a larger background than required, then trim to size after finishing the block or strip). 

(I have not tried this with pieced backgrounds...I wonder if the cotton thread used to seam the pieces together would shrink and cause puckering.  I need to exeriment with this...)


Since I prewash all my fabric, I don't worry too much about colors running. When I am worried, I start with cold water in the bowl and gradually work toward warm water as I change the water. I find that warm (not hot) dissolves the glue faster for some reason).

After the block has soaked for an hour or so, I gently squeeze-release, squeeze-release a few times.  In the first rinses, the water looks cloudy from the glue.  I change the water a few times until the water looks pretty clear.


I very carefully and gently squeeze most of the water out, spread the block out on a clean towel, then roll everything up.


I gently squeeze the roll - NEVER TWIST OR WRING!


When I unroll the block I place it RIGHT-SIDE-DOWN on a dry towel on my pressing surface.  I press, lifting before moving the iron, the block mostly dry with a dry iron.  Then I turn the block over with the right-side up, and press a little more.  I don't worry about getting it completely dry...I pin it to my design wall to air dry the rest of the way.


I never do my embroidery embellishments until AFTER I rinse the glue out.  I usually don't trim the blocks to size until I am ready to sew them into the top.  A lot of handling can make them unravel.

The bassoon block is next to round out the orchestra woodwind section, followed by the string section.  If you would like the background story about this quilt project, you can go here.

I hope everyone in Hurricane Sandy's path is doing OK.  I'm sure there are many quilters in that area.  My prayers are with you.

In stitches,
Teresa  :o)

Monday, October 29, 2012

"Baltimore Rhapsody" Block #10 - the flute


Block #10 of "Baltimore Rhapsody" is the flute block, the third of four central woodwinds in an orchestra and the only one in which the tone is not produced using a vibrating reed.  Flutes are considered to be in the whistle family, which can be traced back to stone-aged man.  Ancient man made flutes from what was at hand - bone, wood, clay.  Early instruments had no holes, therefore only played a single tone.  As holes were added, it was possible to play tunes.  


The sound is produced by blowing air over the hole in the mouthpiece end of the instrument.  The flute is about 2 feet long and sounds the lowest tone when all the holes are covered...as the holes are uncovered, the tone gets higher and higher.


The flute, along with its close cousin, the recorder, have long been considered "pastoral" instruments - the slender shape makes it a convenient and easy choice for shepherds.  They would fill the countless hours with their flocks carving and playing simple flutes and recorders.


One odd member of the flute family associated with indigenous people of Hawaii and southeast Pacific areas is the nose flute.  Yep...it is played by blowing air out one nostril into the instrument while the remaining nostril is held closed.  No comment.


Flutes appeared in European orchestras in the early 1600's.  They were the natural choice for both sweet, calm melodies and acrobatic, active parts.  They are often used to represent the sound of bird song.


Orchestras typically have three flutes, with the third one switching back and forth between playing flute and piccolo, the smallest, highest member of the flute family.


In addition to the orchestra, the versatile flute can be found in woodwind quintets (with oboe, clarinet, bassoon and French horn), concert bands, and as solo instruments in pop, folk, jazz, rock, and church music.  If you love traditional marches, like those written by John Phillip Sousa,  you have heard the bright trill of the piccolo.
 

"Baltimore Rhapsody" is a collection of instrument patterns that I am drawing/designing.  Each block finishes 15 inches and is designed in the Baltimore album style.  The patterns will be sold individually so that the quiltmaker can assemble the "band" of his or her choice.

I am focusing on the orchestral instruments first and am now trying to decide whether this quilt will contain 16 or 20 blocks...probably 16.  Then I will add folk, church, and jazz instrument blocks in addition to a few surprises.

My thoughts and prayers are with those of you on the East coast, anticipating the arrival of Hurricane Sandy.

In stitches,
Teresa  :o)

Friday, October 19, 2012

"Baltimore Rhapsody" Block #9 - the French Horn


My original pattern series, "Baltimore Rhapsody," is continuing to grow (you can read the back story here).  The French horn is my favorite brass instrument.  My younger brother, Riley, played French horn and now my daughter does too.  I never get tired of hearing her practice!


As with all the blocks of this series, this one finishes 15 inches square.  Even though I choose to hand applique, they can be done by machine.


Embroidery details make the fuchsia blossoms come alive!

The French horn got it's characteristic shape from it's ancestor, the hunting horn, and even before that, the conch shell.  If you were to straighten out all the tubing, you would end up with a horn of 12 - 16 feet in length...not very convenient to play at high speed from horseback while signaling the hunters!  Some unknown genius solved this problem by winding the tubing around his shoulder and under his arm.


Early "natural horns" had no valves.  To slightly change pitches, the player would loosen or tighten his lips, or simply stuff his hand a little further into the bell of the instrument.  In order to play in more than one key, the player had to stop and insert another "crook," which helped to make the tubing just enough longer or shorter to change all the pitches on the horn (the virtuoso of the time carried many with him).  Later these inconvenient crooks were replaced with valves.


When the French horn started showing up in symphonies, the French people thought it originated from Germany and called it the German horn, and the German people thought it came from France and called it the French horn.

French horn building...tubing and valves.

Bach and Vivaldi first infused their music with the French horn, followed by Haydn and Mozart.  Because it blends beautifully with strings, woodwinds, and other brass, the horn became widely popular in both symphonic and chamber music.  The low tones are deep and solemn, the middle range is rich and mellow, and the high range can be brassy and brilliant.


The characteristic beautiful tone is still being employed by composers (lots of nice horn "licks" in the soundtracks of all the "Harry Potter" movies...).

Bird building 101...

I am making up birds and flowers right and left in this quilt!!  I was looking at pictures of Paradise birds when dreaming this one up...kind of small, exotic birds with pretty head feathers.  I'm just a modern-day Darwin...


I am still working on the pattern printing.  I hope to have the first dozen patterns available on my web site soon, either individually or in discounted bundles.  I am now thinking about sashing for the first 16 blocks...traditional tiny sawtooth sashing or simple strips...hmmm...

Then, on to the borders!

In stitches,
Teresa  :o)

Thursday, October 18, 2012

And the winners are (YES, I said WINNERS...)


Oh yes, I said WINNERS!  Since I had 57 entries (56 comments plus one pleading email with blogger issues), I decided that more prizes were in order.  (Especially since I went through and straightened my quilt book library a few nights ago and realized I had bought two favored books TWICE...).

So, drum roll please....

Gina of Gina Quilts and Knits wins the Halloween Fat Quarter Bundles!  Check out her blog - she has been working on a couple of cool quilts utilizing plaids, a scrappy 9-patch, and just finished a new hand quilted wall hanging for her work place...very nice.


Carol of Fun Threads wins Quilts in Red and Green, by Nancy Hornback and Terry Clothier Thompson.  You have to check out her current ongoing quilt along and give away for "Mr. October" - me-OW!  It looks like she is in a group that swaps blocks (one person's project is similar to my "zippy-strippy, scrappy-happy" project from last year - fun to see the variations!).


Joan and Kevin (no blog) win Horsing Around by Darcy Ashton.


I will send emails to the winners, then email me back with a snail mail address so I can get these items in the mail!

Thank you to everyone who entered!  We don't always have time to leave comments when we are doing our daily ritual blog reading, so it is fun to do a give away to see who is really out there!  Now I look forward to visiting all the blogs I've never been to before...starting with Gina's and Carol's today!

As I did a tally of the comment results, it was fun to see that we ALL read LOTS of blogs of ALL KINDS!!  But it seems to be universal that we all like the following:
  1. watching project progression
  2. reading tutorials
  3. soaking up color/pattern inspiration
  4. book, fabric and product reviews
  5. stash organization and sewing space set-up
  6. humor from real life stories/situations
  7. ways to use SCRAPS
  8. good recipes
  9. inspiration from non-quilting blogs
  10. give aways...DUH!!!
Many people lament that they should blog-read less and sew more.  Well, maybe...but I think having a blog kicks my butt into working so I have something to share!

Thank you for following along and I look forward to getting to know your blogs better!  You inspire ME to try and do my best!

In stitches,
Teresa  :o)

Wednesday, October 17, 2012

A Halloween give away...


Happy hump day (hump of the week, that is)!  It is 2 weeks until Halloween, and to celebrate now having 500 followers (thank you, all of you!!), we are having a Halloween give away!

Madame Swamphopper, the frog-loving witch pictured above, is holding some Halloween fat quarters hostage on her lap.  I will wrestle them away from her and reward them at 8:00 AM Thursday (tomorrow morning). 


Just leave a comment before then on my blog, and let me know, on average, how many quilt blogs you read a day, or a week.  I am way behind on my daily reading lately...

What's your favorite thing to find when you are cruising the blogs...projects in motion, tutorials, opinions, quilt along's, recipes, how people decorate with quilts, stash organization, gifts and ornaments to make, projects involving scraps, stash-busting projects?


So, good luck on winning the give away!! 

(thanks again for the lovely witch, Ola...every year I take her out, she makes me smile...)

In stitches,
Teresa  :o)

Friday, October 12, 2012

"Baltimore Rhapsody" Block #8 - the trombone


In continuation of my original "Baltimore Rhapsody" quilt (read back story here), here is the third brass block, the trombone, which is Italian for "big trumpet."  The brand of this one is "Conn," I embroidered it on the medallion on the lower parallel arm...


The old English name, "sackbut," comes from two French words meaning "pull-push, which describes how the instrument is played (pulling and pushing the slide to change pitches...).  Most 5th grade boys (and me!) think this is hilarious ("You play a sackbut, you play a sackbut!").


The trombone was actually the first brass instrument to be perfected in the early 1400's and was a favorite instrument in early church service music.  This was because early valveless trumpets and horns could not play the hymn melodies to lead the congregation in the singing of hymns. 


Four trombone sizes were used to match the voices, soprano, alto, tenor and bass, although the soprano and alto trombone versions were eventually discarded.


The tubing of the tenor version, when unwound, measures about nine feet long.  Trombones are very popular in jazz, concert and marching bands.  Most people recognize it's signature "slide" sound.  Symphonic masters such as Brahms utilized trombones in beautiful brass choir sections along with trumpets, French horns and tubas.


I decided to reverse applique the posie centers so they would look "deeper" than the petals.  This requires cutting a center hole in each posie petal section and turning the edges under (instead of turning the edges under on the center and simply stitching it to the top of the petal piece.

Here I am snipping tiny slices (to "ease" the edge) with my little scissors before applying the gluestick and turning the inner edge segments to the back.


After applying the Elmer's Disappearing Purple Gluestick to the center edge, I fold/prod the edge segments down, using the paper pattern (ironed to the front side) edge as my guide.


Now I audition posie centers, choosing possibilities from my tiny saved scraps.


(my clumsy fingers really like using these long tweezers to pick up and manipulate all the fussy little pieces...)


Here are the backsides, with centers glue-basted into place, ready to do the hand applique (off block).


Ta-da!  I was playful with my centers, using a big polka dot and a fussy-cut swirl on two of them.


Tracing the freezer paper leaves...


Thank you to everyone who either left comments or emailed me about remedies for my thumb!  After a couple of days away from stitching, I have healed, and now I have"Liquid skin," masking tape, clear finger nail polish, band-aids, a small homemade leather patch, etc. in my sewing kit to try as I continue stitching this weekend!

Now that I have disallowed "Anonymous" comments, I have had no more spam blogger emails in my in box!  Yippee!  If you would like to be able to leave comments (and participate in give-aways!) on peoples' blogs, it is very easy to get a free Google account. 

All you need is an email address and a password.  You can do this without exposing personal info in your profile.  It just makes it possible for us to respond to your comments and questions (and pick you as winners!).

I will be posting a long overdue give-away on Monday to celebrate going over 500 followers (thank you to everyone who follows my blog - I appreciate each and every one of you so much!).

In stitches,
Teresa  :o)

p.s.  The patterns of "Baltimore Rhapsody" are original copywritten designs that
will be available soon!