Tuesday, October 9, 2012

On the "DL" for 2 days, and other nerdy stuff...


It is baseball playoff season and I am finding that I have something in common with Major League Baseball pitchers...I have put myself on the "DL" (disabled list) for a couple of days.  I actually have an applique "boo boo" that needs to heal.


Overlooking my bad manicure, see the skin above my thumbnail?  I keep sticking myself, over and over, with my super-sharp applique needle as I take quick, little stitches.  Ow-WE!  I need a metal guard to wear over the area...I wonder if anyone makes one?!?


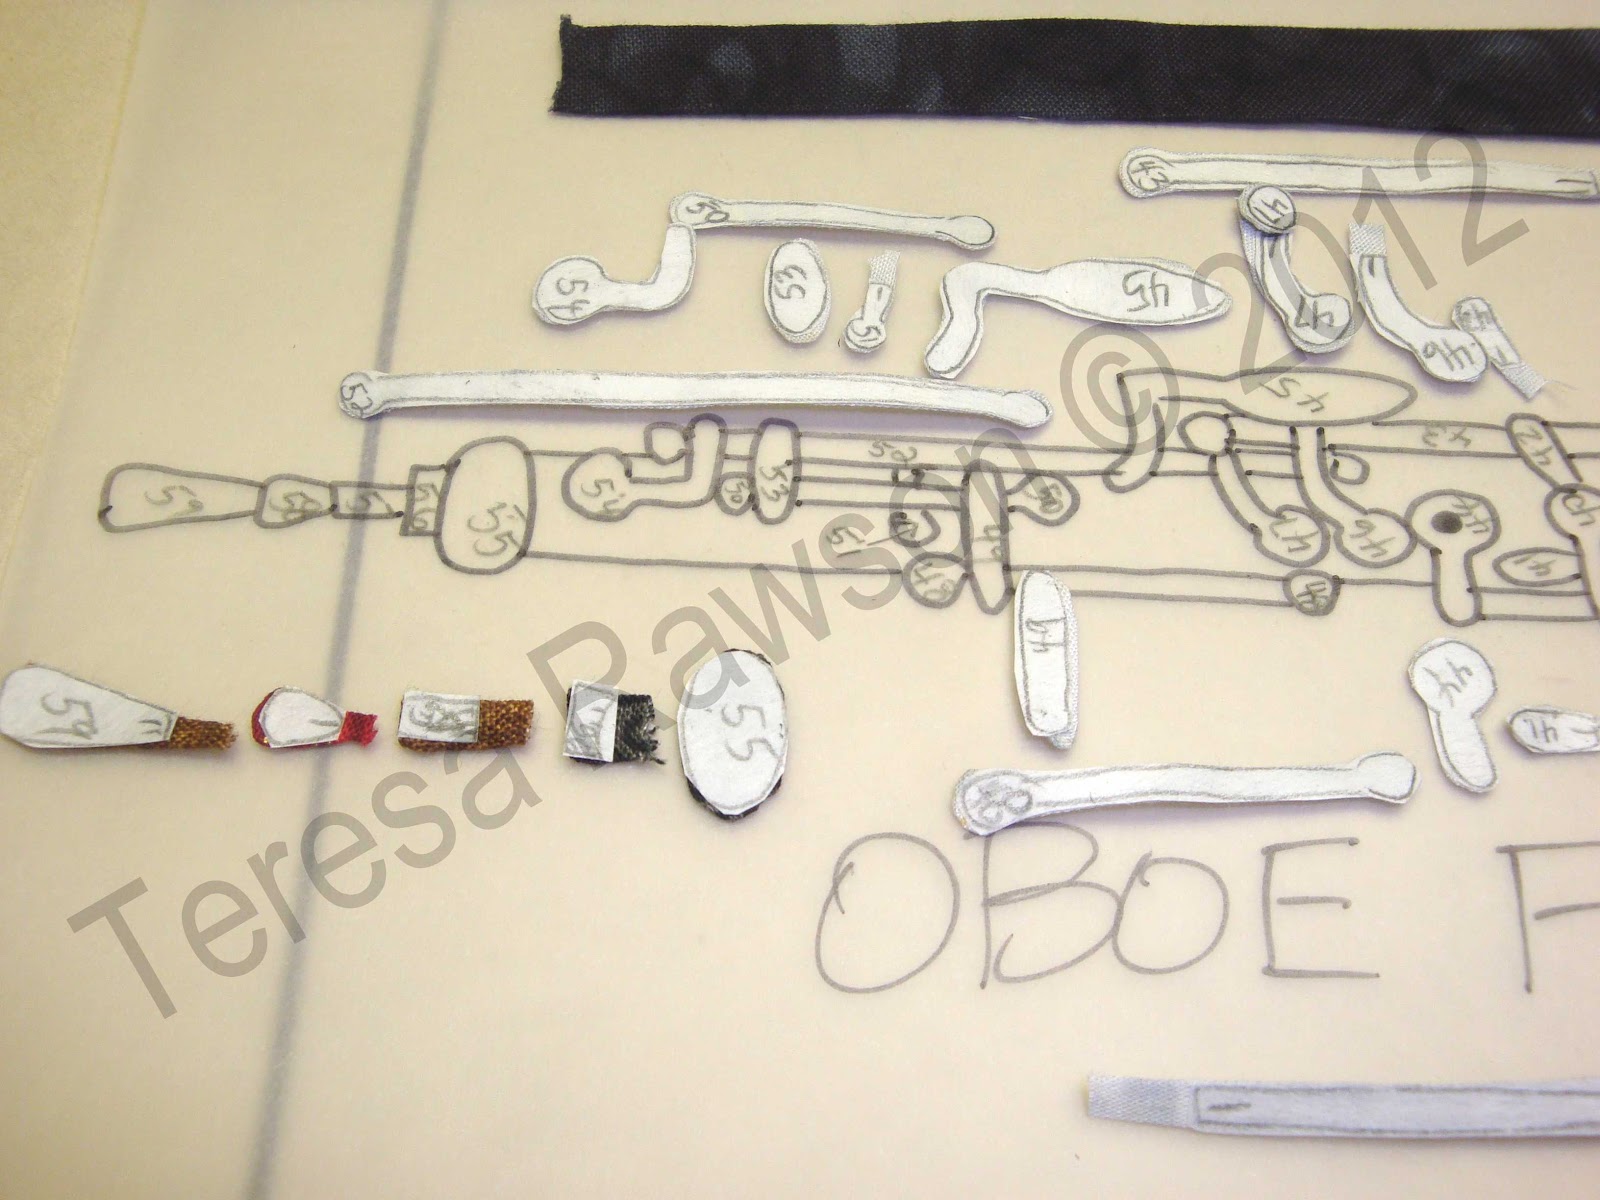
With all the little doo-dads that make up some of these musical instruments I have been stitching, I find myself  "choking up" on the bat unstitched little pieces, willing them to stay in place as I stitch.  I've never had this problem before!

When I hand quilt and stick my fingertips repeatedly, I get nice calluses that harden up, protect me, and DON'T BLEED.  This injury bleeds, as I have a knack for sticking the same places...REPEATEDLY, and I have been reminded that "your own spit removes your own blood" from fabric (our mouths have enzymes that only recognize OUR blood and work to remove it!).  We are amazing beings, aren't we?

So, in my down time, I've gone to the bull pen for other things that need to be done. 

My daughter and I created her Halloween mask.  Are any of you out there familiar with "Portal 2," the video game?  She wants to be the evil computer "Glados" (my nerdy daughter can never be anything normal...sigh).


The actual Glados...


What Riley is aiming for...(something like this girl).


She is also happy because she found campaign buttons that combine her love for Dr. Who, Harry Potter, and Nerd Fighters with her choice of Obama for president.


Meanwhile, Weasley is dealing with substance abuse problems.  He can't keep from "stapling" all my quilt pattern zip loc baggies with his sharp kitty teeth (also loves sheet pocket protectors and cellophane tape, the rascal).


 And, he is also strongly attracted to warm, folded laundry.


One final nerdy note...do you know about www.spoonflower.com?  You can submit your own original drawings to have printed on fabric, or browse and purchase what other people have submitted.  I found some nerdalific "Dr. Who" and "Portal 2" themed fabrics, destined to be pillowcases for my nerdy 15-yr-old.  (They actually have a category for geek stuff...I love it!)


I also bought a fat quarter for me...some Obama fabric designed by Barbara Brackman (adapted from a repro fabric...).


Really...this is definitely the last thing...I think I have solved my "not being able to comment" problem on Blogger.  I have switched BACK to Internet Explorer as my browser (also made sure the "keep me signed in" box was unclicked).  I used to have problems with this browser, which is why I started using Firefox, but now I have switched back. 

Also, I am getting way too much spam, therefore, I AM TURNING OFF ALLOWING COMMENTS FROM "ANONYMOUS" BLOGGERS.  Sorry, but it was either that or turn on recognition tool, which really discourages people from commenting.  I really like getting comments!  If you are Anonymous," you can always email me with your comments/questions, and I hope I will be able to access you to send a response.  If you don't hear from me, I guess it didn't work.  It's free to get a Google account that allows you to comment on blogs...it's worth the effort.

Good luck to your favorite play-off baseball teams!  My Atlanta Braves are out, but my Detroit Tigers are still in!

In stitches,
Teresa  :o)

Saturday, October 6, 2012

"Baltimore Rhapsody" Block #7 - the tuba


Ta-da!  Block #7 of "Baltimore Rhapsody" is the tuba block.  This block features a peacock and an orange tree and makes me want to visit a Florida orange grove!


The tuba is the lowest and youngest member of the brass family of instruments.  If you were to uncoil all that metal you would end up with 12 to 18 feet of tubing!  The length and increasing diameter of the tubing gives the instrument the low, rich sound.


The tuba provides the "oom-pah" sound in classic marches.  They are used in orchestras, bands, and were even used in big bands/dance bands until replaced by the string or electric bass.

Tubas are the favorite and preferred seating for peacocks everywhere...we actually had a pet peacock when I was in high school.  Our neighborhood was near the wooded property surrounding the Birmingham Zoo in Alabama.  He wandered off and ended up in our yard where he liked to roost on my little sisters' swing set.  My mom fed him some leftover scrambled eggs, which he LOVED (isn't that cannibalism?!?)

My dad caught him, put him in the back of our station wagon, and drove him back to the zoo.  When my dad returned home, there was the bird. 

He was very proud of his feathers...he would "show" every chance he got...we would look up from weeding a flower bed or working on the outside of the house, and there he would be in his full glory, slowly turning around, showing off while doing his mating dance.  I think he was confused.  My dad bought some female pea foul for him, but he chased them off.

He roamed the neighborhood, probably collecting leftovers everywhere, but always returned to our house to roost overnight on the swing set.  At sunset every evening, he would vocalise.  After I went to college, the street where I had lived was renamed "Peacock Lane."


Here are the steps to making the tuba.  I start with the freezer paper patterns.


The fronts (right sides) of the prepared pieces...


The backs (wrong sides)...


I start glue basting with the pieces that are under or to the back of the design.  I can't work without the pattern weights...they keep the skinny, squirrelly pieces from escaping.


I kept the freezer paper on some of the pieces until I was through glue basting (I had to wait until I peeled the paper off to glue baste the mouthpiece end of the tubing).  I couldn't leave the paper on the pieces that were to the back...they would have been in the way of the gluing!


Because I want to be able to trim the background away behind the peacock later (to help with the hand-quilting later), I build the tail in sections.  After glue basting the purple spots to the yellow pieces, I hand appliqued the purple spots.  Then I put those units on the green feather units (not shown), and hand appliqued them in place.  I basically construct the whole peacock off block before making the final placement.  That way I only have to stitch around the outside of the bird once it is finally placed on the background, overlapping the tuba.


I hope you are finding all this less intimidating when the process is broken down into steps!

In stitches,
Teresa  :o)

Friday, October 5, 2012

"Baltimore Rhapsody" Block #6 - the oboe, part 2


This is part 2 of "Baltimore Rhapsody," block #6, the oboe (see part 1 here).   "Baltimore Rhapsody" is a music quilt in the Baltimore album style.  All the blocks measure 15 inches square.  The first 16 blocks are instruments you find in an orchestra, but then I will make additional blocks of other folk, jazz, church, and rock instruments. 

I know some of these tiny pieces may seem too difficult.  The blocks could be enlarged to make a 18" or 20" block.  There will also be larger instrument patterns offered...without all the fruits, flowers, and birds.  Soon the blocks will be available for purchase on my web site, either individually or in groups.  I want you to be able to make up your own music quilt, in any size, with the instruments of your choice.


OK...the oboe.  I took lots of detailed pictures when I put the oboe together.  After a few emails asking how, I decided to post the pictures...a picture is worth a thousand words. 

All four orchestral woodwind instruments are constructed in a similar manner.  Don't panic when you see all the tiny pieces!  Yes, they are more fiddly than the fruits and flowers, but they are do-able.  I stitch these by hand with the edges turned under, but you can use Ultrasuede, raw edge machine applique, heavy-duty raw edge fusible, or embroidery if you don't want to hand applique. 


One of the challenges of making these slender instruments is that the body of the instrument is either black, brown, or grey...not opaque like the background fabric.  How do I see where to put the pieces without being able to see through the background to use the pattern as a guide?

First I work right on the pattern to build up units, just like when I make my flowers and other motifs.


I work in several areas at one time...starting with levers, rods and pieces that appear to be under other stuff.  I use the Roxanne's glue baste ("dot-dot-not-a-lot") and put a weight on the glued area and move to another area while the glue sets a bit.

Somewhere I misplaced my American penny that I use to show scale, and I had a Canadian one mixed in the change in my pocket...being less than 50 miles from Canada (Windsor is across the river from Detroit), half my pocket change is usually Canadian, LOL.


I usually leave the freezer paper on for a while when I am in "assembly mode" so I don't get confused.  I use my stiletto and forceps to loosen the paper edges on the tiny pieces when it's time and handle everything with my forceps because my fingers feel clumsy.  I can barely pick up the penny, much less the tiny keys. 


My brothers used to put together a lot of model cars when I was a little girl.  This woodwind construction reminds me of all the little detail pieces my brothers used to lose...thank goodness this glue doesn't smell, LOL.


I also use the weights to hold the pieces down in place while I work on the other end, prying up and gluing.


Do you see the taller white pattern weight below?  It was made by  Bruce, my applique buddy Julie H's husband.  He is very handy, and he worked with some chair leg caps, lead shot, plaster, and little felt circles to make a set for Julie and for me (thank you, Bruce!!).  If you have a handy husband, maybe you could have a set made for you (I think fishing lead weights would work as well in the plaster - the plaster alone isn't heavy enough).  I also use some large washers for weights sometimes, also pictured below.


Once I get segments constructed, I place the black oboe body on the pattern and glue the segments into place, using the places where the levers and keys stick out on each side as my guides. 

Here is is, all glued up.


Here it is, all stitched up on the block.


Tomorrow, the tuba...

In stitches,
Teresa  :o)

Wednesday, October 3, 2012

"Baltimore Rhapsody" Block #6 - the oboe, part 1


The oboe is the next block in "Baltimore Rhapsody," a music quilt in the Baltimore album style that I am designing.  It is the soprano member of the double reed instrument family... double reed because two pieces of thin, narrow reed are shaved and tied together with thread and placed in a holder affixed to the small end of the instrument.  When blown, the softened, wet reeds vibrate to make the distinctive sound.  


The modern oboe was invented in Paris, France about 300 years ago by a bagpiper in the court ballet orchestra, but it is based on similar ancient instruments.  One of these, the Aulos, was popular in Greece and took much strength to play; the player's cheeks were strapped with a leather belt to keep them from bursting, LOL!


It is said that the instrument is not so much blown, but that the air is allowed to escape into the instrument to produce the sound (maybe that is why oboe players always appear a little tortured while they play...). 


My high school band director used to tease that playing the oboe killed brain cells, due to all the back pressure in the head.  Oh my!  (I had expressed interest in the oboe...I think he was trying to discourage me...)

The oboe gives the "A" for all the other orchestra instrumentsto tune to.  This is because altering the pitch of this instrument involves actual carpentry!

The pink Sweet Williams are made petal by petal, glue basted together with tiny dots of Roxanne's Glue Baste.  Petals are prepped with a glue stick first, then the order of the addition of petals is based on which petals are "behind" and which petals are toward the "front."


My fingers are so clumsy, I handle the little pieces with forceps as I line them up, working over my pattern.


I place the tiny dots of glue away from the intersection of the pieces so that I don't have to stitch through the dried glue later.  I use this Roxanne's glue so that I don't have to work with pins.


I find this pre-assembly work very satisfying!


After the glue baste is dry enough, I carefully remove the ironed-on freezer paper patterns (they can be reused!) and hand applique the blossom together using YLI silk thread.

I lay out all my prepped pieces on the pattern to make sure I haven't missed any.  I do as much of the unit assembly BEFORE working on the background as I can...I find it easier and more accurate working right on the pattern to "build" the motifs instead of trying to see the pattern through the background fabric square. 


When all the units are glue basted and the larger ones stitched off block, I center the background square on the pattern so that the design is showing through as my guide (a light box makes this easier). Then I glue baste everything to the background square using as little glue as possible ("dot-dot-not-a-lot").


Here is one of the blossoms, all stitched together, ready to be placed on the background square, using a light box to reveal the pattern through the fabric.  These blocks that I stitch off block are really portable for sewing away from the quilt cave.


At this point, I hand appliqued all the blossom, leaves, buds, and vines to the background square before adding the oboe.  I just find it easier to applique the more involved instrument pieces when I'm not catching my thread on the unstitched edges of the flower pieces.

As this post is getting too long, I will show detailed steps of building the oboe in my next post (the oboe, part 2).  Soon, all these patterns will be available for purchase on my web site.  All the blocks finish 15 inches square, and they will be available individually or in groups.

In stitches,
Teresa  :o)