Thursday, February 3, 2011
Finished my block a little late...
I finally finished Tara's block for the Bee Balm blog sewing bee. I feel like I'm moving through molasses this month! I love the design she picked. Each HST finishes to 4 inches, so the whole block will finish to 16 inches. I finished it on the last day of January, but I wanted to have it mailed and in Tara's hands by the end of the month. I don't know what happened to January...
February is my month to have these talented ladies from Australia, New Zealand, Canada and the USA make blocks for me. I've been thinking about this since Christmas, and I was having a hard time thinking of a project. Then it hit me! (Actually, it nearly fell on me...)
I was pulling another bin off an upper shelf and THIS bin, containing a UFO, nearly fell on me! Since I decided at the beginning of the year that I was going to have to come to some serious decisions about old UFOs, I thought I might figure a way to recycle the blocks into a fabulous new project. How's THAT for shopping your stash?!?
I admit it, I'm human, when a project loses its sex appeal, it becomes a UFO on the shelf. Some projects, the ones we stay excited about and manage to finish, have some spark, some deeper connection that gives us the staying power to get it done. What makes one project hit the mark and another one miss so completely??
This UFO was going to be a quilt like my friend Margit was making. She found this project in a quilt magazine and made hers with feed sack/30's prints and a solid, classic 30's blue, kind of like the magazine sample.
When I saw Margit's project, done with blue and 30's fabrics, I LUSTED after it (I think I was actually drooling...). I couldn't wait to go home and start rifling through my 30's fabrics. And of course, I had to make it queen size. Then the practical person that lives inside of me spoke up and said, "don't do it with blue...it doesn't go with the house." I hate that person sometimes...she is a real kill joy, a total party pooper. I want to stuff her in a trunk and throw away the key.
I LOVED the blue...blue's my favorite color...but I thought that a classic, muted, solid 30's green would be safer. Big mistake. I never really liked the results and lost interest in it. I got a quarter of it pieced and set it aside.
The blue really set off the bright, happy 30's fabrics. Margit's looked so crisp and made the 30's blocks stand up and say "hi there!" The green just made the whole project look and feel depressing. Maybe if I had picked "that green," that bright green that was so popular in the 1930's, it might have worked. But the green I picked was a gray-ish green, very nice, but didn't set off those cheerful 30's fabrics very well.
I spent a lot of time painstakingly cutting out 3 inch squares from every 30's fabric that I had at the time (I do love scrappy)...I was practically rolling around in the floor on them, like my cat...me-OW! It was quite a spectacle, a definite love fest. I didn't want to waste all that effort, the experience (grin), or all those fabulous 30's fabric squares! (I still remember what movie I was watching while doing it...is that powerful and twisted, or what?)
Anyway, I've come up with a plan to put the "sexy" back into this UFO and the packets of fabrics went out this morning! I'll share the idea here when I get blocks back in a couple of months.
Ola's secret Santa gave her a sweet treat on Tuesday at the shop and I just have to share it with you.
Mary Liz allowed me to take her picture with it to share. Remember how I said recently that to become a better quilter, hang out with other talented quilters? Mary Liz is definitely that! She turned me onto using Elmer's glue sticks to turn my edges under for hand applique. She is also a superb technical writer and does the newsletter for the shop and writes patterns, in addition to skiing, loving animals, doing all kinds of crafty things, and being married to a great guy.
She also taught me a great lesson yesterday...it's OK to be a little late with a handcrafted goodie for a friend...it is still greatly appreciated and puts much-needed smiles on gloomy January faces! (makes me feel better about all the things I have not finished yet for friends...blush, blush)
The snow has swallowed my shrubberies...it's hard to believe that there are daffodils sleeping under there somewhere. We usually don't see those until April around here...
Mother Nature has lost her mind...I think she is saying to all of us, enough is enough! I hope that wherever you are, you are coping OK with the snow, heat, flooding, cyclones, and whatever else is being thrown your way!
In stitches,
Teresa :o)
Monday, January 31, 2011
I have a whole town now (mostly)...
Here are the 12 block-of-the-month blocks of "All Around the Town" (Sue Garmon) assembled into the quilt center. Woo hoo!
Before adding the "road" stop border (with appliqued cars!) and the outer border, I still have some yellow stars to add and applique and a few more tiny embellishments (lawn art). I needed to get the hunks of houses pieced together and get it up on the design wall so I could see what other little touches needed adding to make the top feel balanced to me.
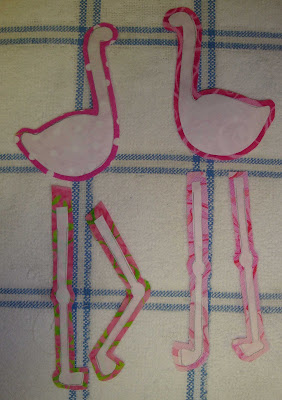
I've made some doodles of little tiny things I want to applique...I want to add a sheep or two, a garden gnome, a pink flamingo or two and a cart of fish with a fishing pole. There are some other little characters running around in my head, but I don't have them on paper yet.
I had to stop and do some quilt cave maintenance. Remember this?
I needed to sort and put away some scraps that have been piling up. The bigger pieces get sorted by color (or type) and go into art bin containers.
The tiny bits get sorted into one of four larger bins of wee bits...warm (yellow, orange, pink, red), cool (green, blue, purple), brown/.black, or neutral/white.
I use these bins a lot when working on an applique project like these houses. Sometimes a small bit is the perfect piece when I am doing really small scale applique motifs.
And I always say, if you want to be a better quilter, hang out with great quilting friends! Here are a few show and tell items made by my friend Kathy F. (no blog). She is amazing! These free pieced houses are just two in a series of Island structures standing on her coastal Maine property.
And here is her finished "Roll, Roll, Cotton, Boll" top, the latest mystery quilt from Bonnie Hunter over at Quiltville.com (that is Kathy on the right). Yep...now that I've seen it up close and personal, I want to make one, too!
It is just stunning! I don't know how Bonnie keeps coming up with such awesome scrap quilts!!
In stitches,
Teresa :o)
In stitches,
Teresa :o)
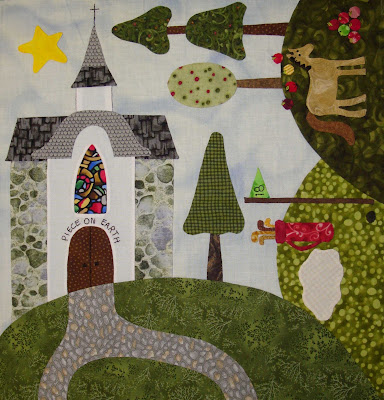
Piece on Earth...
Steel Scraps suggested "Piece on Earth" as a saying for a church sign, and it was so good that I decided to put it on the church building rather than make a sign post. Thank you for suggesting it!!
Just beyond the golf course and the 18th hole, a lone horse stands in a field contemplating an apple snack stack.
Block #10 of this "All Around the Town" quilt is now done! I'm getting very close to getting all 12 blocks done so I can assemble the quilt center. It is getting exciting!
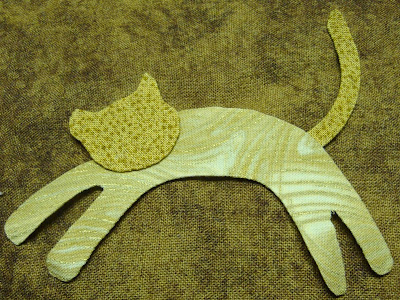
The following pair of pets will embellish a couple of the previous blocks. I just have them glue basted. The doggie's bone is wrong side up so you can see where I glued the raw edges under with my trusty Elmer's glue stick and awl. Now I just need to place them and applique in place. I want to try and make a garden gnome for one of the yards as well. Hee-hee-hee...
After a long time where it seemed I was not making enough progress, I can see the light at the end of the tunnel...and it isn't a train!
In stitches,
Teresa :o)
Friday, January 28, 2011
Fore!!
I don't actually play golf, but just about everyone I've met in Michigan since moving here does. I am a church musician and often hear people on a particularly lovely Sunday morning longing for the golf course. So I was thinking there should be one right next to the church. I can just imagine that moment of indecision on Sunday mornings (the clubs are probably already in the trunk...along with the plaid pants and white shoes...).
It's a given that I would add a horse (and an apple snack stack) in the quilt. My daughter rides and loves horses. The additions are mostly glue basted, I still need to stitch them down and embellish with embroidery.
I have been thinking hard, trying to find some humorous inspiration for a church sign. If anyone has a suggestion, I'd love your help/input. This block will be positioned between the golfing and redneck house, if that gets your creative juices flowing. LOL
The redneck block is now completely finished! Only two more to finish.
The new washer is in and I'm trying to decide if I like it. It is a high efficiency model with no agitator. It uses very little water. I gently pre-wash all my fabric. It removes some of the excess sizing and dye (which my skin is sensitive to) and cuts down on later shrinkage and fading (and freezer paper and fusible materials adheres better when ironed onto washed fabric).
I used to just put the appropriate amount of water in the tub, dump in some fabric, let it soak a while with no soap, hand-agitate a little, then spin and dry. Of course, my husband usually walks by while I am hand-agitating and he quips something like, "you know...I think those machines will do that for you..."
He's hilarious.
I inherited this pile of scraps some time ago and decided I'd experiment on them. They got a little stringy...I sort of expected that...should have put them in a lingerie bag. Then I tried a very large (6+ yards) piece of new backing. I ended up pinking the edges first. It went well.
I tried using the "quick wash" cycle and I never really knew what was going on in there (it locks the lid so I can't just open up and take a peep). I'm going to have to experiment further. Any suggestions?
I am so close to finishing the last 3 blocks of this quilt. I am also going back and adding a few things to the other finished nine blocks...just some animals and the odd piece of lawn art. How I am going to do the sun is slowing me down. Then I can add the "road" skinny stop border, the outer border, and the cars. I can't wait to do the cars!!
Barb over at Fun With Barb has a great blog and recently posted about finding her favorite thimble. When I saw the picture of it, I understand why she was so happy...it is beautiful! It made me start thinking about my favorite thimbles (and wanting one like hers...covet-lust-drool-covet-lust-drool).
The thing on my finger is a reusable leather adhesive pad called 'Thimble Pads' from Colonial Needle. I like to use them sometimes when I am hand appliqueing or binding.
The one on the left was my Grandmother's thimble (on my mom's side). It is only shiny where it is handled a lot.
The middle thimble is one of the three Roxanne's thimbles I have purchased over the years. It is brass. I also have a gold plated one and a silver one. I was really disappointed with the gold one, as the plating blistered and peeled off on the inside and now turns my finger green! Ick! The silver one has lost it's luster on the inside, but is still satisfactory. The brass one has been better, though more expensive.
We have snow on the ground now and will be under a Winter Weather Advisory tonight for 4-5 more inches(of course - it is band Solo and Ensemble competition weekend, and the weather is traditionally bad that weekend every year...sigh). I hope you folks on the northeast are coping with your snowy winter...you just can't seem to get a break!
In stitches,
Teresa :o)
It's a given that I would add a horse (and an apple snack stack) in the quilt. My daughter rides and loves horses. The additions are mostly glue basted, I still need to stitch them down and embellish with embroidery.
The redneck block is now completely finished! Only two more to finish.
I used to just put the appropriate amount of water in the tub, dump in some fabric, let it soak a while with no soap, hand-agitate a little, then spin and dry. Of course, my husband usually walks by while I am hand-agitating and he quips something like, "you know...I think those machines will do that for you..."
He's hilarious.
I am so close to finishing the last 3 blocks of this quilt. I am also going back and adding a few things to the other finished nine blocks...just some animals and the odd piece of lawn art. How I am going to do the sun is slowing me down. Then I can add the "road" skinny stop border, the outer border, and the cars. I can't wait to do the cars!!
Barb over at Fun With Barb has a great blog and recently posted about finding her favorite thimble. When I saw the picture of it, I understand why she was so happy...it is beautiful! It made me start thinking about my favorite thimbles (and wanting one like hers...covet-lust-drool-covet-lust-drool).
The thing on my finger is a reusable leather adhesive pad called 'Thimble Pads' from Colonial Needle. I like to use them sometimes when I am hand appliqueing or binding.
The one on the left was my Grandmother's thimble (on my mom's side). It is only shiny where it is handled a lot.
I LOVE my Roxanne's thimble (can also be purchased through Colonial Needle), but the weight can be a little trying sometimes, especially in cold, dry seasons. I was teaching a hand quilting class one time, and I was apparently gesturing too wildly with my hands, trying to make some stupid point. The heavy brass thimble flew off my finger and hit one of my students in the chest! I was mortified!
I've started licking my finger before putting it on to create a suction...pretty unsanitary now that I think of it. That's probably not good for the inside surface. I was very careful in choosing the size, but we all know that our fingers vary in size from day to day (one reason I have 3 thimbles - 3 different sizes).
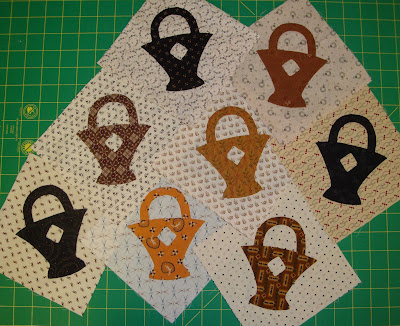
Every now and then I finish another basket...this is a slow, slow, long term project.
In stitches,
Teresa :o)
Labels:
All Around the Town,
Blackbird baskets,
tools
Subscribe to:
Comments (Atom)


