Showing posts with label X Marks the Block. Show all posts

Wednesday, May 16, 2012

Hand quilting away...and some quilt show pictures...


Where does the time go?  I've been quilting on "Folk Art Applique"...I can tell I'm getting older...I quilt the black on black parts when the light is good, and the white on brights part the other 99% of the time...LOL!


As this quilt is smallish, I've been taking it with me as I wait while having the car serviced, sitting in meetings, spending time in the car waiting for my daughter.  It is interesting fielding the questions that arise from total strangers.  My favorite, to date, came Monday while waiting in the Subaru dealership during an oil change..."is that crocheting?"  Wow...


I entered two quilts in the AQS - Grand Rapids Quilt Show that will be in August... "All Around the Town" and "Life of Riley" (my version of the Civil War Bride quilt).  This is my first try at entering a juried, big show.  I spent a whole day trying to get good pictures of them for the required entry photo CD.  They recommend taking the pictures outside on a cloudy day for best results.  Are they nuts?  I live in the midwest...the wind is ALWAYS blowing...hence the whole day, waiting for tiny still moments in between the big puffs, to take four pictures.  


I anticipate how hard it is to have quilts accepted, but I'm still glad I went through the motions of applying.  I think it will make me a better quilt archiver for my own benefit, for one thing.  I have not been taking the time to photograph finished quilts as I should be.  As I try and gather pictures of quilts I've made, they are either TERRIBLE, non-existent, on 35mm film negatives, blurry, or the color is not true.  I am really spoiled by the digital world...now I need to learn to do it properly.


I've been working hard on my new original project I've been drafting.  I hope I can share it with you soon.  I can't share it here until I get a copyright for the designs, as I'm hoping to publish it.  As slow as I am getting things done right now, someone else with more free time might take my images and run with them, and that would make me quite sad...sorry to be such a tease about things.


Well, at least the white quilting thread shows up for pictures...I need to spend more time learning how to photograph the black on black quilting.  Maybe I should make my chalk quilting marking thicker...at least THAT would show up!  The diagonal crosshatching and outline quilting will probably show up better when I photograph the finished quilt outside.


Very slowly, I am processing quilt show pictures from Sauder Village.  Going to the show is one of my favorite yearly traditions.  I will share the pictures as I get them cropped and cleaned up.  I will start with the quilts from me and my friends.


I'm not sure I like it when they hang things on point, around corners...I can assure you that this quilt of Cheryl's is perfectly square.   :o)


Sorry some of these tags are fuzzy...there was a crowd around Cheryl's lovely quilt for her granddaughter...I had to be quick snapping pictures!


It would have been fun to have finished the hand quilting on "Folk Art Applique" in time to enter it in this show, but I must say I am enjoying taking time to do it without a deadline. My husband is so proud that his boxer shorts have now been seen by hundreds, maybe thousands, more women in the midwest.  "Boxer Rebellion" is back on the wall at his work place now...he insisted on having the ribbon displayed with it for a while.  I would wager that there aren't many men that have gotten second place ribbons on their 5+ year old undies...

In stitches,
Teresa  :o)

Thursday, May 3, 2012

"Invisible" hand quilting...


I'm quilting along on my "Folk Art Applique" quilt...I didn't get it finished for the 36th annual Sauder Village Quilt Show.  I would of had to have it finished by last Sunday to drive it down in time for show set up.  I realized the Tuesday before that I was ABSOLUTELY INSANE to think I would finish the hand quilting in time.  Maybe, if I had nothing else to do the rest of the week, but I didn't have that luxury.  (The Wonder Woman cape is back in mothballs...)


Wow...NONE of my black quilting thread shows up in the pictures...except where I crossed the vine when outline quilting the grapes.  Those grapes are floating on a skinny piano key quilted background.  I should have quilted this in GREEN...because my  BASTING stitches certainly show up, LOL...


I am outline quilting all the applique in black, then quilting on top of the applique motifs in off white.  I am doing a cross-hatching design behind the applique blocks, then, as mentioned, the "invisible," skinny piano key design on the outer border, behind the grapes.


At least the white thread shows up!  This feels a little like the "Emperor's New Cloths" style of quilting in that I'm telling you the black quilting lines are there, but who knows...maybe they really aren't...


Does anyone out there have suggestions for photographing black quilting thread on black fabric?!?


So now I am ENJOYING the leisurely hand quilting even more...now that there is not a self-inflicted gun held to my head (big grin).

I took the two other quilts I had planned on..."Boxer Rebellion" (otherwise known as my husband's old undies...)...


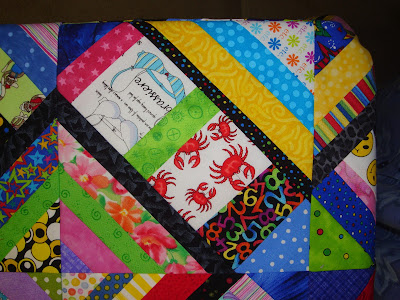
...and "X Marks the Block," an original, free-pieced, "liberated" quilt that I made for my daughter.  The original plan was to hand quilt this one, but that plan changed last February.


The show runs from Tuesday, May 1 through Sunday, May 6, and I am going tomorrow (Friday).  A little bird emailed me Tuesday morning to tell me that "Boxer Rebellion" won second place in the Small Wall Hanging, Mixed Technique, Hand Quilted category (thanks, Norma!).  Being made from old underwear and stupidly quirky, the best I could have ever hoped for was an "Honorable un-Mention-ables" ribbon...hee-hee-hee.

When I called Steve at work to tell him what I heard, he was happy his underpants were being enjoyed by the judges and so many women from all over the Midwest.  HA!  You just never know...

My daughter is a self-proclaimed nerd...straight A student (in an IB program, no less!), closet novel author (we just printed initial copies of her first book!), a musician, a lover of Harry Potter, Sherlock Holmes, Dr. Who, Merlin, and horses.  When I say she loves Harry Potter books, movies and characters, etc., I mean she LOVES them!  Here she is, years ago, posing with her first Harry Potter quilt that I came up with...she has requested another, more dark and mysterious one...not "cute" like this one.


(She had just lost her two front teeth...)


Anyway, my friend Bonnie (no blog) turned me onto the coolest site for "nerd quilting"...it's called Fandom In Stitches.  This site has all kinds of great, FREE, paper-pieced blocks by and for fans of Harry Potter, "Dr. Who," "The Muppets," The Lord of the Rings, "Merlin," Sherlock Holmes, etc.  This site even has some favorite Disney, comics, games, sports, and other patterns.  You'll enjoy browsing here!

Tomorrow I am off with friends to the 36th Annual Sauder Village Quilt Show in Archbold, Ohio...I can't wait!  I'm kind of bummed that I didn't finish my "Folk Art Applique" quilt in time...next year!

I will take lots of pictures to share with you!

In stitches,
Teresa  :o)


Tuesday, March 27, 2012

TUTORIAL: "X" MARKS THE BLOCK (free pieced strippy quilt)


"X" MARKS THE BLOCK - THE TUTORIAL

Are your strippy scrap bins or bags stuffed to bursting?  This is a great scrappy project to help you reduce some scraps and ALL WITHOUT A PATTERN (sometimes a project without a pattern is like a day without pantyhose...ahhh...).


OVERALL DIRECTIONS:


I don't use a paper or fabric foundation when making these blocks...mostly because I am too lazy to reproduce the foundations, then later peel all those pieces of paper off my sewn blocks.  If you would like to use a foundation, go right ahead...it's all good.  But I challenge you to try one block without a foundation to s-t-r-e-t-c-h yourself.

Here's the ONE I tried with a 8.5 inch paper foundation...it was really harder than doing it without one, believe it or not...


This block/quilt uses mostly "strips" and "chunks."  I define strips as anything from 3/4 - 2-1/2 inches wide.   I try to keep them separate in my quilt cave - that way I don't have to dig through all my scraps just to find strips.  Chunks can be odd-shaped, cut-off chunks of leftovers or wider strips, maybe even extra triangles or squares. 


If you are careful and use fatter strips at either end of the central pieced section,  you don't have to fool with using chunks.  We just don't want to trim down our final blocks and find too many seam allowances in the corners where blocks meet.


The focus fabrics that form the "X" need to contrast the rest of your general scraps.  I used blacks with brights.  You could use something light as well, or maybe a color.  Your "X" strips can either be scrappy like mine or all one fabric/color.  Medium to dark batiks with light "X" strips would look cool.  Maybe red and neutral scraps with green "X" strips for a holiday quilt.  The sky is the limit! 
 

I cut my "X" strips 1 - 2 wide.  The variation just adds to the wonkiness and draws attention away from the fact that the "X" strips don't line up between blocks.  You can see below how the scrappy black strips are different widths and don't match up precisely...charming!  Sometimes, my strips are wider at one end than the other...even MORE charming!


After looking at my available strips and chunks, I chose to make blocks that would finish eight inches square.  I had some short, stubbly strips that were 3.5 to 4 inches long, so I decided on a center diagonal strip that would finish about 3 inches wide.


After looking at your scraps, you may decide to make smaller or larger squares, of maybe even rectangles, triangles, or other shapes.  I will show you how I figured out the rough dimensions of my units, then you can apply what I did to your size block.


Here is my 8.5 inch square ruler with a 3 inch wide ruler on top (which represents my central pieced strip).  See how I have allowed roughly a half inch at each end?


You can see, from the pictures above, that the unfinished length of that initial, central pieced strip needs to be at least 13 inches, once it is pressed.


In my quilts, the strips that define the edge of the central pieced strip and make the prominent "X" design are scrappy black.  Yours could be light, dark, or a certain color.  They can be scrappy or cut from one fabric.  You can see in the pictures above and below how to determine the minimal length of these setting strips.


Each strip added to the central pieced strip needs to be at least a half inch longer in each direction than the edge of the ruler.

Now you can vary the size of your blocks and central pieced strip to please you.  Just be sure to allow adequate overhang of strips so that when you square up your blocks you won't have any holes!

Just because you see brights and blacks in my tutorial doesn't mean that is the only color option possible.  Look at your scrap stash, then decide how YOU want to proceed.  You can even do it without a contrasting color for the "X" strip.

Look at the backside of this finished block to see how you should press your block as you progress.  I pressed the central pieced strip only after piecing the whole thing, then pressed the seams in the same direction, either way. 


Then starting with the black focus strips, I pressed each added strip to the outside.


Now just fill some bobbins, put in a new sewing machine needle, replace your rotary cutting blade, and let's get started!

STEP 1:

I do not cut the short strips to 3.5 inches before chain-piecing the little strips together into a long section...as long as they are at least 3.5 inches long, it's OK of they are a little longer.   

Some of these strip sets have a triangle or chunk at either end, sometimes just a piece of a wider strip.  I do this to avoid an accidental seam too close to the corners where 4 blocks will meet.

Start with a chunk, wide strip or triangle at one end, then chain-piece strips together, matching up one end of your irregular, variable in length, short strips.  Do not worry about pressing after each addition of a strip.  Check the length of your pieced strip as you go.  This central pieced strip needs to be at least 13 inches long...make sure you stop in time to place another chunk, wide strip or triangle at the opposite end.


Turn your strip sets over and press ALL the seams in ONE direction, either way.

STEP 2:

Now you are ready to sew on the contrasting focus "X" strips, right sides together.  These should be at least 10 inches long (1 - 2 inches wide), CENTERED along the edge of your pieced central strip. I place the first strip along the "straightest" edge of the strip set, lining up the edge of the shortest strip (the cow strip in the following set). 


Even though this is wonky sewing, I still maintain a quarter inch seam allowance when I can (old habits are hard to shake...).  A consistent quarter inch seam allowance is not critical while making the blocks, but will be very important when sewing the blocks together into a quilt top.


After stitching, trim away extra seam allowance with your rotary cutter or scissors (trim the uneven end of the central strip set even with the quarter inch seam of your "X" strip).


Press strip to the outside.


(I like to chain stitch several of these units, then sew on the opposing strip before stopping, trimming and pressing.) 


Place this opposing strip. face down and centered on the other side of the strip, with the help of a ruler (or just "eyeball" this for extra wonky-ness).  Your stitching line should be at 3 inches (or the outer edge of this strip should be 3.25 inches from the opposing seam).


After stitching, trim away extra seam allowance with your rotary cutter or scissors.  (Would you believe I save some of these longer cut away leftovers?  That will be the subject of another liberated tutorial project!).


Press strip to the outside.  (Again, chain piecing really saves time with this method.)


STEP 3:

Now we can start adding strips, one on each side, building our block, chain piecing and pressing to the outside after the addition of each new pair.


As you continue centering strips (chain piecing), adding strips to each side, notice that they are getting shorter and shorter.  Press toward outside before adding the next pair.


Just make sure the strips are long enough so that when you trim down your blocks there aren't any surprise "peek-a-boo" holes.


Please notice the left side of the block pictured below.  The white-ish strip just under the left corner of the ruler is a little too wide and would cause there to be a seam too close to the corner of the block.  Just slice or cut some of it off so that your last strip will form a larger triangle after the block is trimmed down.  You may need to make a few of this kind of adjustment as you go.


Place your block on a small cutting mat.  Square up your block by placing the 8.5 inch ruler on top, centering the ruler's diagonal line in the middle of your center strip set and sliding the ruler back and forth until the end triangles are centered and all seams are solid under the ruler (no "peek-a-boo" holes...).


Cut away each side, turning the MAT, not your block, as you go.


A small rotary mat works OK, but I like trimming these blocks on a revolving rotary mat, like this Brooklyn Revolver.  It has a 'lazy Susan' mechanism that allows you to easily rotate the block as you trim each side away (I just LOVE a good gadget...).  There are other versions of the revolving rotary mat out there...here's the Olfa offering from Joann's Fabrics online (use your coupon on it!). 


Ta-da!!!  You did it!  Now you can make as many or as few blocks as you want.  For each of the quilts pictured at the beginning of the post, I set 8 blocks across, 10 blocks down, with a 1.5 inch (finished) stop border and outer borders of either 6 or 5 inches (finished).  The green-bordered quilt measured 79 x 95 inches and the one with red borders, 77 x 93 inches.


I recently taught a class on this block at my LQS.  Janet S worked with her medium to dark, earthy scraps, with a consistent light "X" fabric (she cut her light strips the same width throughout).  She ended up cutting her remaining setting strips more consistent in width, while keeping her central pieced strip wonky. 


Lori L used fun, colorful scraps with lime green "X" strips.  I've never seen such a fun bag of colorful, happy scraps (I admit it...I had scrap envy!)  Both had stunning results!


When it comes down to piecing the blocks together, sew in rows, pressing the seams to one side, alternating direction every row.  This way the seams will nest nicely for beautiful, accurate piecing.  Remember that the edges of your strips are most likely bias edges, so handle them carefully until they are seamed in and stable to they won't stretch.

ENJOY!

In stitches,
Teresa  :o)