Saturday, April 30, 2011

Sauder Village 2011 Quilt Show - Part 1


I am shocked and humbled that "All Around the Town" (pattern by Sue Garmon) took Best of Show Wall Hanging.  Here it is, hanging on point, at the show.  I will get some better pictures tomorrow when the show is not so crowded...I want to get one that is oriented "right side up" so that it looks square again, also some close ups.  Some of you know what I went through to get it square, LOL!!

My "Wickedly Liberated" took a second place ribbon in the Bed Quilts: Large Pieced-Machine Quilted category.  It was custom machine quilted by Marilyn Lange of Ypsilanti, Michigan, a friend in my stitch group.  Again, hard to photograph on a busy day...I will do better tomorrow, I hope.  It is about 93 inches square, so it is hard to photograph when you can not back up enough!  (And definitely hard to photograph in my little house).  It took two pictures at the show to be able to read the borders!


This free-pieced adventure was the result of a liberated lady block swap in my Friday morning Sit and Stitch group.  My friend Mary J made witches, so I knew I had to come up with a quilt that incorporated my daughter's love of "Wicked" and "The Wizard of Oz."  I came up with some free-pieced doggies, a few trees, a witch hat, and a house fallen on a witch to round out the theme.  Then I tried Tonya's free-pieced letters in the border (Lazy Gal Quilting).


My friend, Cheryl G (no blog) took two first place ribbons.  The first one was for "Labor of Love/Double Wedding Ring" in the Bed Quilts: Pieced-Hand Quilted category.  She made this for her daughter as a wedding gift.


Her second win was in the Bed Quilts: Small Pieced-Hand Quilted category.  It is called "Solace," and it was custom machine quilted, again, by Marilyn Lange.


Mary J (no blog) took three ribbons!  Two were Honorable Mentions in the Bed Quilts: Mixed Technique-Machine Quilted category.  This is "It's a Dog's Life," which incorporates redworked pooches with pieced diamonds and a paw print border.  Ola R (no blog) drew additional doggie patterns to make this quilt bigger and bark to life.  It was quilted by Rhonda Loy of  Dexter, Michigan in an allover doggie pattern.


 Here are a few of the lovable pups - Mary is an excellent stitcher.


And the border...


The second HM ribbon in the same category went to "Mulligan Stew" (the Hobo quilt).  It was machine quilted by Rhonda Loy of Dexter, Michigan.


Here is the back, where she used a train to display some additional information about the life of hobo's.


This is Mary's third quilt, which took a second prize ribbon in the Bed Quilts: Appliqued-Machine Quilted category.  It is called "Tidings," a design by Nancy Halvorsen.  It is custom machine quilted by Marilyn Lange of Ypsilanti, Michigan.


A couple of the blocks...she does really nice raw edge applique with machine blanket stitch...


My friend Margit McPhee took a second place ribbon in the Bed Quilts: Small Pieced-Machine Quilted category with "Buggy Barn Baskets."  This was custom machine quilted by Marilyn Lange as well.


I have so many more pictures to share with you!  Stay tuned for LOTS more eye candy in my next few posts.

In stitches,
Teresa  :o)

Wednesday, April 27, 2011

Concerns justified...

In my last post, I was being all neurotic about having 7 prize worthy quilts from my friends as overnight guests (spend-the-night guests of my two quilts...) in my livingroom, awaiting a 90 mile journey to the Sauder Village quilt show in Archbold, Ohio (click on "2011 quilt show winners" to at least see pictures of the first place quilt in every category - that will hold you until I post pictures I take on Friday evening).

Well, the show opened yesterday and runs through this Sunday, May 1.  As I perused the list of ribbon winners on Facebook and the Sauder Village web site, I saw that 8 of the 9 quilts I took received ribbons, including 2 first place ribbons (woo hoo Cheryl for both of them!), 3 second place ribbons (yippee Mary J, Margit...and me!), 2 honorable mention ribbons (yahoo to Mary J for both of them!), and a Best of Show, Wall Hanging (shock and awe...mine!!).

I feel justified in my neurosis...LOL.

I go to the show on Friday, then will post lots of lovely eye candy...yum!  There is a short video of highlights on the Sauder Village Facebook page, if you are interested, to tie you over until then.

In stitches,
Teresa  :o)

Saturday, April 23, 2011

In case of fire...


Have you ever had to be responsible for your quilting friends' best quilts?  Since Easter is so late this year, the holiday overlaps with dropping off quilt entries for for the Sauder Village Quilt Show that opens this next week.  Some of my participating friends went out of town to spend Easter somewhere else and I took responsibility of taking seven of their beloved quilts to the show along with two of mine.

Gulp...

What if there is a fire at my house?  What if Weasley gets cat hair on them?  What if someone breaks into my house?  What if I oversleep and start the 90-mile trip too late to get there by noon?  What if I forget one or two?  What if I am in a car accident or run out of gas and miss the 2.5 hour drop off window?

Yes...I'm neurotic.  Should I get a limited time fancy textile rider on the homeowners insurance?  Should I tell my family that in case of fire, grab the cat and the bundle of show quilts, which are right by the front door in a rocking chair, stacked in such a way to keep old Mr. Weasley off of them?

I'm pathetic really, but these are REALLY SPECIAL quilts, one a hand quilted double wedding quilt made for a beloved daughter.  Yikes - no wonder I slept a little fitfully last night!

Here they are, all ready for the car journey (I just love my huge IKEA bags!).


OOPS!  I guess I should make room for other passengers and put these in the back of the car...

The quilts are now all checked in and I am graciously allowed a couple of pictures of the huge Founder's Hall where the show will be hung before Monday, when the judging will take place before the show opens on Tuesday morning.  The committee members are carefully sorting and staging all the entries.  They have tall, rolling scaffolding units and super tall ladders for getting up to the hanging cables.  Once hung this is the neatest, best hung show I've ever been to (that includes the annual Houston International Quilt Festival).  I would have loved to see the recent red and whilte NY show...I LOVED how those pictures looked!


My pictures don't do this huge place justice.  It's hard to see in these pictures, but there is a sturdy system of stainless steel cables criss-crossing the arena in a grid.  That is where all the big bed quilts will be hung.  Then all the walls are fitted with panels where wall hangings can be pinned.  The stage is usually reserved to display master quilts and the quilts exhibited by the featured teacher of the week.  More panels are set up in the lobby to feature the yearly challenge quilts and baby quilts.  There is a quilt stretched on a frame below in the lower right.  I enjoy being invited to place a few stitches in every year!  There are also tables set up for various demos.


Then I just had to stumble over to the Threads of Tradition quilt shop that is located in the village.  I mean, I was already here, right?  I must do my part to help the Ohio economy, right?  (I need to stop in before 100's of women start shopping on Tuesday, right??  LOL)

Here are my friends' claim tickets for picking up quilts after the show and free show passes.  There is a great security system worked out for this show.  Absolutely no one can pick up a quilt without presenting these claim tickets.


Now I just have to keep them safe until I see Margit, Mary and Cheryl on Friday when our sit and stitch group goes to the show.

Oh crap!  What if there is a fire at my house?  What if someone breaks in?  What happens if Mr. Weasley makes mischief with them?

Sigh...

Happy Easter to everyone!

In stitches,
Teresa  :o)

Friday, April 22, 2011

Life after tutorials...


Bound, labeled, de-fuzzed, de-threaded, de-cat haired and ready to be taken for entry to the 35th Annual Sauder Village Quilt Show in Archbold, Ohio (northwest Ohio, west of Toledo) on Saturday morning.  The show runs next Tuesday, April 26 through Sunday, May 1.  Is anyone out there planning to go?!?  It is a fabulous show and definitely worth the drive from anywhere.  And did I mention, there is a great quilt store at Sauder Village??  Here is a link for more info.

I will take some good pictures at the show...of mine and the other 430 quilts that will be on display (where someone else will deal with the hanging of the quilts so that pictures are possible!).

So, with two finishes this week, I am finally allowing myself to dream about a new project or two.  Here's what I've been reading lately:


A little light reading...ha-ha-ha!  I want to do an album quilt, so I am reading everything I can get my hands on about Baltimore Album quilts.  I'm still suffering from withdrawal since finishing the Civil War Bride quilt.  I'm also thinking about Stars and Sprigs.  Hmmmm...

I went on a road trip recently to visit a couple of shops I've never seen before.  I'm usually not too tempted by bag patterns and supplies, but I fell "in love" with these:


These are the most beautiful, hand made leather hand bag handles.  I have a couple of sort of made up bags in mind for these!  I found them at The Hen House in Charlotte, Michigan.  Here's a link to their web site.  They have great primitive, wool, and reproduction fabrics and kits. 

I also went to a great quilt store in a funeral home...is that cool, or WHAT?!?    The Marshall House in Marshall, Michigan...great color wall, reproduction fabrics, awesome book room.

All this to distract me from my chocolate bunnies...back to work on those on Saturday!

In stitches,
Teresa  :o)

Friday, April 15, 2011

Glue stick applique, the tutorial: PART THREE...


Welcome to PART THREE of my glue stick applique tutorial.  When I left off in PART TWO, my block was all prepped, glue basted and ready to be hand stitched.

My friend Mary Liz turned me onto Jeana Kimball straw needles for hand applique.  They are slender, super sharp, and sturdy (everything I want to be...LOL).  I order them from Foxglove Cottage if I cannot find them at my LQS.  I like size 10.
 

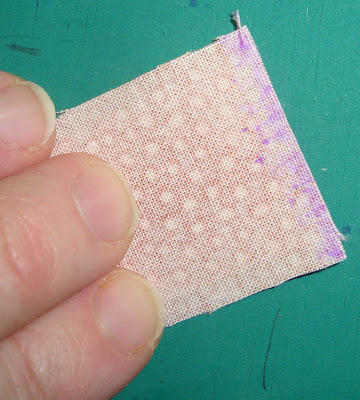
Yes, the glue does cause a little needle resistance.  I figure it's a trade off...I don't like the constant stuffing under of edges while tryng to take tiny stitches that is involved with the needle turn method, so I put up with a little needle resistance.  I like that when I sit down to stitch, I am mostly just stitching.  I wear a thimble now, but I have one I love so that is not a hardship.  The less glue I use, the easier the sewing.  The balance gets better with practice.  I'm striving to have as little needle resistance as possible.  I had to get past gluing like a pre-schooler (I've seen kids use a whole glue stick on two pieces of paper...zeesh!).  I used more glue for this tutorial than I usually do because I wanted the glue to show up for the photo shoot!  I'm trying not to depend on seeing the purple color when I prep now.  As the glue sticks get older, the purple color is less intense anyway (keep those caps on, even if not "snapped" tight, when not gluing!).


See the little purple handled tool above?  If you don't know about these, this will change your appreciation of the needle tip applicator for the Roxanne's.  It is a "Lil' Stick" by Fasturn, and you can order a set of 3 of them for $3.50 from P3 Designs.  They are great for clearing the tip when it gets clogged!  Order a pack and share 2 of them with your friends.

Hopefully your local quilt shop carries Roxanne's glue baste.  If not, you can order it from Colonial Needle.  It is offered in the big bottles with the needle tip applicator or smaller bottles.  I like both, although I think my "dot-dot-not-a-lot" dots are smaller with the needle tip applicator.  But the tip on the smaller bottles requires less maintenance.

I like to use YLI silk thread for hand applique.  It is very fine...sometimes it feels like I am stitching with human hair, LOL!  It may be old fashioned, but I coat my thread with beeswax...it makes it a little better about knotting and protects the thread a bit from the rigors of being repetitively pulled through the fabric layers (thanks Barb of Fun With Barb!).  It runs $5.00-5.50 a spool and many LQS carry them.  There are other brands of silk...like Clover, but I have not used them.


I used to use cotton thread, which now seems as thick as rope after using the silk.  I would dutifully match thread color with every applique piece and it was difficult to make invisible stitches.  With silk, I don't have to match colors unless I just want to...usually a range of neutrals will suffice.  I do have some colors though...they are like quilter's sugar-free candy!


Silk, being so fine and slippery compared to the fibrous cotton, makes me "knot off" my sewing a little differently when it is time to stop stitching, make a knot and trim the thread.  I take an extra stitch or so in place in the backing behind the applique piece before making my knot.  After knotting, I take some running stitches in the hidden backing before cutting my thread (sometimes first in one direction and then back in the other).  I just want to make sure my stitching doesn't come unraveled over time.  It takes no time to take a few extra stitches for peace of mind.  I just sort of made this up as I went along - if anyone else has a better suggestion, I'd love to hear it!  Here's the back of one of my appliqued baskets.


Now the stitching!  Since I usually build up my layered applique areas in smaller units, once things are glue basted to the background I am generally just stitching around those big areas (and, of course, securing the individual elements like stems, leaves, etc.).


I do what I think is called a blind hem stitch...I come up with the needle through both the background and very edge of the piece I am stitching, then I go down with the needle in the same place without traveling, just through the background, right under the edge of the piece I am attaching.  I try not to travel more than a 1/8 inch per stitch. 

I generally take extra little stitches on pointy things and in tight turns and corners...just for added security.

After stitching everything down, I am ready to get rid of the glue.  The glue stick glue is the easiest to remove, especially once you are comfortable with the technique and are using the minimum amount of glue.  The Roxanne's glue baste requires a few minutes of soaking. 


The "dot-dot-not-a-lot" is VERY important.  If you use huge globs of glue baste, it takes longer to soak out.  I use slightly warm water and work in a plastic container of some sort in my sink.  I just let the piece(s) sit in the water for a while to rehydrate the glue.  Look - you can see the Roxanne's glue dots through lighter colored backgrounds.  (Hmmm...looks like I could have used less glue...the dots always look huge at this point because I squoosh.)


...now you don't.


I GENTLY squeeze and release, squeeze and release the pieces while they are in the water to help facilitate glue dispersal.  I also change the water a few times to make sure I'm not just taking the concentrated little glue dots and spreading them into a fine glue glaze...LOL.


On bigger globs of glue, sometimes I squeeze and release with my thumbnail right on the glue dot, just to gently target, agitate and facilitate the dissolving of the glue.  I usually soak block for a while before helping with my hands!  Especially if the Roxanne's has been there a while.

(I usually wait to cut behind the bigger applique pieces until after I have washed the glue out, but this time I trimmed a couple first.)


Once I am satisfied that the glue is mostly gone, I roll the piece up in a clean, dry towel and GENTLY squeeze to remove water.  NEVER wring or twist as this would put stress on your applique stitches and cause your block to get out of shape.

Now I spread a towel on my pressing surface, smooth my block with the right side DOWN, and press with a dry iron to dry and re-shape the block.


At this point, I usually trim away the background from behind the larger applique pieces that I am likely to hand quilt over later.  Many people choose not to do this, but I hand quilt heavily enough not to worry about removing background.  I leave a 1/4 inch margin.  I still quilt over the smaller pieces (like veins in leaves) but just settle on slightly larger stitches...sigh.


Now my block is finished and ready to trim down to 7-1/2 inches square.


I never cut my background to exact size needed until after all the stitching, washing and drying is finished.

I would be remiss if I didn't talk about color fastness at some point.  I wash all my fabric before using due to skin sensitivities.  As a result, I enjoy the added advantage of not worrying about color fastness and unpredictable shrinking.  I hear a lot of rumors out there about machine applique fusible film and freezer paper not sticking to unwashed fabric as well as it adheres to washed goods.  I am the lucky recipient of some fabric scraps from other people which I hand swish and iron dry if I am terribly worried about excess dye running.  I guess if you are worried about color fastness, I would soak the glue out in cold water rather than lukewarm, and maybe snip a smaller square off one of those commercially available color catchers and swish it around in your glue removal soak along with your block(s).

OK, on with prepping pointy, narrow, skinny, tiny, the weird, and reverse appliqued pieces.  I picked an album block for demonstration purposes with rounded pieces intentionally because roundy things are faster and easier, at least to me.  I have no problem navigating curves and the tiny pleats necessary to keep things round and smooth.


Ah, but the applique world is not completely baby proofed.  There are shape challenges to every method.

Some leaves have points.  I usually first fold the tip back, then fold from either side, then sometimes trim away a little of the bulky folded stuff.  I call this a "tri-fold" and I used to do it with my baste under method, but never got the 100% pointy ends with my old method.


My camera man went to bed, so you are stuck with  a one handed demonstrator and less-than-perfect pictures.  Here I tried to show in larger paper what I did with fabric.


Then I miter trimmed the bulk with my scissors...


The point of the heart is done the same way, along with clipping the top cleft.


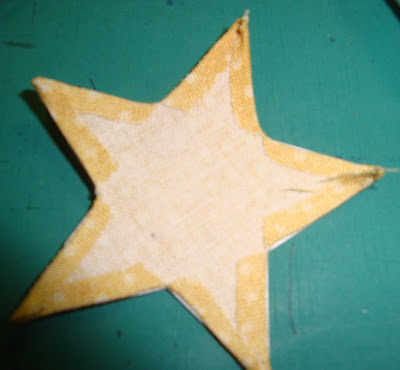
Stars are a little tricky, even the less pointy ones because of the tight curves.  I clip twice in each star angle for these folk art stars so I get a smooth inner curve.


I glue from clipped angle to clipped angle and take them one "point" at a time.


I clip the angles only once for the more formal, pointy stars.


For pointy stars, I work from point to clipped angle.


I either carefully trim the bulky excess (away from tip)...


...or I wait and stitch one side of each tip, then (in needle turn fashion), I stuff the bulk under as I stitch down the other side of the point.  If I am going to do this, I am careful not to glue the bulk down.  I use my thumbnail to pry it loose while my glue is still damp.


It looks a little messy until stitched.


You can see the folded bulk here, hanging down and ready to be stuffed while stitched.


Skinny stems are so easy with this method...


I love skinny stems, especially on small blocks!


I treat square corners either of 2 ways.  I either just do side by side, them miter/trim the bulk at the corner...


...or I do the tri-fold thing I do on leave and heart points...


(the tri-folded corner is the bottom right corner below...the upper right corner was done the first way and is waiting to be trimmed)


Some shapes require reverse applique to gain the proper perspective.  In this, I create a little peep hole, then, eventually, place another fabric beneath it, in the window.


The outer edges are done the regular way...


...then I clip inside curves and glue to create the little peep hole.


I usually press pieces lightly between gluing and glue-basting/stitching so that my pieces are completely flat.  If you are worried about excess glue, put a scrap between the iron and your nice, neat pressing cover!


Nice and crisp...just the way I like them!


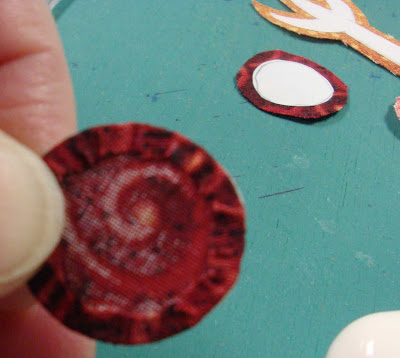
How about circles?  They are a little messy.  I find it easiest to get a completely round circle by gluing all the way around before starting to fold the edge over.  If your circle is smaller than the end of your finger, this means there is very little unglued area for your finger to hold the circle.


This circle is smaller, and I think the lighter color will make it easier to actually see what I've done.


Now you can see the tiny pleats.  A really small turn under allowance makes this pleating process easier and neater, but don't trim away too much...then you have to deal with fray.


OK...now the weird.  I have found these damn bird/chicken feet the hardest thing I've tried...with either hand applique method!  It takes a combination of all methods to make it work...and sometimes some "fowl" language.  (yuck-yuck-yuck)


I blunt my points a bit to get rid of some bulk and clip the angles at the...ankles (?)...


These feet aren't for the faint of heart...there is no shame in using embroidery, ultra suede, or simply screaming (or hiding bird feet under extra leaves).


To sum up, I love this method!  The one thing I have not figured out yet is how to do this on scrappy pieced backgrounds, which I love.  Seams sewn with cotton thread tend to pucker when wet, so I think the soaking part would make me scream (and the subsequent trying to make the block beautifully flat and straight).  The purple glue stick is supposed to be acid free and archival quality, but I am still a little freaked out my leaving it in, especially on heirloom quality quilts. 

When I did my Civil War Bride Quilt, I also ran into the problem of connecting appliqued borders when they are machine pieced around corners...hmmmm.    I got around this by appliqueing my borders separately, washing, trimming to size, sewing onto the quilt, then bridging the corner by using the needle turn method to applique the pieces that go over the machine seams.

If anyone has any ideas how to deal with doing this on pieced backgrounds, let me know!!  Let me know how this all goes for you!

In stitches,
Teresa  :o)