Hopefully the light isn't a train at the end of the tunnel! The two side borders are stitched, embroidered, soaked, pressed and ready to apply. Only the top border stands between me and getting this quilt assembled and ready for quilting.
I am waiting until all four borders are stitched before attaching to the body of the quilt.
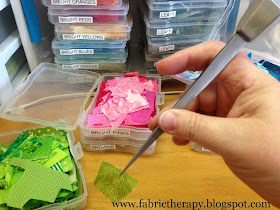
I spent some time over the weekend picking out the fabric bits for that final top border. My "little bits" boxes make this process a little easier.
I have two bits boxes for each color, one 4 x 6 inch size and a larger one that is 5 x 7 (boxes are photo boxes by Iris, available at JoAnn's).
When I first set up the bits boxes, I cut a rectangle, sloppily by hand with scissors, from favorite fabrics roughly 5 x 7. Then every time I cut out a piece, the rectangle in the larger box gets smaller and little scraps start filling the smaller box.
This works well for me and saves time. Larger applique pieces like apples, pears, wedding rings are cut from the larger piece in the bigger box, then the scraps (like the center of a wedding ring motif) get put away in the smaller box.
I know it sounds fussy and tedious, but over time I have a good system. The smaller bits are good for grapes, berries, individual petals, leaves, etc.
They are quickly and easily sorted through and manipulated with my large beading tweezers. This really helps me and my post cat bite, post surgery, dumb, swollen, crooked index finger that is quite useless at picking through and gripping little fumbly things (tweezers purchased from Amazon.com).
Then I had a long session of trimming and gluing the scant edges under with a good DVD to watch. There were 321 pieces in this top border alone! It will measure somewhere around 56-inches long.
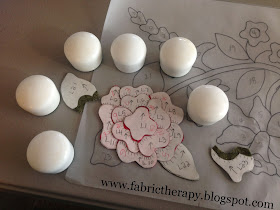
I build some of the units, like the more complicated flowers, right over the pattern, before attaching them to the border fabric using my light box (I remove the freezer paper pattern pieces before attaching).
I love my vintage pattern weights, but sometimes a larger, weighty surface is needed to secure pieces until the glue baste is dry. I use a very small plexi-glass ruler to cover motif area...
...then I pile the heavy little weights on top until things are flat and secure...kind of looks like a clump of grapes.
Here is a look at the same thing, without the distracting glare of the light box.
The pattern weights and a straight line drawn with a washable, blue Clover pen keep my 56-inch long vellum pattern properly aligned with my fabric border strip over my light box and I can scoot things from side to side as I work over the lit surface.
Cupcakes with no calories! I really like using cupcake papers to sort applique bits awaiting glue basting. I can lift them out of a cupcake pan and they are light weight and easy to work with on my work surface.
Again, use of my beading tweezers to apply pieces makes handling the fussy pieces MUCH easier as I glue baste into place.
And here is the final top border...all ready to start stitching! I am watching the episodes of "Series of Unfortunate Events" on Netflix and "Victoria" on PBS. It makes all that hand stitching ever so pleasant!
In stitches,
Teresa :o)


Where did you get the weights? I have not seen them but haven't really looked - I use the ruler too - you are getting organized
ReplyDeleteGorgeous!
ReplyDeleteAmazing
ReplyDeleteI know I've said it before, but I enjoy hearing about your process. You're getting close. Woohoo!
ReplyDeleteThat's a brilliant way to organize your scraps! Looking forward to seeing the finished quilt, it's going to be lovely!
ReplyDeleteI so enjoy watching how you progress with your work. I slapped myself - thinking that was a coffee filter! Now this is Teresa - that's tiny! Cupcake papers - duh! Love the tips
ReplyDeleteYour quilt is going to be AMAZING.....cant wait!!!
ReplyDeleteI can see how your bits and pieces system works well for you. I don't have storage space for all the containers but would do something like you have if I did.
ReplyDeleteYour borders are gorgeous. I am still waiting on my patterns. I did get out today and bought some background fabric. Not sure I will use it for the flower blocks. Chris
ReplyDeleteThat was fun peeking over your shoulder and seeing what you do with your fabric scraps!
ReplyDeleteSuch gorgeousness!
Amazing--the organization, the beautiful work, the fabrics, everything!
ReplyDeleteWow, wow, wow!
ReplyDeleteNow that is so much work and so beautiful! I really reminds me of my Dorinda quilt which had vines of heavy applique' in the borders. Your post brings back memories!
ReplyDeleteYou are truly amazing! You are the most organized person I know. Thank you so much for the tutorial on how you put your tiny pieces together. Your work is magnificent.
ReplyDeleteAre the little bit boxes for photo's?
ReplyDeleteWow. inspiring to see the tiny bits boxes. If you are doing a lot of applique, that is amazing. And I adore the photos showing your applique process. thank you. It's great to try new techniques. Lorraine
ReplyDeletewhich basteing glue are you using?
ReplyDeleteThat is beautiful! I've been watching Victoria too, except when I try to find episodes on my computer, Goggle keeps thinking I should go buy lingerie instead.
ReplyDeleteBeautiful. Thanks for sharing photos of your process.
ReplyDeleteI am so impressed with all the organization and time savers you tell about in this post. Your applique is beautiful
ReplyDeleteYour quilt is beautiful, as they always are. Thank you for showing your method of applique. I don't do much of it, but putting the pattern on top of the bits and pieces makes so much sense, instead of on the back sides.
ReplyDeleteThe amount of applique' you have done is so remarkable and gorgeous! I love love love how organized you are to boot! Thanks for sharing!
ReplyDelete