I don't know about you, but for me PAPER CLUTTER IS THE WORST! More paper stuff comes into my house than anything else...mail, notes from school, stuff for doing the shop newsletter, class coordinator crap, catalogs, magazines, pictures, snip-its, bills, important documents. YIKES!
What is important, how do I file it, what can I recycle, what do I need to shred? It's a constant battle. a continual mountain that has to be climbed, an obstacle to get over.
I get so annoyed when stuff starts to pile up, then a pile gets knocked over by me or the cat, or I can't find something in a pile.
My Mom saved EVERYTHING and was also a victim, in her final years, of magazine salesmen. When I cleaned out her condo before her move to assisted living, there were THOUSANDS of magazines, piles of junk mail, with just enough important stuff sprinkled in to keep me from recycling everything in total.
I love quilt magazines, patterns, books, block-of-the-months, free downloads from the Internet...there is so much input we quilters have access to now. Because I am always thinking about quilts, I see inspiration in non-quilty things as well...New Yorker covers, discarded wrapping paper, greeting cards, catalogs, photographs...every shred of paper has potential as inspiration for applique or quilting designs.
All of that has to be contained in such a way that I can find it again when I need it. Nothing makes me crazier than hunting for something. This post is dedicated to how I sort, save and store quilt media.
Magazines are my first problem, which brings me to my first fix. Some of you may find this next section disturbing. Feel free to scroll through it.
HOW TO BUTCHER A QUILT MAGAZINE
I can't save magazines in pristine form...I don't have room or the patience to dig for the juicy, quilty bits I really like. With the exception of some issues of Quiltmania or special block collection issues, I go through each one and only save what appeals to me.
I start at the beginning, peeling away pages and sorting what to keep and what goes into the recycling bin.
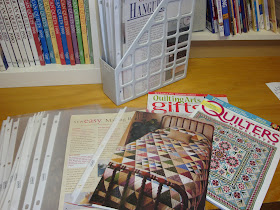
Projects with directions go in sheet pocket protectors with all templates, patterns, etc. I trim the pages to fit, but I try and save the issue information (magazine name, month, year) that is printed on the bottom of each page. That way, I know the source of the pattern.
Sometimes I'm not interested in keeping the whole project with instructions. Maybe there was something about a quilt picture that inspires me...the color combination, a border, a block, an interesting setting. I just cut out the picture of the quilt, or even just part of a quilt, and put all those in a little pile.
I don't just look for pictures in the main articles...I also see inspiration in the ads, artwork, font style, tips, isolated quilting motifs or applique templates (like an interesting leaf shape, for example). I just add all this to the snip-it pile until later.
The "how to" articles are my FAVORITE!
I LOVE the "how to" articles...how to do binding, how to make HST's, how to wash your quilt, how to make prairie points, etc. Sometimes it's an article comparing batting types and brands. I clip each page, or article, and put it in a sheet pocket protector as well.
This magazine file is like my personal "how to" book. I used to keep it in a binder, but it works better for me to keep them loose in this upright file.
I also do this for articles about quilt history, or a favorite pattern author or designer (this one is about Lori Smith of From My Heart To Your Hands Designs).
Now comes the filing...
I sort the patterns by topic (like "STARS - HST's and squares" or "LOG CABIN" or "CHRISTMAS - table runners, for example") and file them in hanging file folders in secondhand, 2-drawer filing cabinets.
Commercial patterns that come in zip loc bags get the zip part of the bag trimmed off and they get filed with the magazine patterns (sometimes I put the smaller ones in sheet pocket protectors). If I have reduced or enlarged the pattern, I can store those sheets neatly with the patterns.
Every now and then (when I'm looking through a folder of patterns for somethings), I will thin out these saved patterns and reuse the sheet pocket protectors. Maybe I no longer "love" the project, or decide to keep the picture only, for inspiration. I keep a sheet pocket protector with these snip-it's inside, until I have enough to process (keep scrolling).
Sadly, none of my 2-drawer filing cabinets match, but it's hard to complain when I only paid $10 a piece for them at U of M Property Disposition!
It is a flexible system and can change as needed. When I choose to make one of these saved patterns, I place it (in it's sheet pocket protector) in the project box (so I will remember what I am cutting all these pieces for...). If I cut any plastic or freezer paper templates while making it, I can store them in the sheet pocket protector with the pattern, then file the whole nonsense away when I'm done (if I still want to keep it).
I used to keep my books safely on the second floor of my house, but that was inconvenient since my quilt cave was in the basement. Since I'm paranoid about water down there, I put my bookshelves off the floor.
I put old doors, minus their hardware, over the filing cabinets. This is very sturdy, but a little tricky as my mismatched filing cabinets are all different heights (of course!). They are, mostly, level with the help of wood blocks.
I don't scrimp on bookshelves...not anymore. I came home once and what I thought was a pretty sturdy bookshelf had collapsed and half of my books were all over the floor! Mercy! I went to IKEA and got multiple, SMALL, sturdy shelving units with multiple small openings (adds to the structural strength). I have a lot of money invested in my books, so it makes sense to store them properly.
I sort my books by subject - history/antique quilts, hand applique, hand quilting, block collections, scrap quilts, Christmas quilts, etc. I like to sticky note some of my favorite things so that I can find them later!
There's a little bit of space in front of the base of the book shelves (on the doors) to use as a table when I am looking through a book or pattern. (Wondering what is stored on top of the bookshelves? I do a little scrapbooking/family archiving...and Christmas ornaments - all pretty lightweight).
Oh...I forgot...what do I do with all those little bits of inspiration that I snipped from magazines, greeting cards, wrapping paper, junk mail, photos, etc.??
I make inspiration books. I just glue them into bound or spiral books willy-nilly...no organization here. I just arrange them to get as many on a page as possible.
These are great to turn to when I feel stuck for ideas on color grouping, setting, borders, etc.
All the ads and "dead weight" from the magazines goes into the recycling bin.
I also save funny or inspirational "sayings" I come across...they may end up in a redwork piece or border some day.
People always ask me, "how do you get so much done?" I love being able to find things...it leaves more time to sew. The system is easy to maintain and can be changed easily.
As I butcher magazines or purchase patterns, I put them in a "to be filed" tray. Processed snip-it's are placed in one sheet pocket protector (in the "to be filed tray") until I have enough to glue in my inspiration book.
All the leftovers go in the recycling bin.
This didn't happen overnight...you may feel overwhelmed by a mountain of magazines or stacks of loose paper. Baby steps. Just a little every day. maybe you just work on cutting out the things you want and putting them into some kind of folder until you see what kind of volume you will need to store.
Remember the 5 steps outlined by Julie Morgenstern in her book, Organizing From the Inside Out :
:
- sort
- purge
- assign a home
- containerize
- equalize (maintain)
Don't rush out and spend money on your system until you see what you need to store. You may purge more than you think! (My tastes have certainly changed and refined since I started saving stuff).
In stitches,
Teresa :o)


